Connecting wallet to Cyber
Follow these steps to add the Cyber network to your MetaMask wallet:
-
Open MetaMask
Make sure that MetaMask is installed in your browser and you are logged in. -
Access Settings
Click on the MetaMask extension icon and then click on your account icon in the top-right corner. From the dropdown menu, select Settings. -
Add Network
In the Settings menu, select Networks and then click Add a network. -
Enter Cyber Testnet or Mainnet Details
Fill in the following information:
| Name | Testnet | Mainnet |
|---|---|---|
| Network Name | Cyber Testnet | Cyber |
| RPC Endpoint | https://cyber-testnet.alt.technology/ | https://cyber.alt.technology/ |
| Chain ID | 111557560 | 7560 |
| Currency Symbol | ETH | ETH |
| Block Explorer | https://testnet.cyberscan.co/ | https://cyberscan.co/ |
💡 MetaMask's frequent queries often hit public RPC limits. Ensure faster, reliable dApp transactions with a free private Cyber endpoint on QuickNode.
-
Save the Network
After filling in the details, click the Save button. You will now be connected to the Cyber network in MetaMask. -
Switch Network
To switch to the Cyber network, click on the network dropdown at the top of MetaMask and select Cyber. -
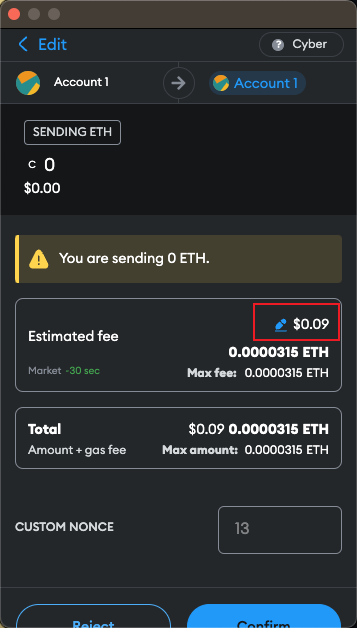
Adjust Gas Price There is a bug for MetaMask users that causes the gas price to be set too high. To avoid this, you can set the gas price manually by clicking on the Estimated fee button in the transaction confirmation window.
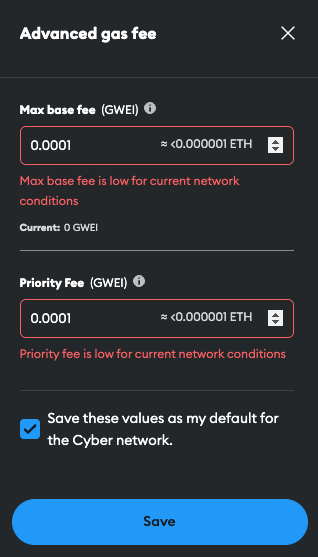
Click on the Advanced button

- Edit the Max base fee to a lower value, for example,
0.0001GWEI. - Edit the Priority fee to a lower value, for example,
0.0001GWEI. - Check the Save values checkbox.
- Click on the Save button.
- Edit the Max base fee to a lower value, for example,
You're now set up to interact with the Cyber via MetaMask!