# Cyber Docs
### Cyber AI Overview
Cyber AI is a specialized AI model built to navigate the crypto space’s fast-moving data and complexities. It pulls information from reliable sources—including CoinGecko, RootData, Snapshot, hundreds of thousands of crypto X accounts, and more—to deliver clear, context-aware answers. It combines both onchain and offchain datapoints to create a comprehensive AI model that actually understands crypto.
#### Cyber AI’s Design Principles
* **Grounded, not generic**
Trained exclusively on crypto data, Cyber AI ignores unrelated topics like weather reports or sports scores. This allows it to have unprecedented accuracy for crypto inquiries.
* **Freshness by default**
New crypto data is constantly indexed, so you don’t have to maintain your own data pipelines.
#### When to Use Cyber AI
* Creating agents, dashboards, or products that need consistent answers or insights from scattered crypto data.
* Powering real-time alerts for various crypto use cases.
Surf, our public crypto copilot, relies on the same APIs, proving they are production-ready at scale.
## Cyber L2
Cyber is a Layer 2 blockchain embedding social dynamics into onchain experiences with a suite of AI products to make crypto more accessible and engaging for everyone. As an EVM chain, Cyber does not limit use cases only to social networks. EVM-based applications can run on Cyber without modifications.
Cyber is built by the team behind CyberConnect, which has been developing decentralized social networks, consumer apps, and cutting edge onchain infrastructure since [2021](https://mirror.xyz/cyberlab.eth/k3pL5s2G3Emdz2iguhypcY3HPJaZLkC7SNB8XjgPkm0). Product built by the Cyber team have recorded multiple tens of millions of transactions from millions of users.
Cyber provides developers and users with a great onchain experience by focusing on supporting unique applications, building innovative products, and making blockchain technology more accessible and easier to use..
Cyber L2 is built on OP Stack with benefit of modularity and standardization. With that, builders can develop based on existing modules and exponentially speed up the growth of the ecosystem.
## FAQs
#### Q. Is Cyber L2 EVM compatible?
Cyber, as an EVM-equivalent L2, does not limit use cases only to social networks. Existing EVM-based applications can run on Cyber without modifications.
#### Q. Is there a rate-limit on Public RPC URLs?
Yes, the rate-limit is 20 calls/second/IP default for both mainnet and testnet. If you are facing rate limit issues then please get a new endpoint from [Quicknode](https://www.quicknode.com/docs/cyber).
#### Q. Can I use Hardhat, foundry or Remix to deploy contracts on Cyber L2?
Yes, you can use EVM-compatible Web3 libraries and developments frameworks such as Hardhat, foundry and Reemix to deploy or connect to Cyber L2. To see how to use these libraries visit the links below:
* [Hardhat](/developer-tools/deploy/hardhat)
* [Foundry](/developer-tools/deploy/foundry)
* [Remix](/developer-tools/deploy/remix)
#### Q. How can we fetch NFT data on Cyber L2?
You can use [Reservoir's NFT APIs](https://reservoir.tools/) to fetch all the revelant NFT data. To learn more about it, check out the [Reservoir docs](https://docs.reservoir.tools/reference/nft-data-overview)
#### Q. How can i join the cyber developer ecosystem?
To join the cyber developer ecosystem, visit the [Guide to deploy your first contract on Cyber](/get-started/deploying-contract).
* Follow the steps 6 and 7 to fill out the [Developer ecosystem form](https://cyber.deform.cc/ecosystem-builder/) by providing the transaction hash of your **Mainnet** contract.
#### Q. How do i keep myself updated with latest announcements by Cyber?
To join the Cyber developer ecosystem, visit the social media channels to interact with other commmunity members.
* Discord : [https://discord.gg/buildoncyber](https://discord.gg/buildoncyber)
* Twitter : [https://x.com/BuildOnCyber](https://x.com/BuildOnCyber)
* Github : [https://github.com/cyberconnecthq](https://github.com/cyberconnecthq)
* Linkedin : [https://www.linkedin.com/company/buildoncyber/](https://www.linkedin.com/company/buildoncyber/)
## Techincal Support
Welcome to the Cyber L2 support page. If you're facing any issues or have questions regarding Cyber L2, our team and community are here to help.
### Getting Support
Our primary support channel is on Discord. By joining our Discord server, you can connect directly with our support team as well as other community members who can help resolve your issues and answer your questions.
#### How to Join Our Discord
1. [**Join the Cyber discord server**](https://discord.gg/buildoncyber)
2. **Navigate to the Support Channels**\
Once you join, look for the support-specific channels under "Builders & Developers". For general support discussions you can post your questions under `#dev-discussions` or to open a support ticket create a post under `#dev-support`.
3. **Post Your Query**\
In the support channel, post your query. Please provide as much detail as possible so that we can assist you efficiently. Screenshots, error messages, and detailed descriptions of the issue are very helpful.
Thank you for being a part of the Cyber L2 community!
## Features
1. Safe and Simple Identity Management:
* In Web3, many users manage multiple wallets or switch between them. CyberID is transferable, allowing you to carry your identity and reputation with you when you change wallets. Building your onchain reputation takes time and effort, and with CyberID, you can preserve this valuable asset.
2. ENS Compatible (Coming soon):
* CyberID is compatible with the Ethereum Name Service (ENS). If you’re familiar with sending funds to an ENS handle like `ryan.eth`, you can now do the same with a CyberID handle, with a minor modification. On ENS-compatible web3 applications, you can send funds to `ryan.cyber`, and CyberID will handle the rest.
3. Create your own Subdomains:
* With CyberID, you don't just get a handle; you also own a unique domain on Cyber. For example, if you own **`ryan.cyber`**, it's not just a handle — it's a digital realm under your control. As the owner of a `.cyber` handle, you can generate as many subdomains as you like, following the format `nft.ryan.cyber` under the primary `ryan.cyber` domain.
## Overview
* CyberID is the naming system used on the Cyber blockchain. It links personalized, human-readable usernames to addresses on the Cyber Mainnet.
* CyberID serves as your unique identity within the Cyber ecosystem. It is a tradable ERC-721 NFT with a unique handle for naming addresses on Cyber. It makes it easier and more fun to connect with others and build your onchain reputation.
* CyberID was previously deployed on OP Mainnet but is being migrated to Cyber Mainnet as part of an upgrade. After the upgrade, CyberID can now be owned by any address. ***In the new CyberWallet currently in development, CyberID will play an important role in unifying a user’s onchain identity directly within the wallet, further simplifying the user experience.***
***
At Cyber, we aim to make web3 more social, meaning it's both fun and easy to connect with others onchain. CyberID is a key part of this vision, as it simplifies onchain interactions for users. Similar to a username on Instagram or X, CyberID provides a unique handle for your account in the Cyber ecosystem.
Beyond being an identifier, CyberID represents your identity and adds context to your onchain presence. It acts as a user-friendly alias for your blockchain addresses, making it easier to build your reputation and connect with others in the Cyber ecosystem.
If you’ve been in web3 for a while, you’re likely familiar with interacting with wallet addresses, but even experienced users find it frustrating. If you've ever double or triple-checked a recipient address before sending a transaction, you know how tricky managing long strings of numbers and text can be. CyberID simplifies this by replacing these long strings with easy-to-remember usernames, making it easier for others to interact with you and send transactions.
The [cyber.co](http://cyber.co/) website and popular native apps, like cyberscan.co and Link3 will support CyberID at launch. In the future, all apps on Cyber will support CyberID. Secure your CyberID now to start building your onchain reputation.
CyberID is currently being migrated to the Cyber chain from OP Mainnet, and existing CyberID holders can migrate their IDs free of charge (except for gas fees). Starting on September 23, 2024, existing users can migrate to Cyber Mainnet, and new CyberIDs will be available for purchase. All existing CyberIDs will retain their rights and name displays.
Registering a CyberID requires a one-time fee, and once registered, you can trade your CyberID with other users.
## Query CyberID Holdings
### GraphQL
In CyberWallet, the CyberID is minted to the CyberAccount address owning by the EOA wallet. However, the CyberID can be transferred to another EOA/CyberAccount address. So when querying the CyberID holdings, we need to query the CyberAccount address and the EOA wallet address. Here is an example of how to query the CyberID holdings.
The exmaple shows that the EOA holds one CyberID and the CyberAccount holds two CyberIDs.
request example
```graphql
query {
wallet(address: "0x2E0446079705B6Bacc4730fB3EDA5DA68aE5Fe4D", chainId: 10) {
cyberIds {
totalCount
pageInfo {
hasNextPage
hasPreviousPage
startCursor
endCursor
}
edges {
node {
tokenId
name
}
cursor
}
}
... on GeneralWallet {
cyberAccounts {
edges {
node {
address
chainId
cyberIds {
totalCount
pageInfo {
hasNextPage
hasPreviousPage
startCursor
endCursor
}
edges {
node {
tokenId
name
}
cursor
}
}
}
}
}
}
}
}
```
response example
```graphql
{
"data": {
"wallet": {
"cyberIds": {
"totalCount": 1,
"pageInfo": {
"hasNextPage": false,
"hasPreviousPage": false,
"startCursor": "gaFpzwAAAAIABNb5",
"endCursor": "gaFpzwAAAAIABNb5"
},
"edges": [
{
"node": {
"tokenId": "100825946603575596559116553043502383673924335859128257978611995451204032790483",
"name": "pengdeng_crypto.cyber"
},
"cursor": "gaFpzwAAAAIABNb5"
}
]
},
"cyberAccounts": {
"edges": [
{
"node": {
"address": "0x6651Fa0D314C5b5818d60320C6809f6D5254Fdb9",
"chainId": 10,
"cyberIds": {
"totalCount": 2,
"pageInfo": {
"hasNextPage": false,
"hasPreviousPage": false,
"startCursor": "gaFpzwAAAAIAAADd",
"endCursor": "gaFpzwAAAAIAAxE0"
},
"edges": [
{
"node": {
"tokenId": "11527189254859138244284356481875939991877142832628553021790283721900744067035",
"name": "peng.cyber"
},
"cursor": "gaFpzwAAAAIAAADd"
},
{
"node": {
"tokenId": "37914373758897262772835640952534568580069934000688553339264814582153787252397",
"name": "pengdengcyber.cyber"
},
"cursor": "gaFpzwAAAAIAAxE0"
}
]
}
}
}
]
}
}
}
}
```
### ON CHAIN
> Due to ERC-721 standard limitations, we can't get all CyberIDs that are owned by a user.
## Query CyberID owner by name
### GraphQL
request example
```graphql
query {
cyberIdByName(name: "pengdeng.cyber") {
tokenId
name
owner {
address
}
}
}
```
response example
```graphql
{
"data": {
"cyberIdByName": {
"tokenId": "85399087058221196933735331368181146816035410356131591160153355702122418658771",
"name": "pengdeng.cyber",
"owner": {
"address": "0xD9c208dB8d08365916C35473b97A390dDAA551B2"
}
}
}
}
```
### ON CHAIN
```solidity
// remove the `.cyber` suffix to get the tokenId
uint256 tokenId = getTokenId("pengdeng");
address owner = ownerOf(tokenId);
```
## CYBER Token Distribution
A total and max supply of 100,000,000 CYBER is distributed among the categories outlined in the table below.
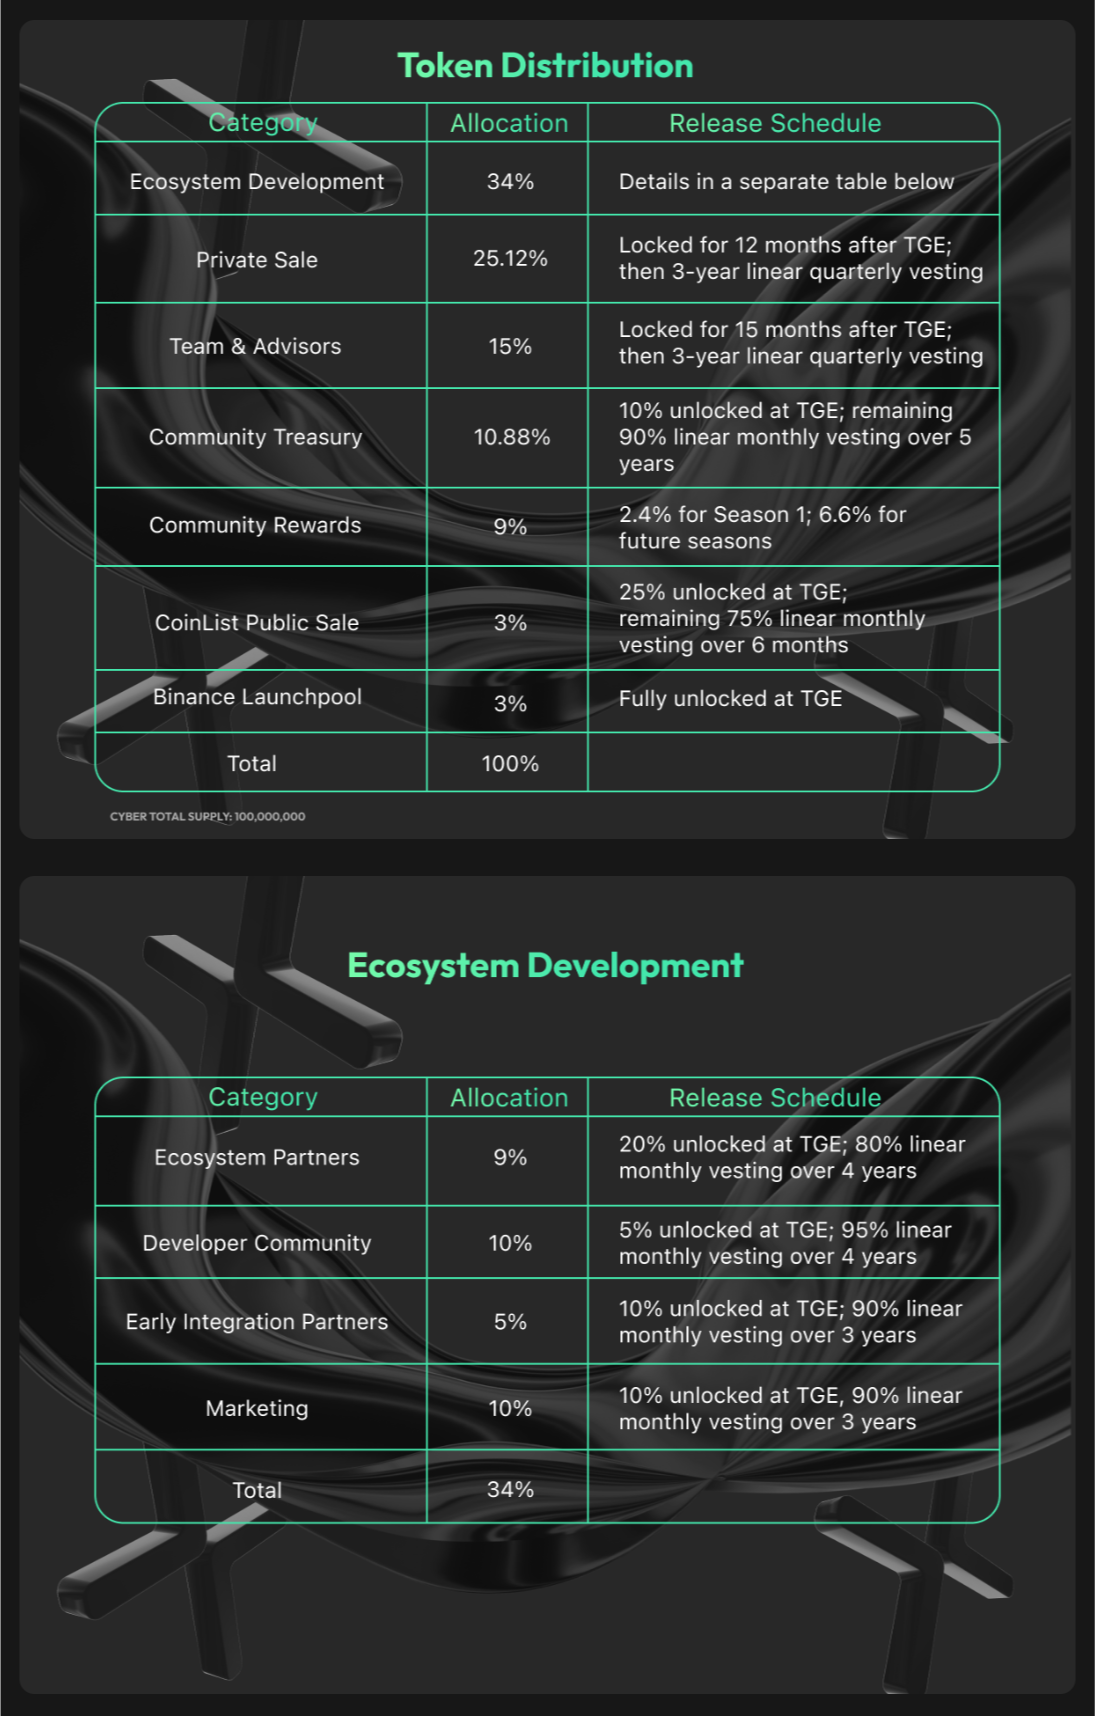
*The information in this communication is for informational purposes only and is neither an offer to purchase, nor a solicitation of an offer to sell, subscribe for or buy any CYBER, nor shall there be any sale, issuance or transfer of securities in any jurisdiction in contravention of applicable law.*
## Governance
It is intended that CYBER stakers will have authority over Cyber, the L2 for social, and CyberConnect Social Graph, along with their underlying protocols.
CYBER stakers are responsible for submitting, deliberating, and voting on governance proposals. Staked CYBER, via derivative tokens cCYBER and stCYBER, grants holders the ability to submit and vote on governance proposals, directly influencing the ecosystem's future. To participate in governance, CYBER holders must stake their CYBER and hold cCYBER or stCYBER.
Specialized councils are formed with high-context delegates to streamline processes and make high-context judgments. The first council created is the [Grants Council](https://app.charmverse.io/cyber-ecosystem-grants/). A well-constructed grants program is a great way to accelerate the ecosystem's growth and attract high-quality builders. The [Cyber Ecosystem Grants](https://app.charmverse.io/cyber-ecosystem-grants/) program has been set up, with a dedicate $2M worth of CYBER tokens, to support builders in growing a thriving social L2 ecosystem and accelerate the overall adoption of onchain social and web3. This program will establish a Grants Council of 4 members with a [CharmVerse](https://charmverse.io/) program manager. All grant proposals will follow a separate process different than described below.
**Types of proposals**
All non-grant governance proposals must fall within one of the following categories:
1. Community Treasury
2. Protocol Upgrades
3. Council member designation and removal
**Proposal Process**
Anyone who stakes CYBER can submit a proposal to governance. Proposals are rejected or accepted using a voting process. The proposal must be one of the valid proposal types listed below.
**Voting Process**
All governance proposals go through a two-week cycle.
Week 1
The proposer submits a new discussion thread in the appropriate category. By the end of the week, 1 of the top 30 delegates must give explicit approval on the discussion thread and move the proposal to a vote.
Week 2
All CYBER stakers are invited to vote on proposals. A snapshot to determine voting power for stakers.
The proposal is approved if it satisfies the following minimum vote thresholds:
1. Quorum: The minimum number of total votes required to be cast. A quorum is measured as *a % of the non-excluded votes.* CYBER holders can exclude their vote by delegating to a special address. The primary use case is the CYBER community treasury.
2. Approval Threshold: The minimum number of votes to be cast in favor of approving a proposal. The approval threshold for each proposal is measured *as % of votes cast to approve relative to the total number of yes/no votes cast in connection with a proposal.*
**Protocol Upgrades**
Upgrades to L2 and the bridge may be subject to [The Law of Chains](https://optimism.mirror.xyz/JfVOJ1Ng2l5H6JbIAtfOcYBKa4i9DyRTUJUuOqDpjIs)
## Overview
Cyber Token is a multichain token that uses LayerZero’s OFT token standard to be usable on across multiple chains. It is the native utility and governance token of the Cyber chain, protocols, and ecosystem, used for governance, staking, and accessing Cyber products.
## Cyber Staking = Governance + Network Security + Economic Rewards
*Staking is not available in restricted countries, including the US, Canada, China, Iran, North Korea, the Syrian Arab Republic, and Cuba.*
Cyber staking enables CYBER holders to stake their CYBER tokens, thereby securing the network, while granting them **economic rewards** and **voting rights**. This not only bolsters network security but also democratizes governance, allowing users to actively participate in decision-making processes.
#### Economic Rewards for Stakers
5,500,000 CYBER has been initially allocated over the next several years to attract stakers with compelling rewards and ensure the long-term sustainability of network staking. Moving forward, staking rewards each year will be determined through DAO governance and are subject to change. However, significant staking rewards are anticipated.
#### Voting Rights for Stakers
Staked CYBER, via derivative tokens cCYBER and stCYBER, grants holders the ability to submit and vote on governance proposals, directly influencing the ecosystem's future. To participate in governance, CYBER holders must stake their CYBER and hold cCYBER or stCYBER.
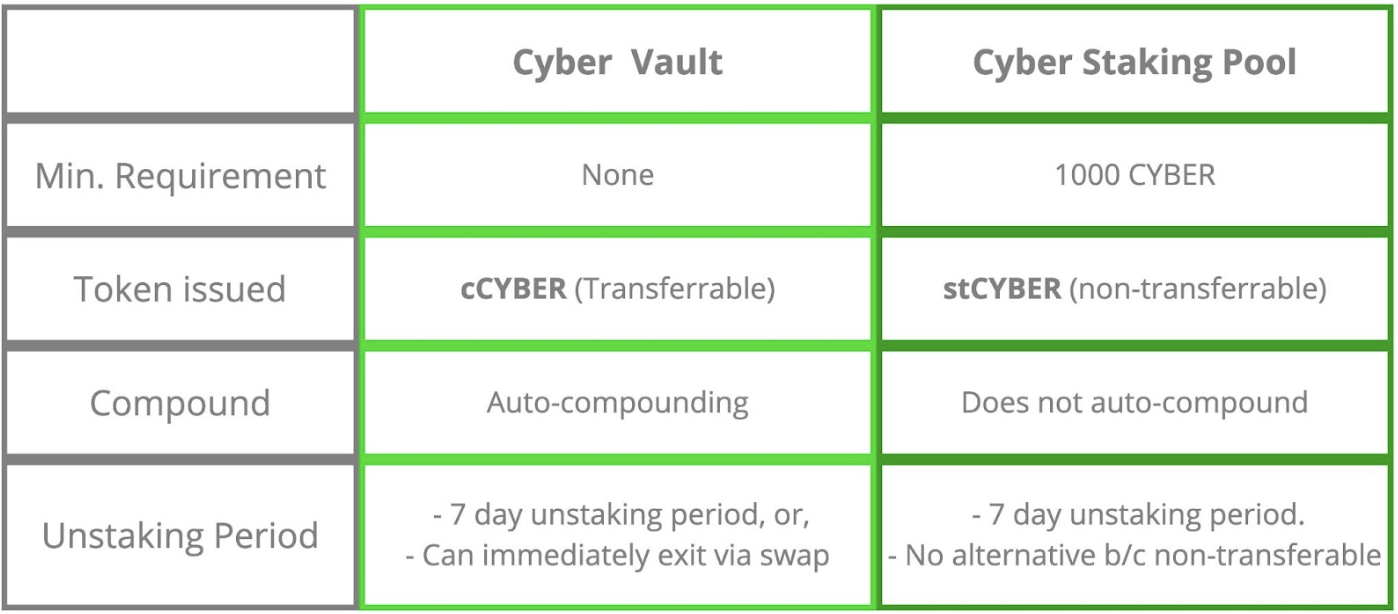
#### How CYBER Mainnet Staking Works
CYBER holders have two primary staking options: the Cyber Vault and Cyber Staking Pool contracts. Both options distribute rewards programmatically based on predefined rules, with the total staking rewards shared between users of both the Cyber Vault and Cyber Staking Pool.
Both options issue tokens to stakers that represent their staked CYBER, enabling them to participate in governance while staking. Users of the Cyber Vault receive cCYBER, which is transferable and benefits from auto-compounded rewards. Users of the Staking Pool receive non-transferable and non-auto-compounding stCYBER.
#### Cyber Vault
The Cyber Vault is an EIP-4626 Vault contract that simplifies and enhances accessibility for staking on Cyber Mainnet. It offers auto-compounding, no minimum stake requirements, and instant liquidity through cCYBER.
The Cyber Vault operates similarly to stake management facilitators on Ethereum. It automates claiming and staking rewards, increasing the efficiency of staking. The Cyber Vault charges a 10% fee on rewards, which is used to fund the Cyber Treasury to support future rewards and to sustain ecosystem growth. This fee is comparable to most Staking-as-a-Service providers.
#### Staking Pool
The Staking Pool is a direct staking contract designed for holders with at least 1,000 CYBER. It offers a more hands-on approach with some additional restrictions, such as not offering auto-compounding or instant liquidity. This option may suit those who are more technical and hold significant amounts of CYBER.
Compared to the Cyber Vault, the Staking Pool offers a more involved staking experience that requires manual interaction with smart contracts. Using the Staking Pool on Cyber Mainnet can be thought of as similar to direct staking on Ethereum which has additional requirements, including a minimum stake of 32 ETH and running a node.
#### Unstaking
Holders of stCYBER and cCYBER typically face a 7-day unstaking period when unstaking their staked CYBER. However, because cCYBER is transferable, holders can immediately exit their staking position by swapping the asset on a DEX. In contrast, because stCYBER is non-transferable, therefore this immediate exit option is not available to its holders.
*Legal Disclaimer
The information in this communication is for informational purposes only and is neither an offer to purchase, nor a solicitation of an offer to sell, subscribe for or buy any CYBER, nor shall there be any sale, issuance or transfer of securities in any jurisdiction in contravention of applicable law.*
## Token Address
### $CYBER token address
| Token/Controller | Chain | Contract Address | Explorer |
| ---------------- | ---------- | -------------------------------------------- | ------------------------------------------------------------------------------------------ |
| CYBER | ETH | 0x14778860E937f509e651192a90589dE711Fb88a9 | [View](https://etherscan.io/address/0x14778860E937f509e651192a90589dE711Fb88a9) |
| CYBER | OP Mainnet | 0x14778860E937f509e651192a90589dE711Fb88a9 | [View](https://optimistic.etherscan.io/address/0x14778860E937f509e651192a90589dE711Fb88a9) |
| CYBER | BSC | 0x14778860E937f509e651192a90589dE711Fb88a9 | [View](https://bscscan.com/address/0x14778860E937f509e651192a90589dE711Fb88a9) |
| CYBER | Cyber | 0x14778860E937f509e651192a90589dE711Fb88a9 | [View](https://cyberscan.co/address/0x14778860e937f509e651192a90589de711fb88a9) |
| CYBER | Base | 0x14778860E937f509e651192a90589dE711Fb88a9 | [View](https://basescan.org/address/0x14778860E937f509e651192a90589dE711Fb88a9) |
| CYBER | Solana | 5gzCDgVf5Nk6gosa5dpYZV6P6RiAytvCyQUaMwAVyf8z | [View](https://solscan.io/token/5gzCDgVf5Nk6gosa5dpYZV6P6RiAytvCyQUaMwAVyf8z) |
### Staking on Cyber Network
| Token/Controller | Chain | Contract Address | Explorer |
| ---------------- | ----- | ------------------------------------------ | ------------------------------------------------------------------------------- |
| cCYBER | Cyber | 0x522d3a9c2bc14ce1c4d210ed41ab239fded02f2b | [View](https://cyberscan.co/address/0x522d3a9c2bc14ce1c4d210ed41ab239fded02f2b) |
| stCYBER | Cyber | 0x3efe22fa52f6789ddfc263cec5bcf435b14b77e2 | [View](https://cyberscan.co/address/0x3efe22fa52f6789ddfc263cec5bcf435b14b77e2) |
### $CYBER LayerZero Contracts
| Token/Controller | Chain | Contract Address | Explorer |
| -------------------- | ---------- | -------------------------------------------- | ------------------------------------------------------------------------------------------ |
| CyberTokenAdapter | ETH | 0xCB07992DE144bDeE56fDb66Fff2454B43243b052 | [View](https://etherscan.io/address/0xCB07992DE144bDeE56fDb66Fff2454B43243b052) |
| CyberTokenController | Cyber | 0x9a9d5a29206dde4f70825032df32333de5f63921 | [View](https://cyberscan.co/address/0x9a9d5a29206dde4f70825032df32333de5f63921) |
| CyberTokenController | BSC | 0x9a9d5a29206dde4f70825032df32333de5f63921 | [View](https://bscscan.com/address/0x9a9d5a29206dde4f70825032df32333de5f63921) |
| CyberTokenController | OP Mainnet | 0x9a9d5a29206dde4f70825032df32333de5f63921 | [View](https://optimistic.etherscan.io/address/0x9a9d5a29206dde4f70825032df32333de5f63921) |
| CyberTokenController | Base | 0x9a9d5a29206dde4f70825032df32333de5f63921 | [View](https://basescan.org/address/0x9a9d5a29206dde4f70825032df32333de5f63921) |
| CyberTokenOFT | Solana | 8SeNKqJ5gsfToqHsQ5qLXZhQH3iTvpUAax8oGquKwe66 | [View](https://solscan.io/account/8SeNKqJ5gsfToqHsQ5qLXZhQH3iTvpUAax8oGquKwe66) |
## Block Explorers
### SocialScan
| Network | URL |
| ------------- | ---------------------------------------------------------------------------- |
| Cyber | [https://cyber.socialscan.io/](https://cyber.socialscan.io/) |
| Cyber Testnet | [https://cyber-testnet.socialscan.io/](https://cyber-testnet.socialscan.io/) |
### Routescan
| Network | URL |
| ------- | -------------------------------------------------------- |
| Cyber | [https://7560.routescan.io/](https://7560.routescan.io/) |
## Bridges
The bridge allows seamless asset transfer between these networks to help developers test, build, and experiment with decentralized applications (dApps) on Cyber Layer 2.
### Bridge Sepolia ETH to Cyber Testnet
[https://cyber-testnet.testnets.rollbridge.app/](https://cyber-testnet.testnets.rollbridge.app/)
To learn about how to use the bridge visit the guide to [Bridging assets to Cyber Testnet](/get-started/bridging-assets).
### Bridge ETH to Cyber Mainnet
[https://cyber.co/bridge](https://cyber.co/bridge)
## Faucets
You can claim Sepolia ETH on Cyber testnet by using the following faucets:
* [QuickNode's Cyber Sepolia Faucet](https://faucet.quicknode.com/cyber/sepolia)
* [Thirdweb Cyber Testnet Faucet](https://thirdweb.com/cyber-testnet/faucet)
* [Alchemy Faucet](https://www.alchemy.com/faucets/ethereum-sepolia)
## Node Providers
### QuickNode
[QuickNode](https://www.quicknode.com/) provides public and private rpc endpoints for Cyber, along with websocket support.
#### Supported Networks
* Cyber Mainnet - Public RPC: [https://rpc.cyber.co/](https://rpc.cyber.co/)
* Cyber Testnet - Public RPC: [https://rpc.testnet.cyber.co/](https://rpc.testnet.cyber.co/)
## Uniswap
This page lists all the Uniswap V3 contract addresses on Cyber. You can find the documentation for the Uniswap V3 contracts [here](https://docs.uniswap.org/contracts/v3/overview).
### Contract Addresses
| Contract | Address/Hash |
| ------------------------------------------ | ------------------------------------------------------------------ |
| crossChainAccount | 0x21751694aEf1a2689e298248A298EBc3AD65Bc63 |
| v3CoreFactoryAddress | 0x9701158fcF072c6852FD83B54D237e0cf5910C08 |
| multicall2Address | 0x906d6eB9CF8f64e100e44f8f491b833a8d40B530 |
| proxyAdminAddress | 0xACAC121Ba54d891670094EE10f04c3429591e1C0 |
| tickLensAddress | 0x6cb5504B957625d01a88db4b27EAaFD5Ae4422b6 |
| nftDescriptorLibraryAddressV1\_3\_0 | 0x3040bcD5f5Bb55135ea883E0Ee397ebE324A57b7 |
| nonfungibleTokenPositionDescriptorV1\_3\_0 | 0x9490AF0a88c9AE07d425f59c462a9740C55Ef579 |
| descriptorProxyAddress | 0x8a7885e5188C0CEeb306e976E49272A1fFf0131d |
| nonfungibleTokenPositionManagerAddress | 0xa5005349B7dcD9536832D97235675EF5Ae40f095 |
| v3MigratorAddress | 0xc4D8Afb323C316DD7c91ddd4f818d5aCCd0661E3 |
| quoterV2Address | 0xb7493d86A83eb7e4b57A3747013AaE82c907A58E |
| swapRouter02 | 0xdB4f0Db998BC1d429499fB11638fd3705E8e60Cc |
| permit2 | 0x000000000022d473030f116ddee9f6b43ac78ba3 |
| universalRouter | 0xbc1287f5af439c7d6dcfa0bdcbb30d81725ffda0 |
| v3StakerAddress | 0xe8CE43f2697491f2BF20DBC206F1cFde33F10FBa |
| v2CoreFactoryAddress | 0x8AdDa31FE63696Ac64DED7D0Ea208102b1358c44 |
| UniswapV2Router02 | 0x58C90b5Dbc69963Fb0CAbee1163747FDBB7A8b18 |
| Pair Init Hash (V2) | 0x96e8ac4277198ff8b6f785478aa9a39f403cb768dd02cbee326c3e7da348845f |
| Pool Init Hash (V3) | 0xe34f199b19b2b4f47f68442619d555527d244f78a3297ea89325f843f87b8b54 |
| Currencies | |
| WETH | 0x4200000000000000000000000000000000000006 |
| USDC | 0x81759AdbF5520aD94da10991DfA29Ff147d3337b |
| USDT | 0x6F6238c8eaea56F54Df418823585d61FDD7DE5Da |
| DAI | |
| WBTC | |
## Build your own Crowdfunding dApp
Welcome to this tutorial on creating a crowdfunding dApp on Cyber L2. Crowdfunding application on Cyber L2 offers transparency, security, and efficiency, ensuring funds are handled precisely according to predefined conditions. This tutorial will guide you through building a Solidity-based crowdfunding contract, allowing you to set goals, describe projects, and define deadlines. Whether you're a developer or project creator, learn how to leverage Cyber L2's capabilities to successfully fund your ideas. Let's get started!
### Creating a Hardhat Project
1. Create a directory for your project
```bash
mkdir crowdfunding-example && cd crowdfunding-example
```
2. Initialize the project which will create a package.json file
```bash
npm init -y
```
3.Install Hardhat
```bash
npm install hardhat
```
4.Create a project
```bash
npx hardhat
```
When you execute this command, hardhat should create a project for you and will prompt to fill basic project details like:

### Creating your Configuration File
Modify the Hardhat configuration file and create a secure file to store your private key in.
1. Create a **secrets.json** file to store your private key
```bash
touch secrets.json
```
2. Add your private key to secrets.json
```json
{
"privateKey": "YOUR-PRIVATE-KEY-HERE"
}
```
3. Add the file to your project's .gitignore, and never reveal your private key.
4. Modify the hardhat.config.js file
* Import the secrets.json file
* Inside the module.exports add the Cyber network configuration
```js
//hardhat.config.js
require("@nomicfoundation/hardhat-toolbox");
const { privateKey } = require("./secrets.json");
module.exports = {
solidity: "0.8.14",
defaultNetwork: "CyberTestnet",
networks: {
CyberTestnet: {
url: "https://cyber-testnet.alt.technology/",
chainId: 111557560,
accounts: [privateKey],
},
Cyber: {
url: "https://cyber.alt.technology/",
chainId: 7560,
accounts: [privateKey],
},
},
};
```
### Deploying your Smart Contract
1. Create a new contract called `crowdfunding.sol` and refer to the code below.
```javascript
// SPDX-License-Identifier: UNLICENSED
pragma solidity ^0.8.14;
contract Crowdfunding {
address public owner;
uint public goal;
string public description;
uint public deadline;
uint public totalFunds;
bool public withdrawn;
mapping(address => uint) public contributions;
address[] public investors;
constructor(uint _goal, string memory _description, uint _deadlineBlockCount) {
// Define goal, project description, and deadline
goal = _goal;
description = _description;
deadline = block.number + _deadlineBlockCount;
// Set owner to deployer of the contract
owner = msg.sender;
withdrawn = false;
}
function contribute() public payable {
require(block.number <= deadline, "Funding period has ended.");
// Add amount to total funds
totalFunds += msg.value;
// Add wallet to investor list and amount to contributions dictionary
contributions[msg.sender] += msg.value;
investors.push(msg.sender);
}
function withdraw() public {
require(block.number > deadline, "Cannot withdraw before the deadline.");
require(!withdrawn, "Funds have been withdrawn.");
withdrawn = true; // prevent re-entrancy attacks
if(totalFunds >= goal) {
// If goal was reached, transfer the funds to the owner
payable(owner).transfer(totalFunds);
} else {
// If goal was not reached, refund investors
for(uint i = 0; i < investors.length; i++) {
address investor = investors[i];
payable(investor).transfer(contributions[investor]);
}
}
}
function isGoalReached() public view returns (bool) {
return totalFunds >= goal;
}
}
```
Let's understand the solidity contract code:
#### State variables
```js
address public owner;
uint public goal;
string public description;
uint public deadline;
uint public totalFunds;
bool public withdrawn;
mapping(address => uint) public contributions;
address[] public investors;
```
* `owner`: The address of the person who deployed the contract.
* `goal`: The fundraising goal in wei (the smallest unit of ether).
* `description`: A description of the crowdfunding project.
* `deadline`: The block number at which the crowdfunding period ends.
* `totalFunds`: The total amount of funds raised.
* `withdrawn`: A boolean indicating if the funds have been withdrawn by the owner.
* `contributions`: A mapping that tracks the amount of funds contributed by each address.
* `investors`: An array of addresses that have contributed to the crowdfunding campaign.
#### Contribute function
```js
function contribute() public payable {
require(block.number <= deadline, "Funding period has ended.");
totalFunds += msg.value;
contributions[msg.sender] += msg.value;
investors.push(msg.sender);
}
```
This function allows users to contribute funds to the crowdfunding campaign:
* It checks if the current block number is less than or equal to the deadline.
* Updates totalFunds with the contribution amount.
* Records the contribution in the contributions mapping.
* Adds the contributor's address to the investors array.
#### Withdraw Function
```js
function withdraw() public {
require(block.number > deadline, "Cannot withdraw before the deadline.");
require(!withdrawn, "Funds have been withdrawn.");
withdrawn = true; // prevent re-entrancy attacks
if(totalFunds >= goal) {
payable(owner).transfer(totalFunds);
} else {
for(uint i = 0; i < investors.length; i++) {
address investor = investors[i];
payable(investor).transfer(contributions[investor]);
}
}
}
```
This function allows the owner to withdraw funds after the deadline:
* Checks if the current block number is greater than the deadline.
* Ensures that funds have not already been withdrawn.
* Transfers funds to the owner if the goal is reached.
* Refunds contributors if the goal is not reached.
#### Goal Reached Function
```js
function isGoalReached() public view returns (bool) {
return totalFunds >= goal;
}
```
This function allows anyone to check if the fundraising goal has been reached.
2. Compile the contract
```bash
npx hardhat compile
```
Once you execute the compile command, it should look like:

3. Create a new directory for the script and name it scripts and add a new file to it called deploy.js
```bash
mkdir scripts && cd scripts
touch deploy.js
```
4. Create a deployment script, like the one below
```js
// scripts/deploy.js
const hre = require("hardhat");
async function main() {
// Get the contract to deploy
const Crowdfunding = await hre.ethers.getContractFactory("Crowdfunding");
// Define contract constructor parameters
const goal = hre.ethers.parseEther("10"); // Example: Goal of 10 Ether
const description = "Fundraising for a new product";
const deadlineBlockCount = 100000; // Example: Deadline in 10000 blocks
// Deploy the contract with the constructor parameters
const crowdfunding = await Crowdfunding.deploy(goal, description, deadlineBlockCount);
// Wait for the deployment to be mined
await crowdfunding.waitForDeployment();
console.log("Crowdfunding contract deployed to:", crowdfunding.target);
}
// Recommended pattern to be able to use async/await everywhere
// and properly handle errors.
main()
.then(() => process.exit(0))
.catch((error) => {
console.error(error);
process.exit(1);
});
```
5. Deploy crowdfunding.sol using the command below
```bash
cd ../
```
##### Testnet
```bash
npx hardhat run scripts/deploy.js --network CyberTestnet
```
##### Mainnet
```bash
npx hardhat run scripts/deploy.js --network Cyber
```
You will be able to deploy the contract and hardhat will return the deployed contract address like:

* You can verify the contract address by visiting the [Cyber explorer](https://cyber-testnet.socialscan.io/)
### Conclusion
You've successfully deployed a crowdfunding contract on Cyber Testnet. Continue to explore and leverage Cyber L2's features to create a frontend to interact with the contract and share your project within the developer community. If you face any issues, feel free to reach out to our engineers for [Support](/support.md).
## Deploying an ERC20 Token on Cyber Mainnet with Thirdweb CLI
In this tutorial, we will explore how to deploy an ERC20 token on the Cyber mainnet using the thirdweb tools. ERC20 tokens are a standard for creating fungible, interchangeable tokens on the Ethereum blockchain, and they're used widely across various projects. The Cyber mainnet offers a robust platform for these tokens, and with thirdweb's CLI and GUI tools, the process becomes straightforward even for those with minimal blockchain development experience.
### Requirements
Before we begin, ensure you have the following:
* Node.js and npm/yarn installed on your system. You can install the CLI as a global command on your machine:
```bash
npx thirdweb install
```
* Cyber mainnet/ testnet added to the wallet. [Check the guide to add Cyber to the wallet](/get-started/connecting-wallet)
* An active [thirdweb account](https://thirdweb.com/dashboard) connected to a wallet loaded with ETH for gas fees.
### Step-by-Step Guide
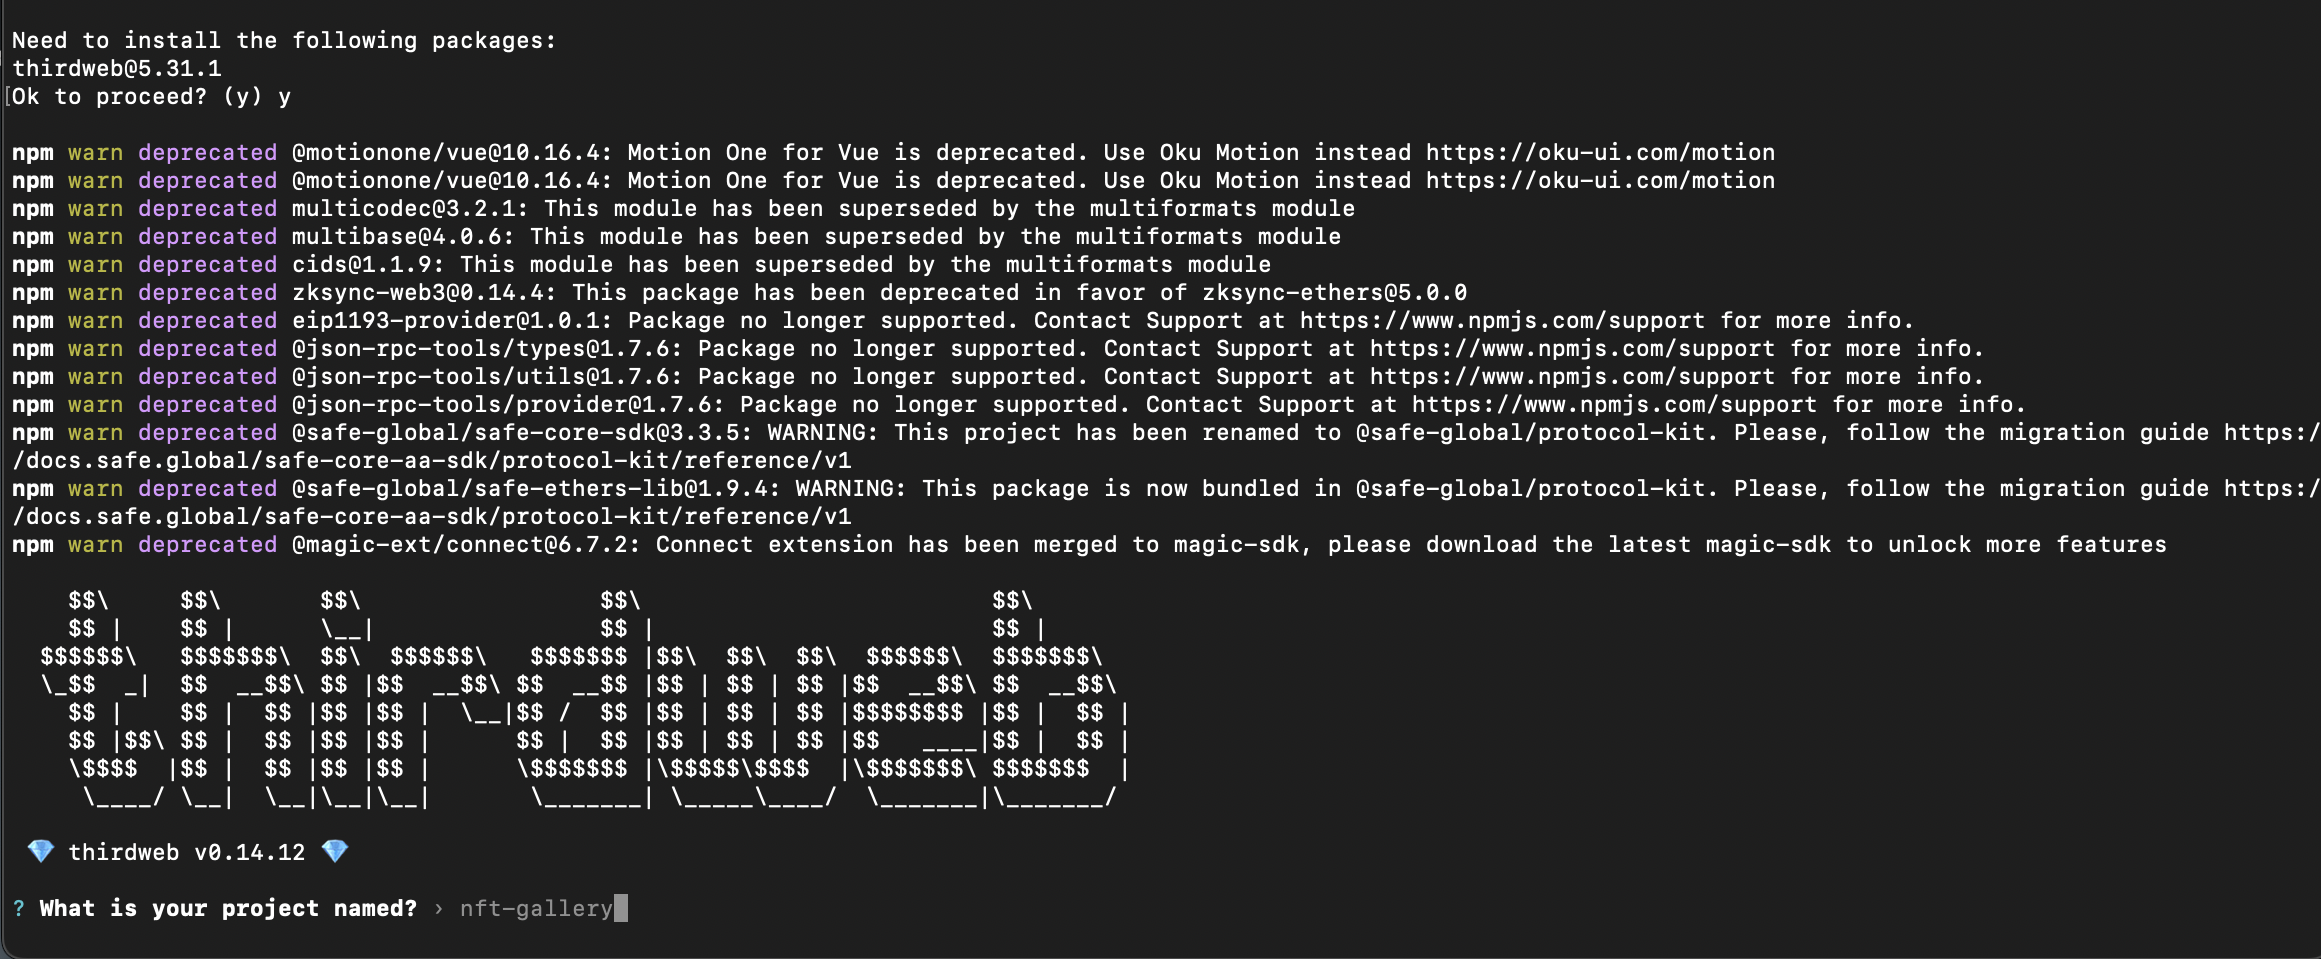
#### 1. **Create a project**
To create a new smart contract using the thirdweb CLI, run the following command:
```bash
npx thirdweb create
```
#### 2. **Configure your project**
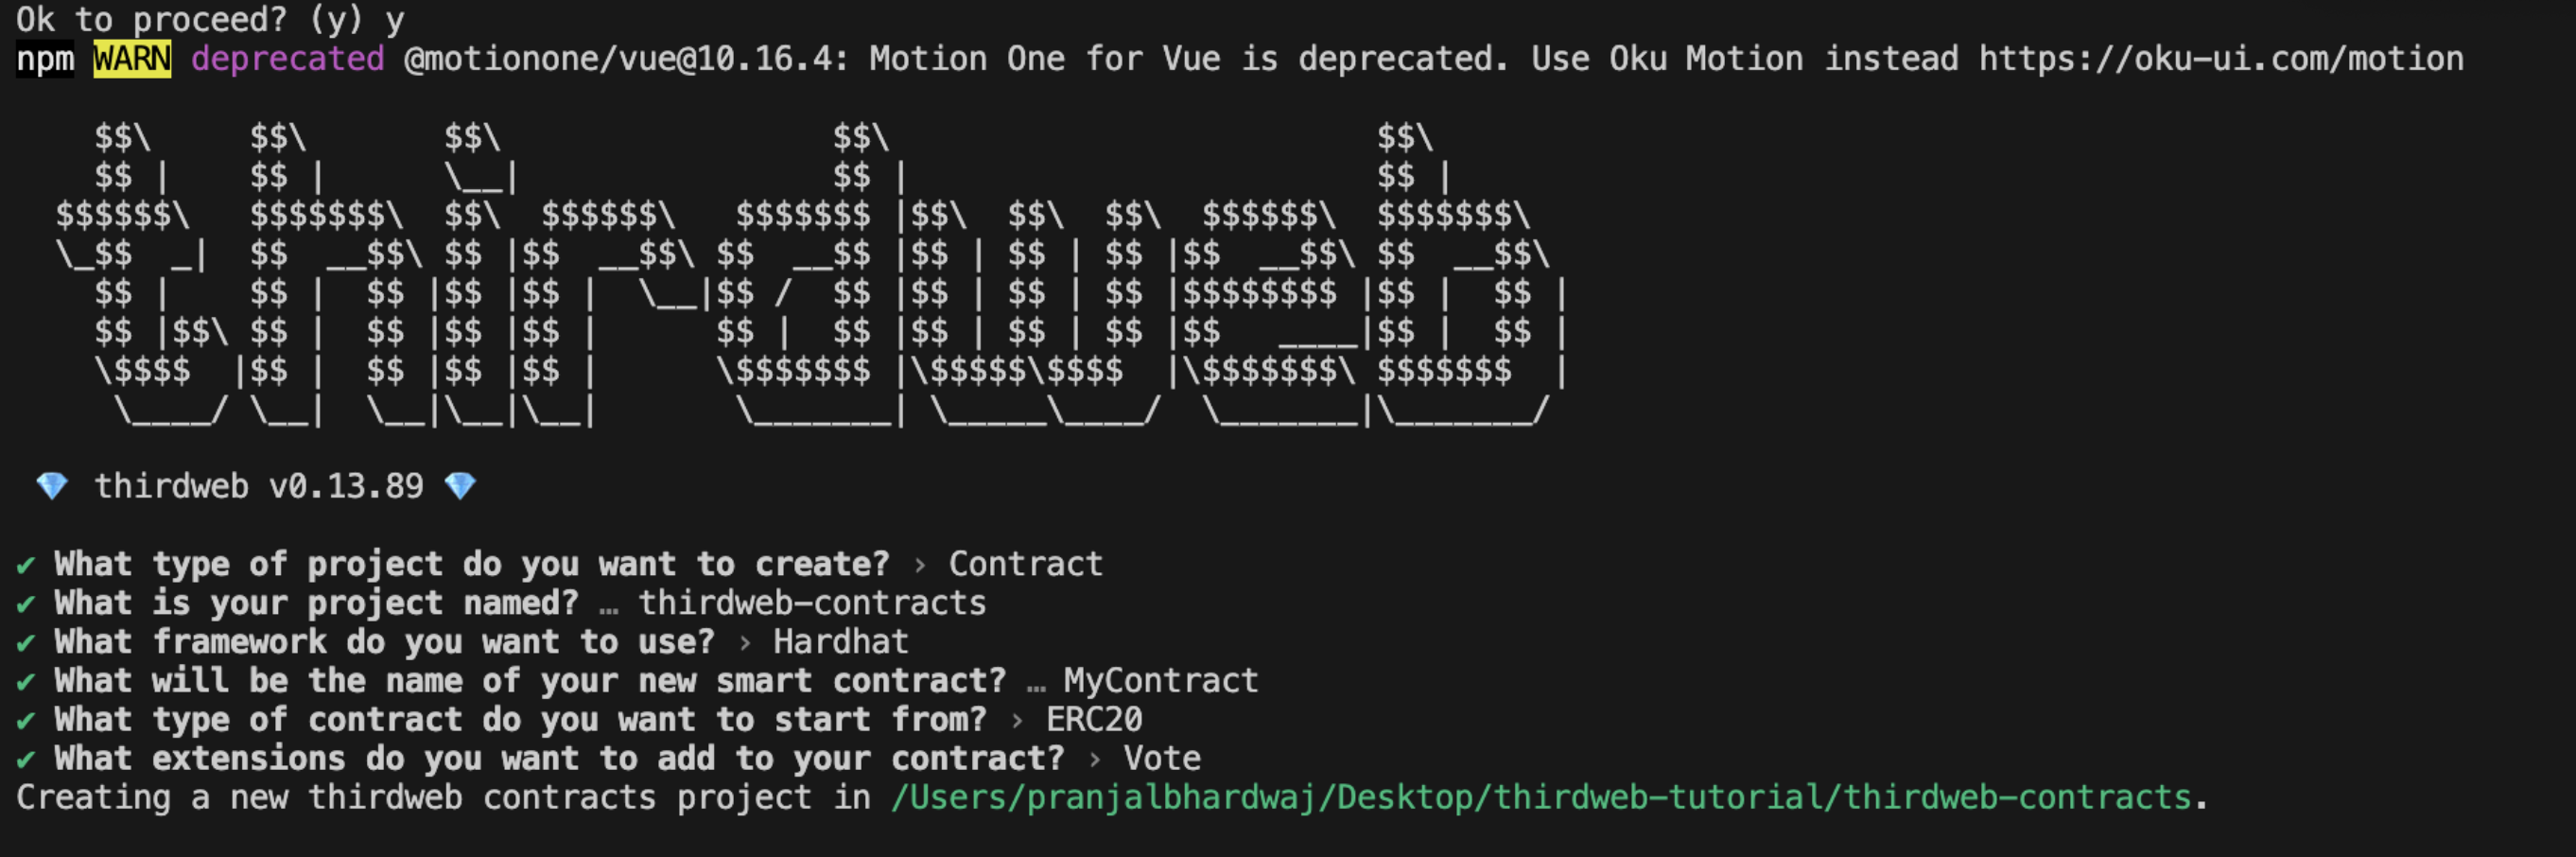
Input the following to configure your project in CLI:
* What type of project do you want to create?
* What is your project named?
* What is the framework you want to use?
* What will be the name of your new smart contract?
* What type of contract do you want to start from?
* What extension do you want to add to your contract?
Thirdweb gives you the flexibility to choose the suitable options. Example, You can create a new project using Hardhat or Forge and add optional extensions.
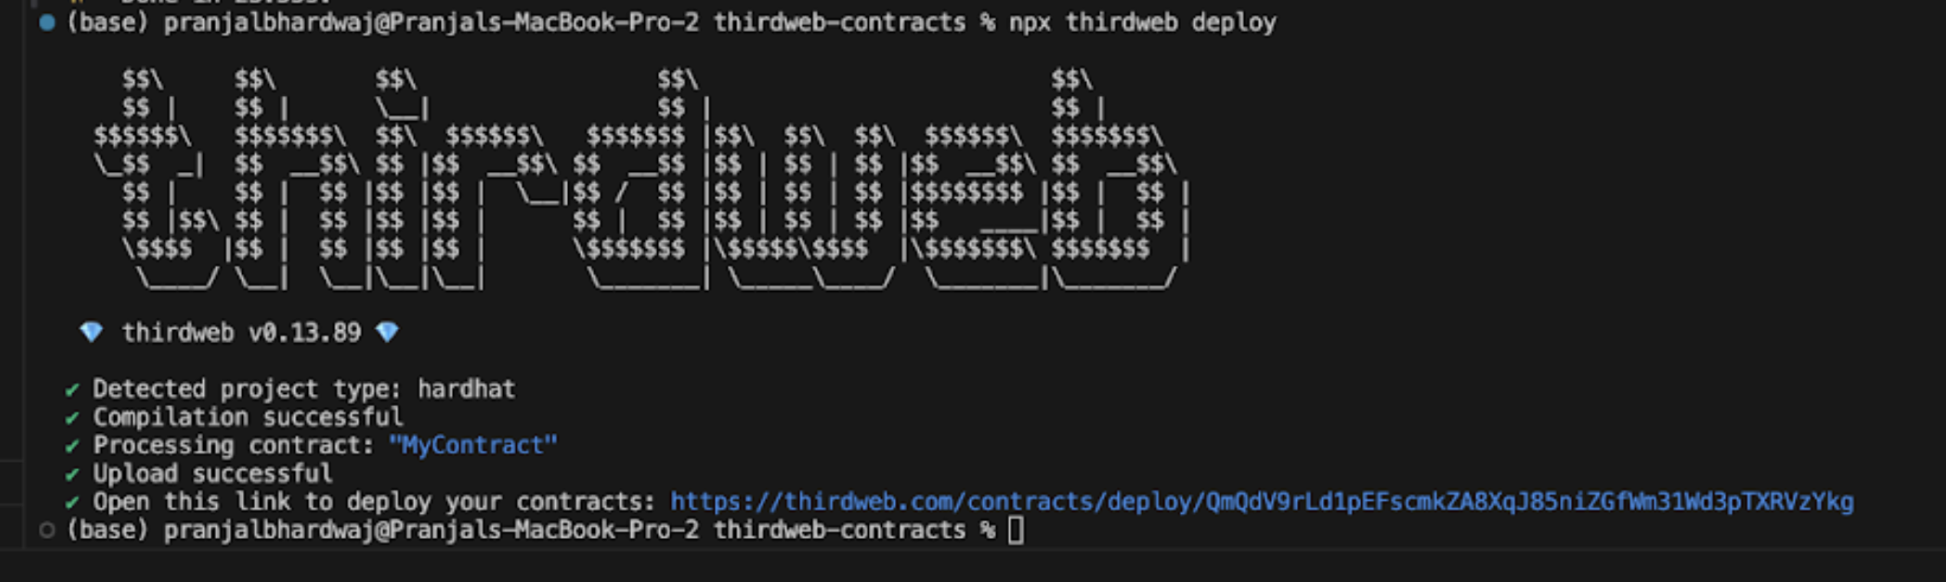
#### 3. **Deploying a smart contract:**
```bash
npx thirdweb deploy
```
Executing this command will trigger the following actions:
* Compiling all the contracts in the current directory
* Providing the option to select which contract(s) you wish to deploy
* Uploading your contract source code (ABI) to IPFS
#### 4. **Network selection**
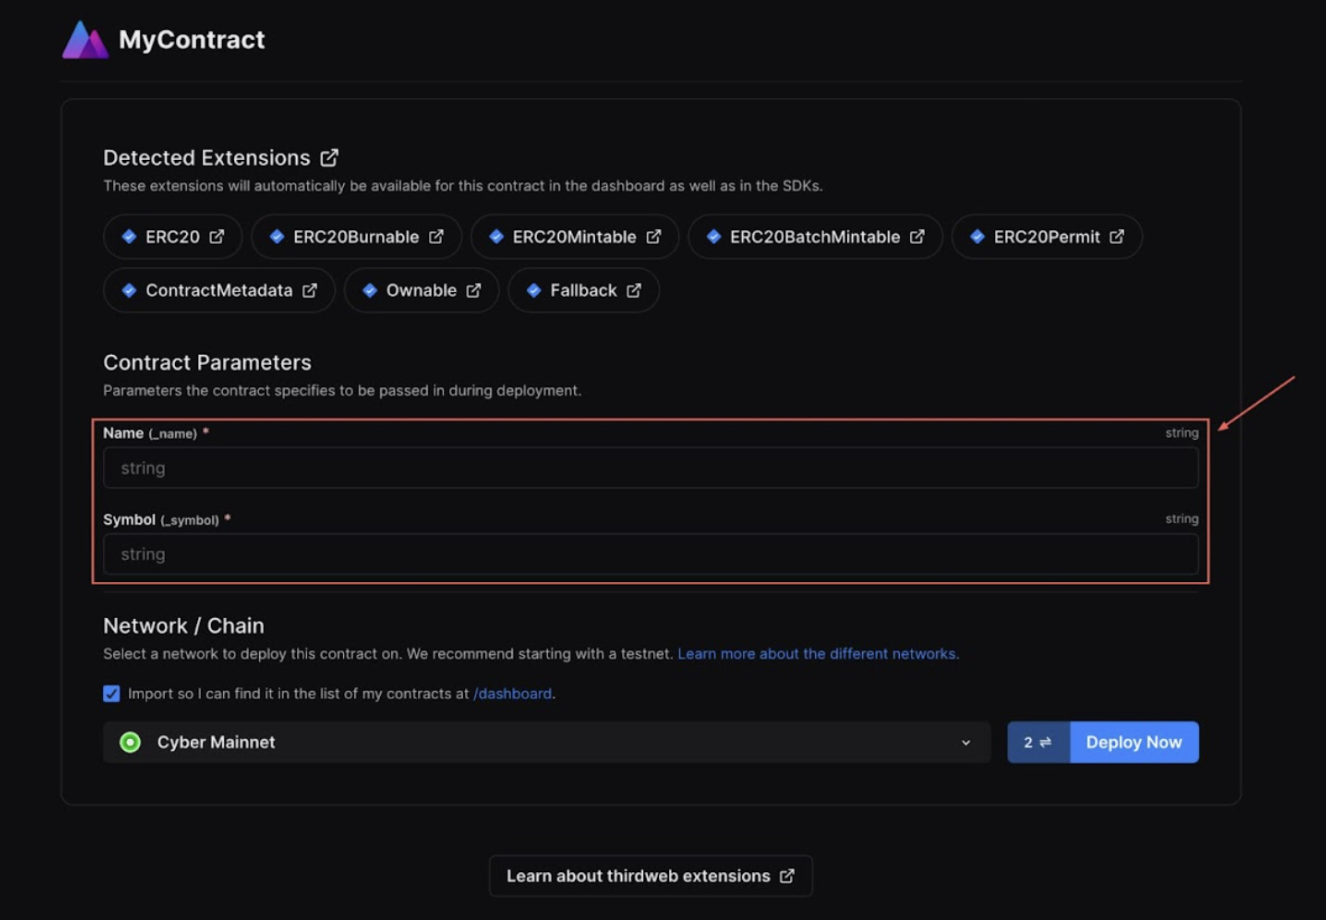
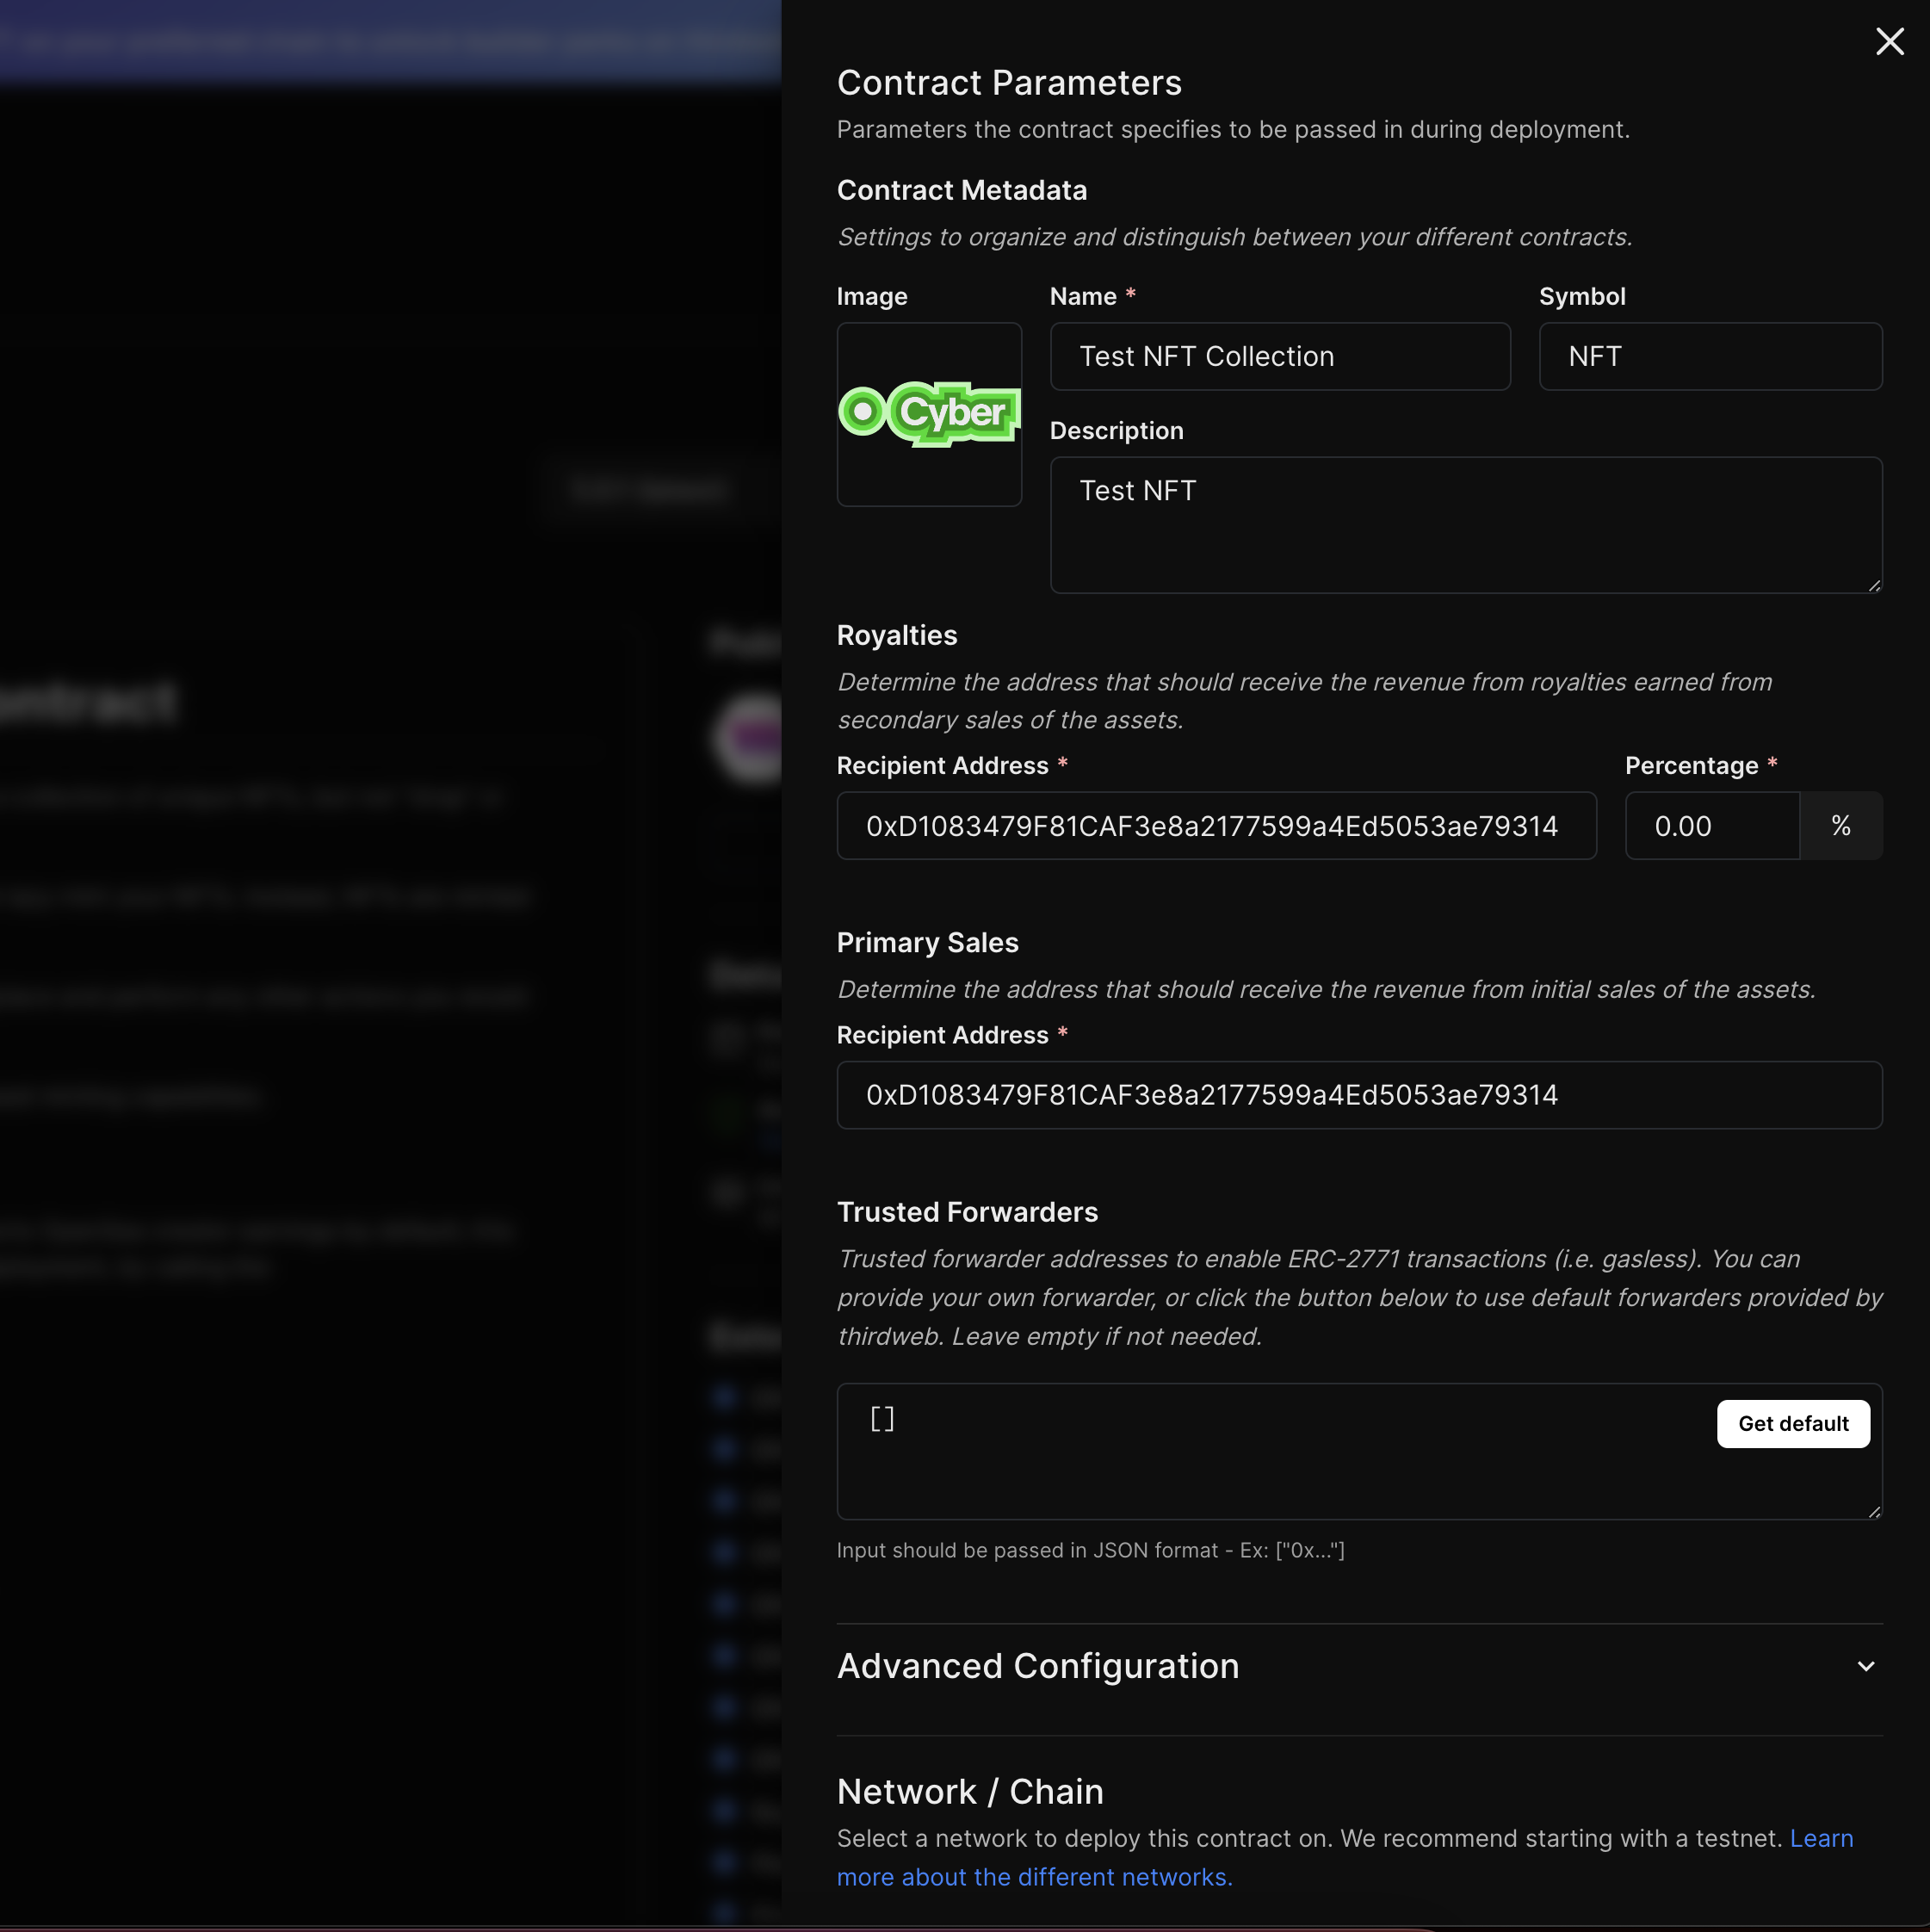
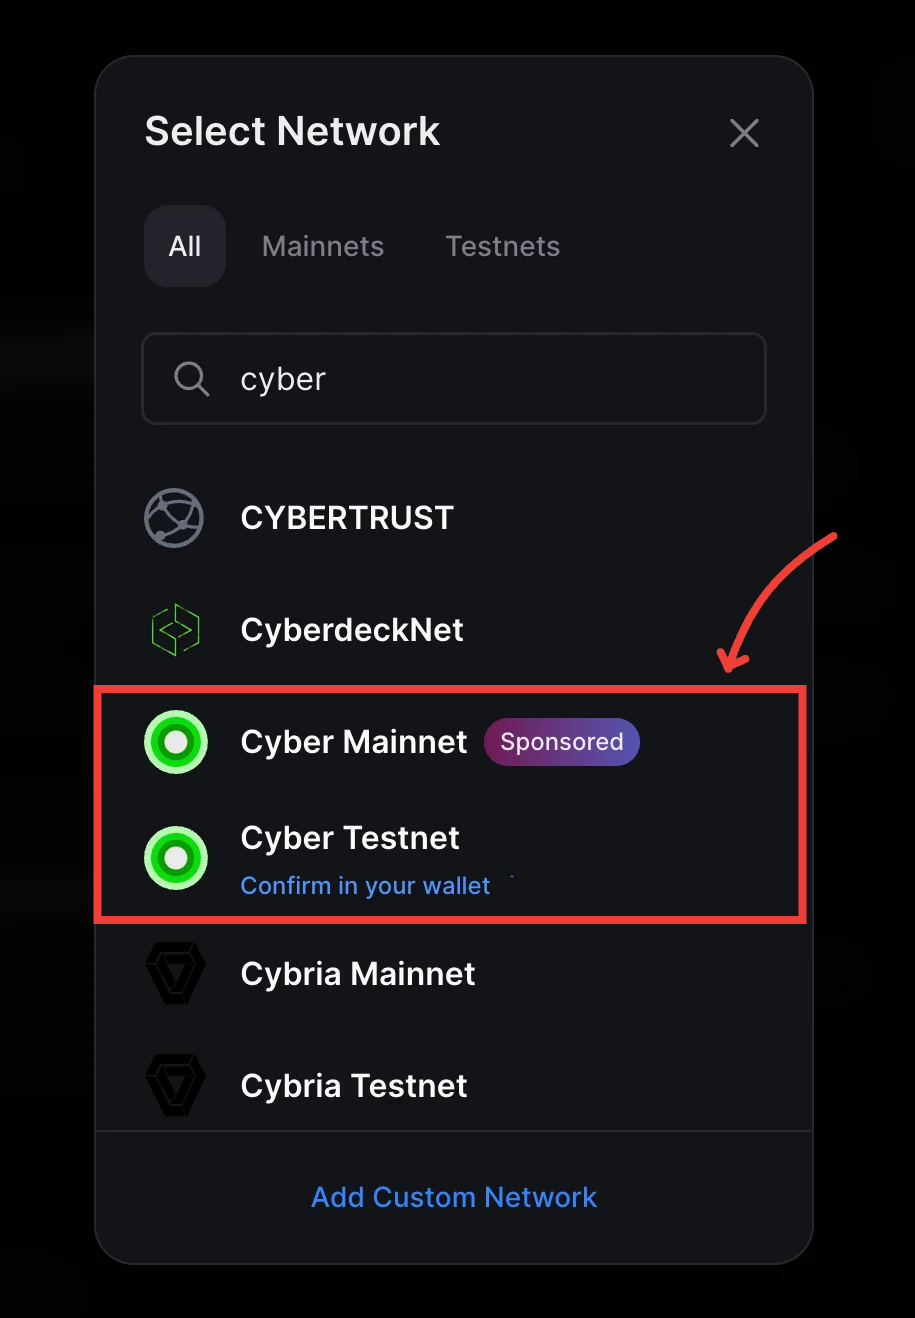
After running the above command, visit the provided dashboard URL and select Cyber or Cyber Testnet from the network dropdown.
The dashboard will also require you to fill out the parameters. For example, If you are deploying an ERC20 based smart contract, you will have to enter the \_name(Contract Name) and \_symbol(Token symbol or ticket).
For additional information on Deploy, please reference thirdweb’s documentation.
For this particular example, I am naming the token to be ‘ThirdWeb Testing Token’ and the ticker symbol will be ‘TWTT’.
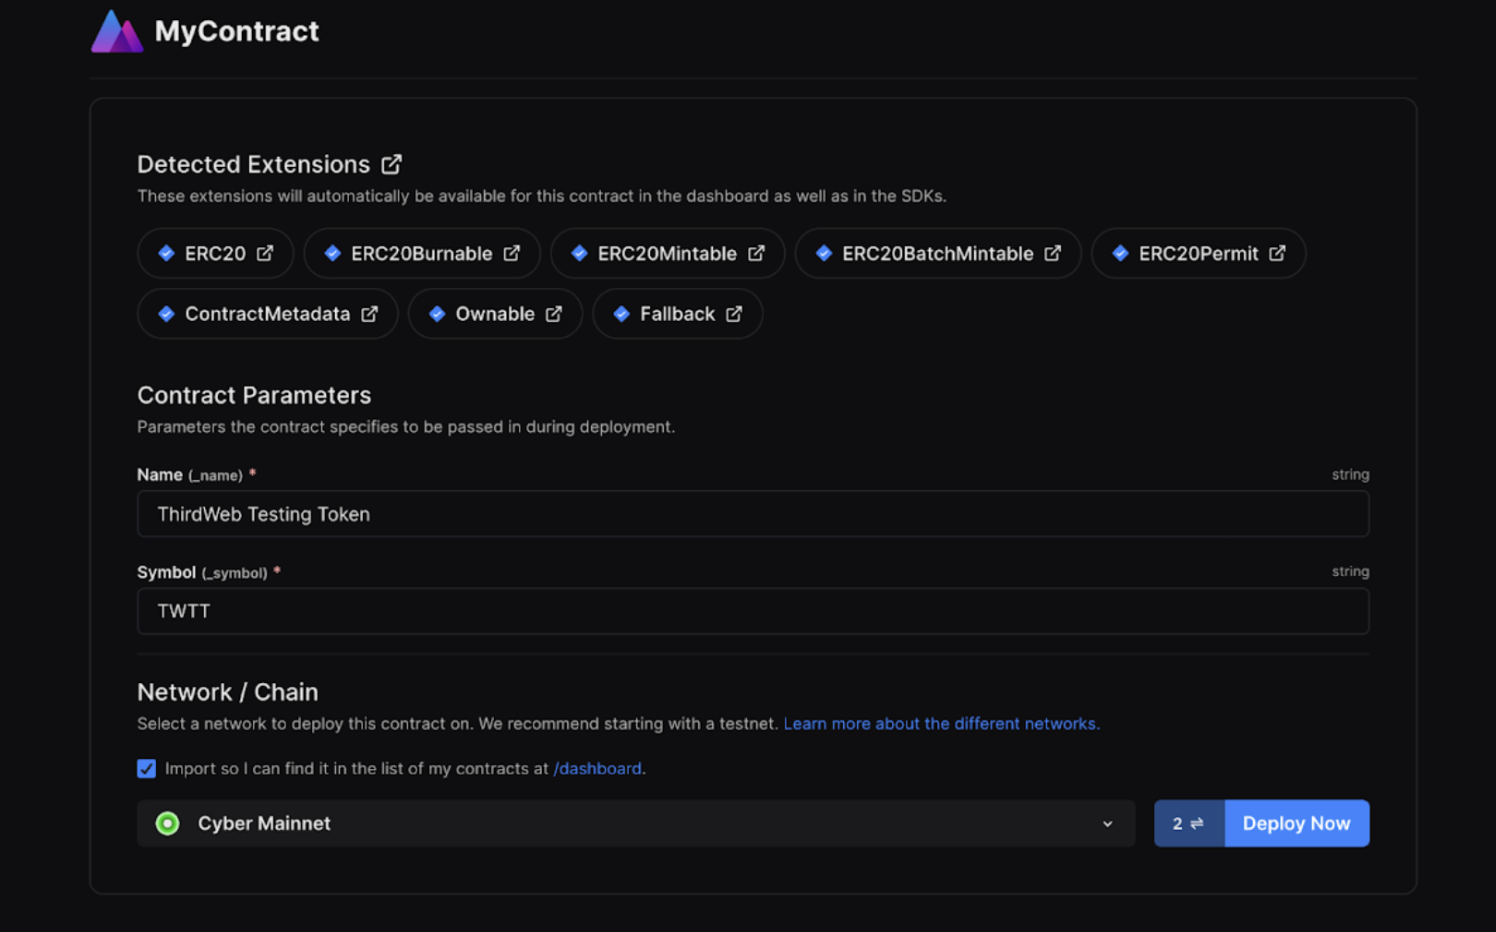
Once the parameters are filled out, you will need to click on “Deploy Now” which will trigger the transaction and you will see the metamask pop-up to sign the transaction. The deploy process takes place in two steps. The first step is signing the transaction to deploy the smart contract, while the second step is a gasless transaction to add the smart contract in Thirdweb dashboard for further uses.

Once the signature is verified, you'll be redirected to the dashboard.
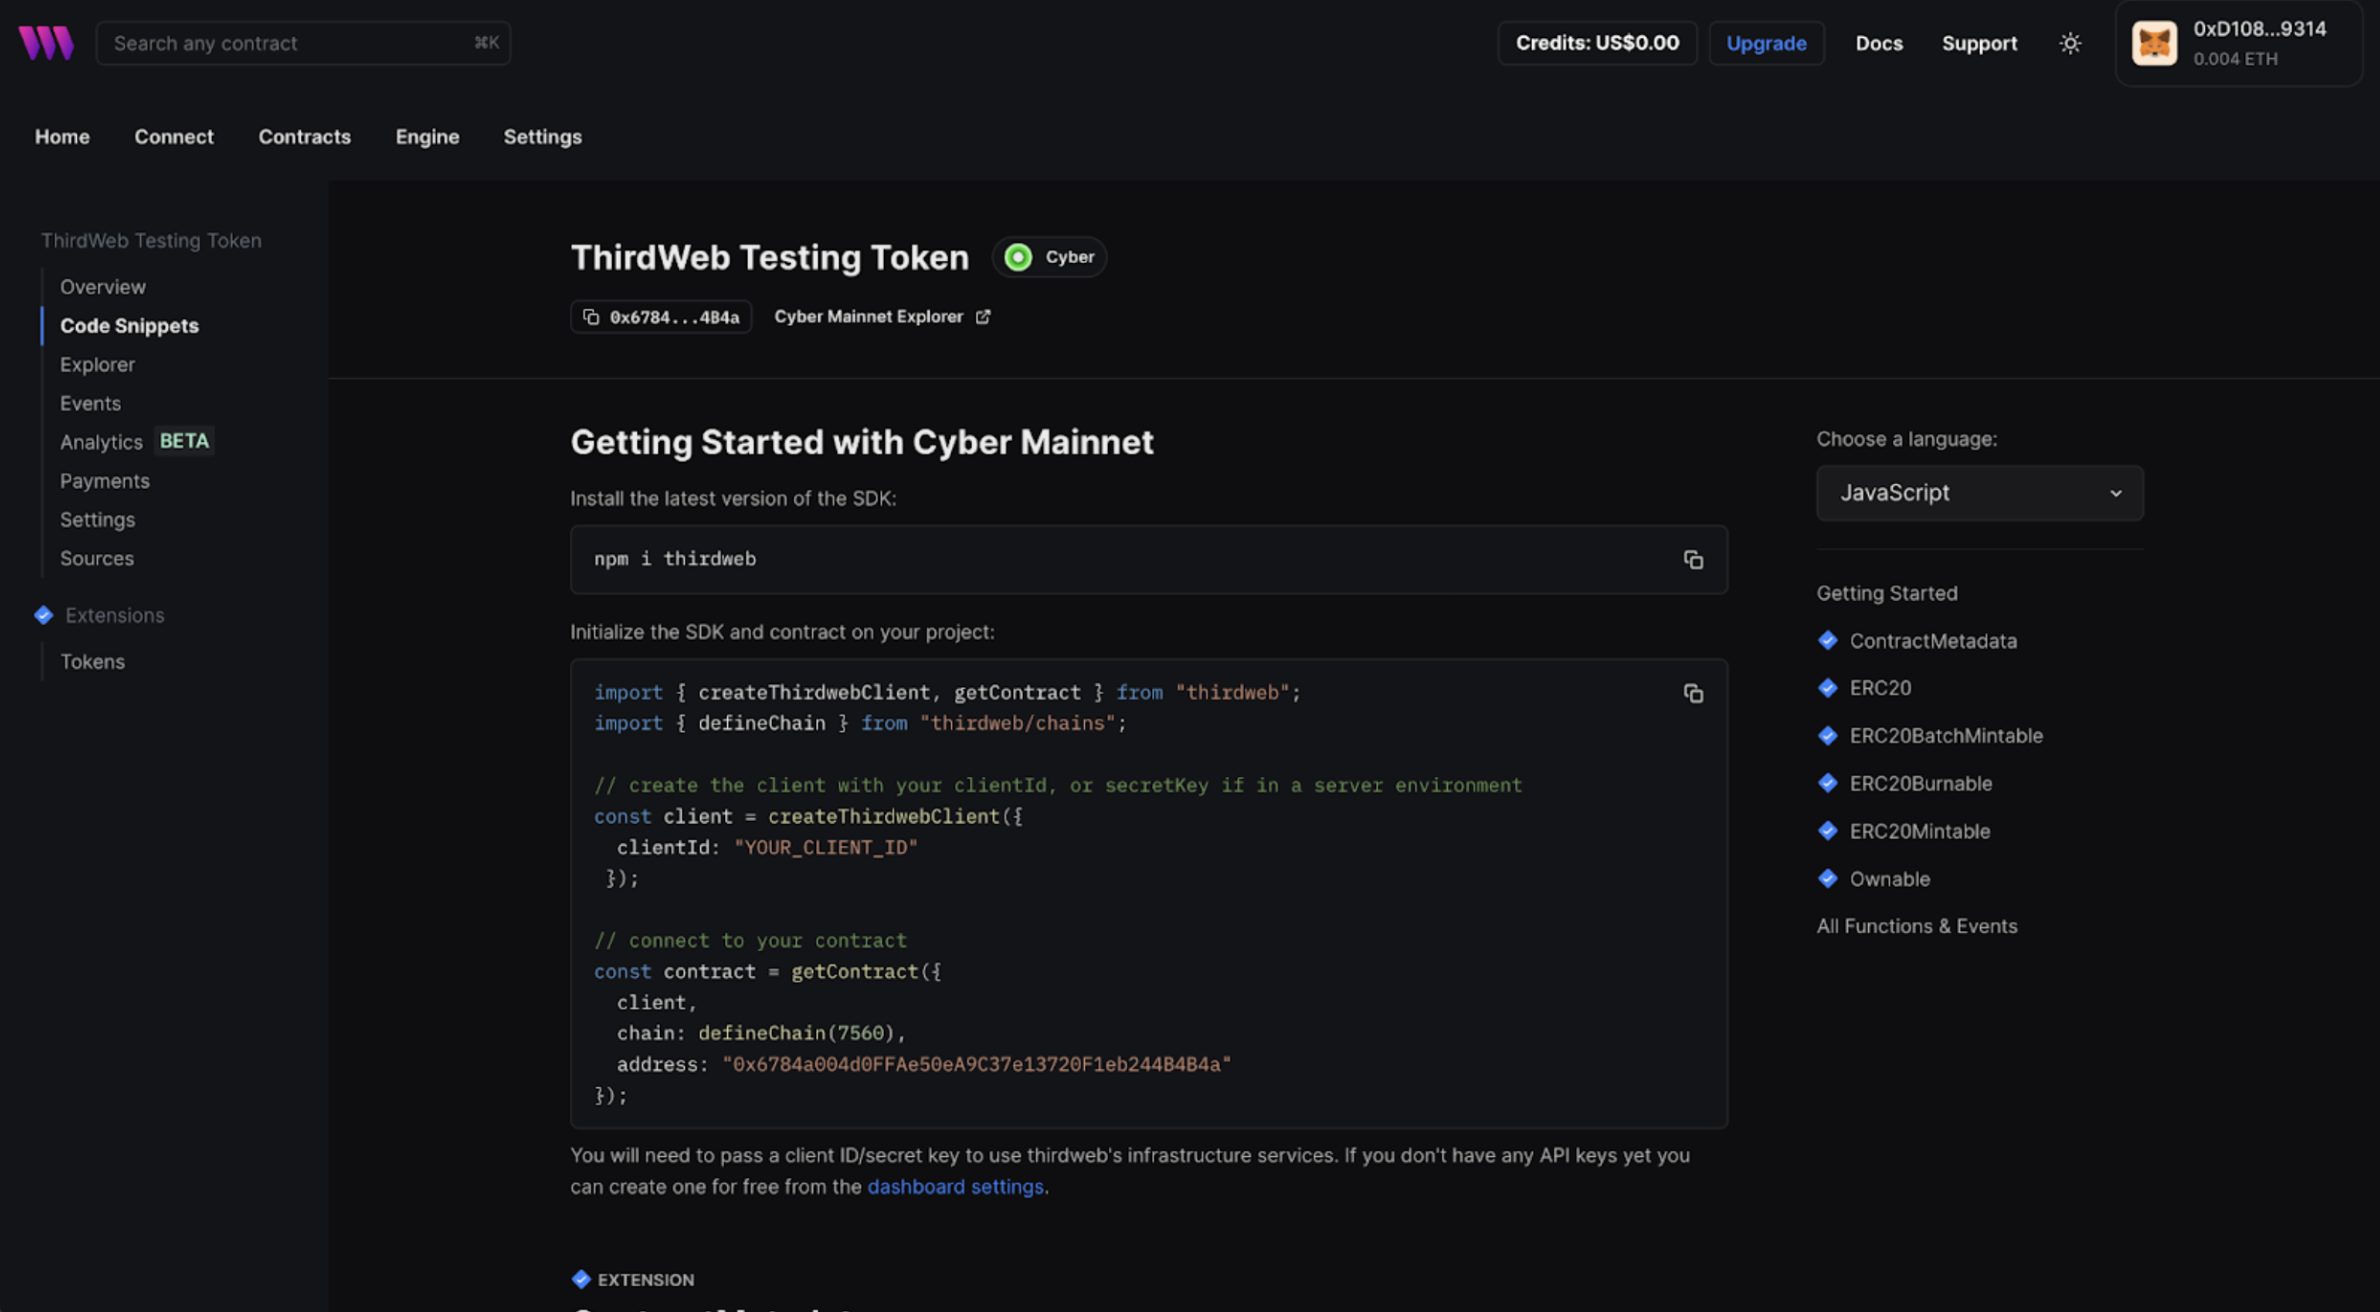
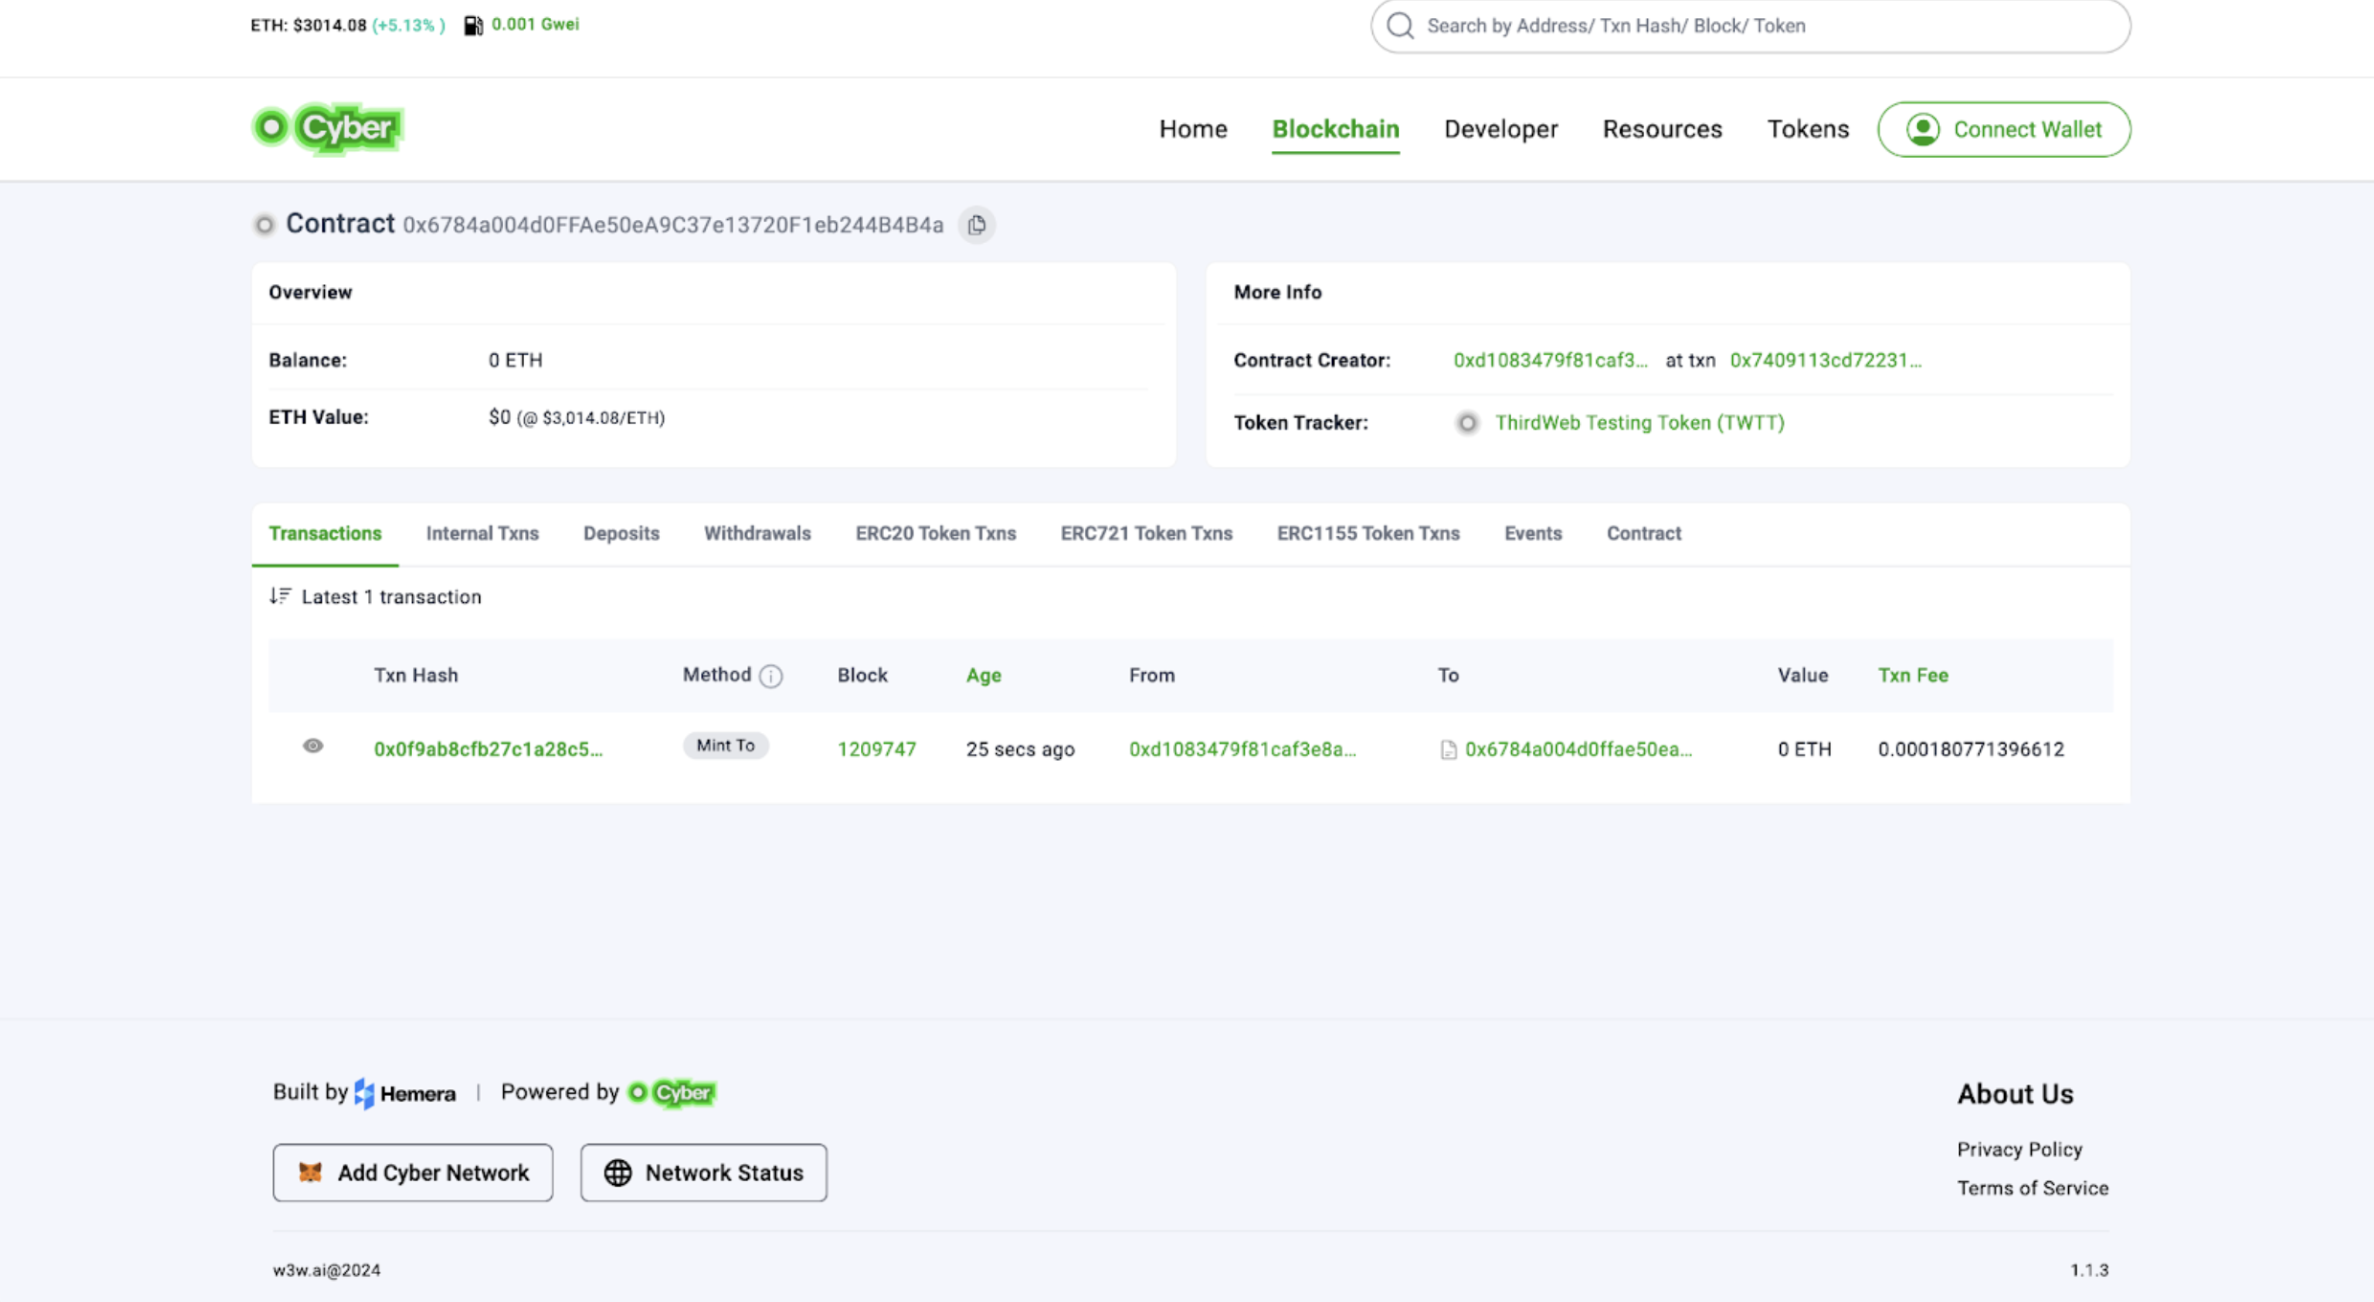
You can verify the contract deployment by heading over to the explorer and searching for the deployed contract.
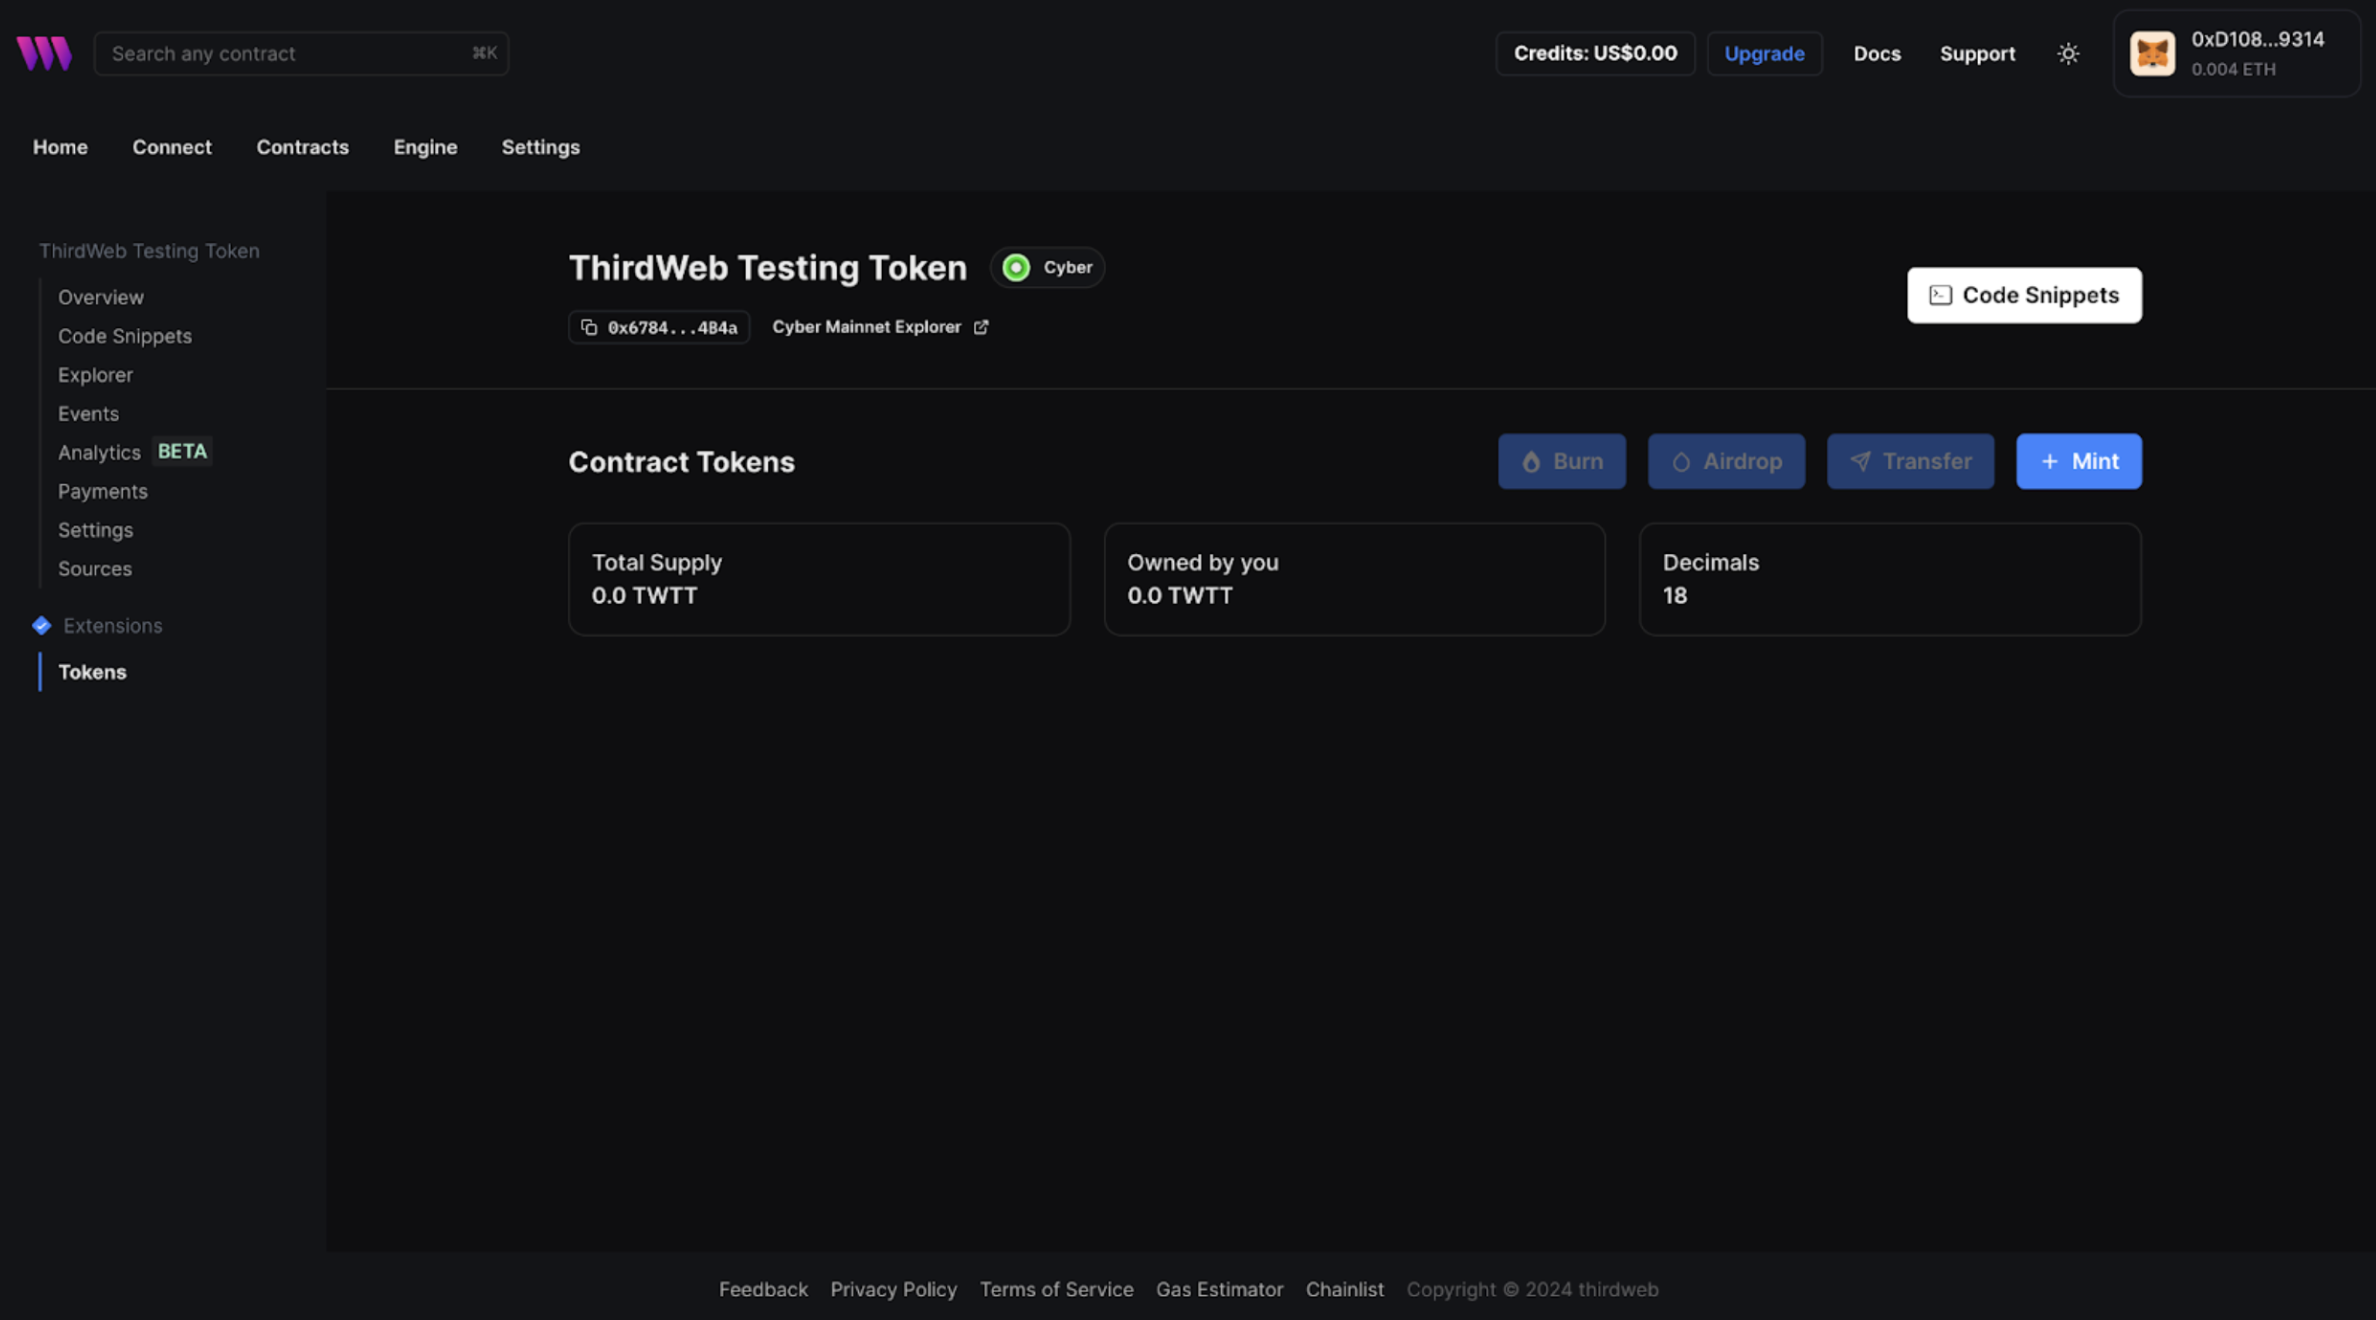
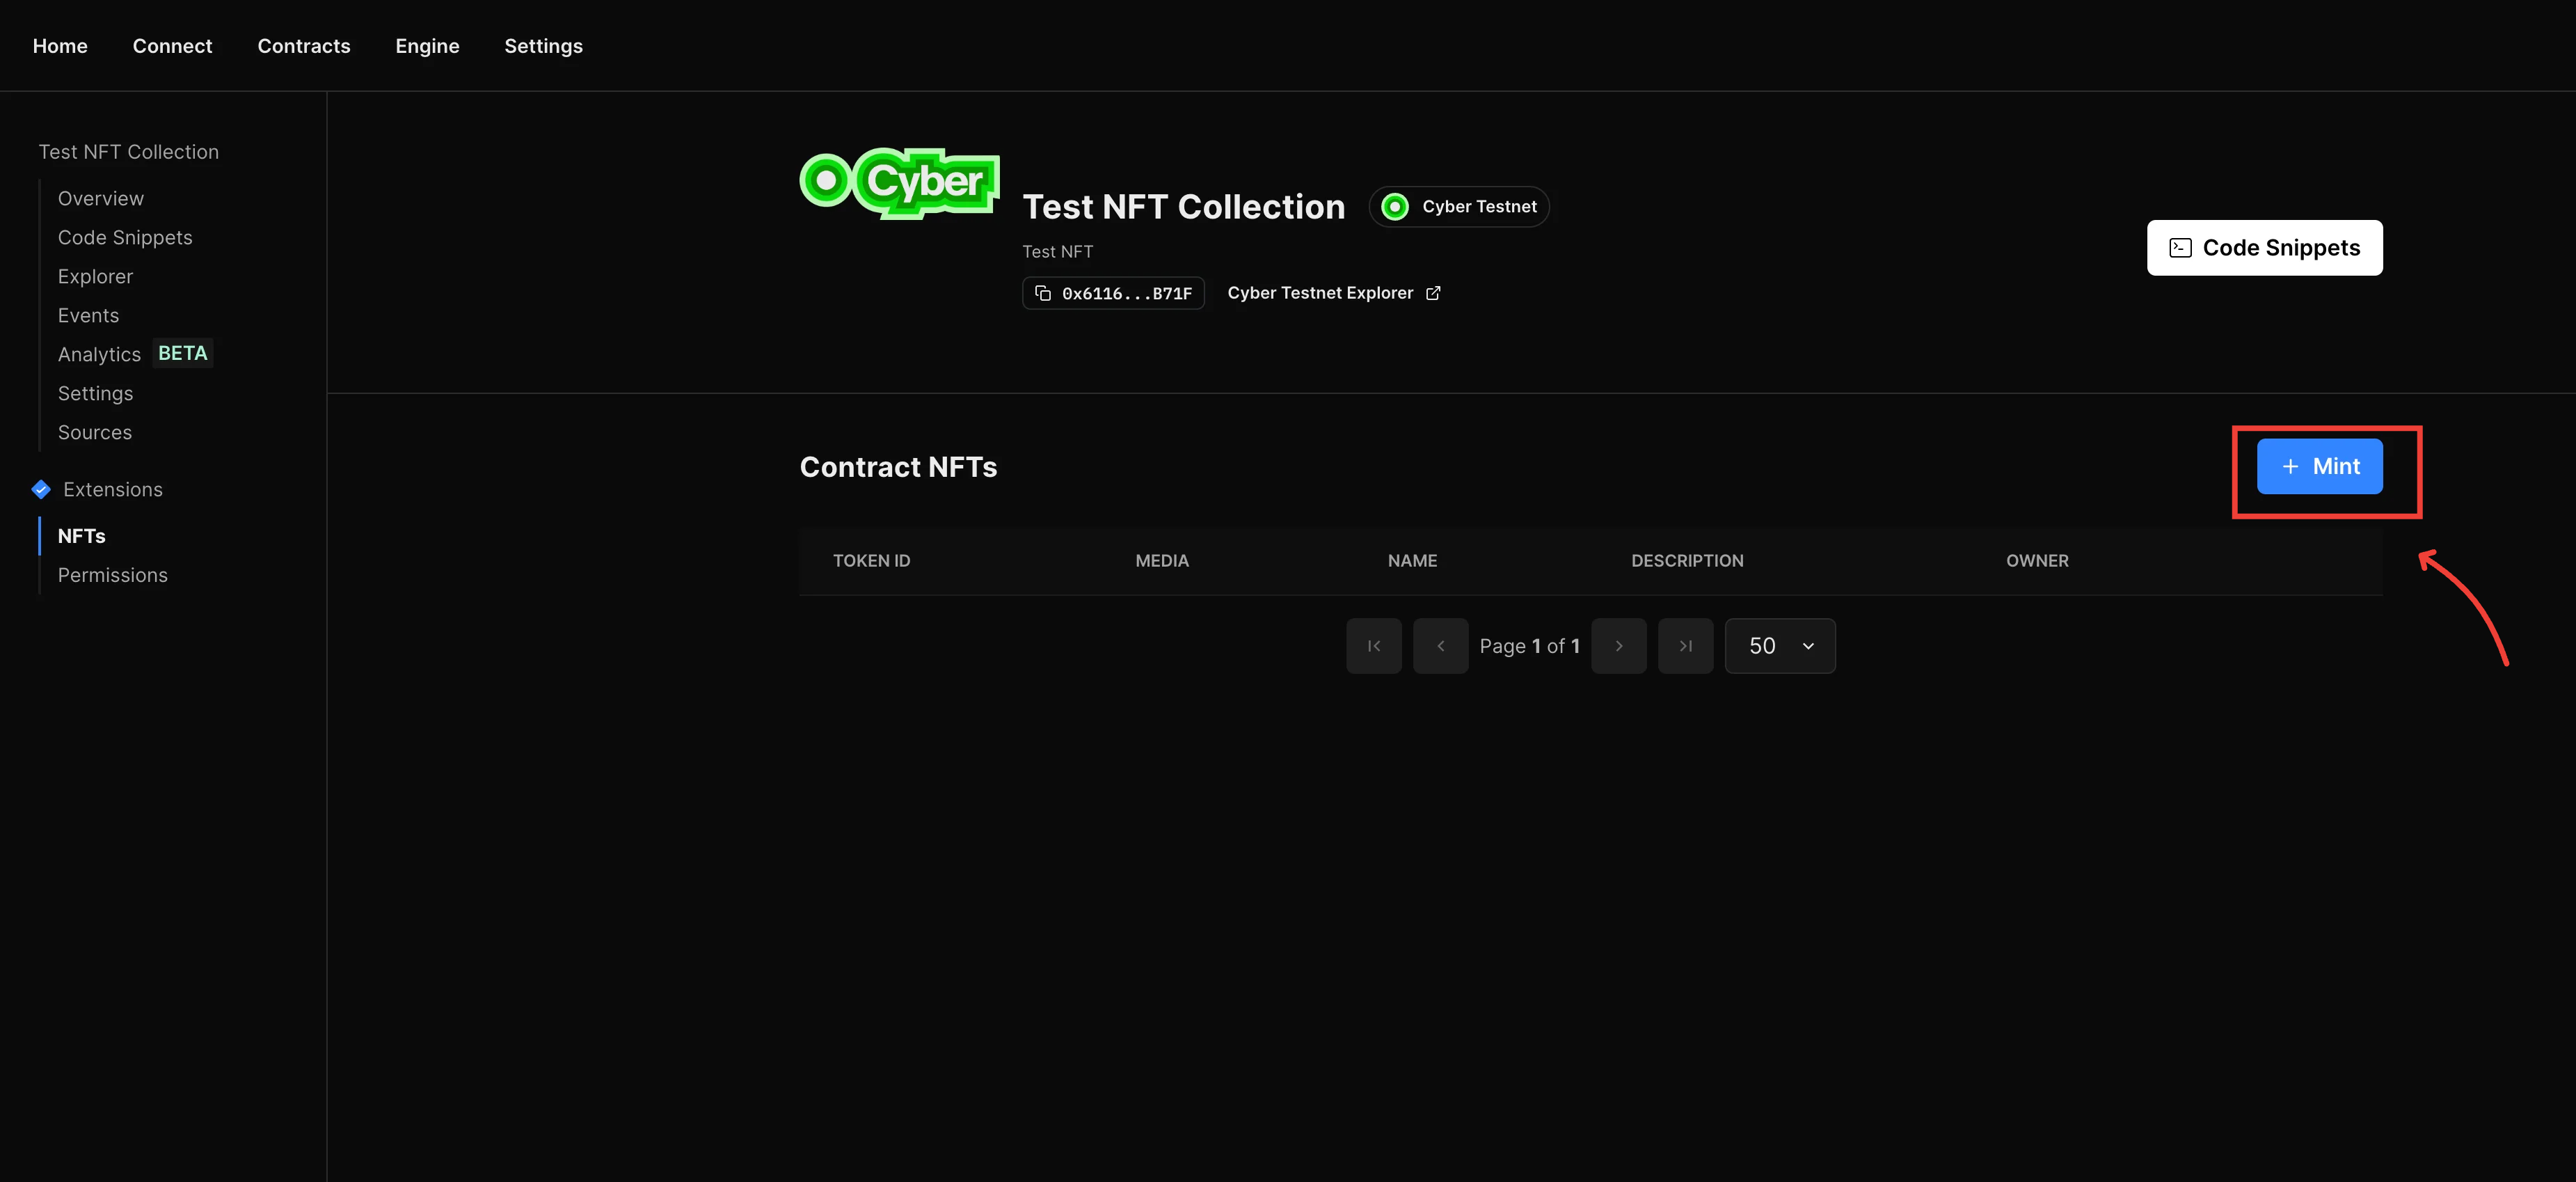
#### 5. **Minting tokens**
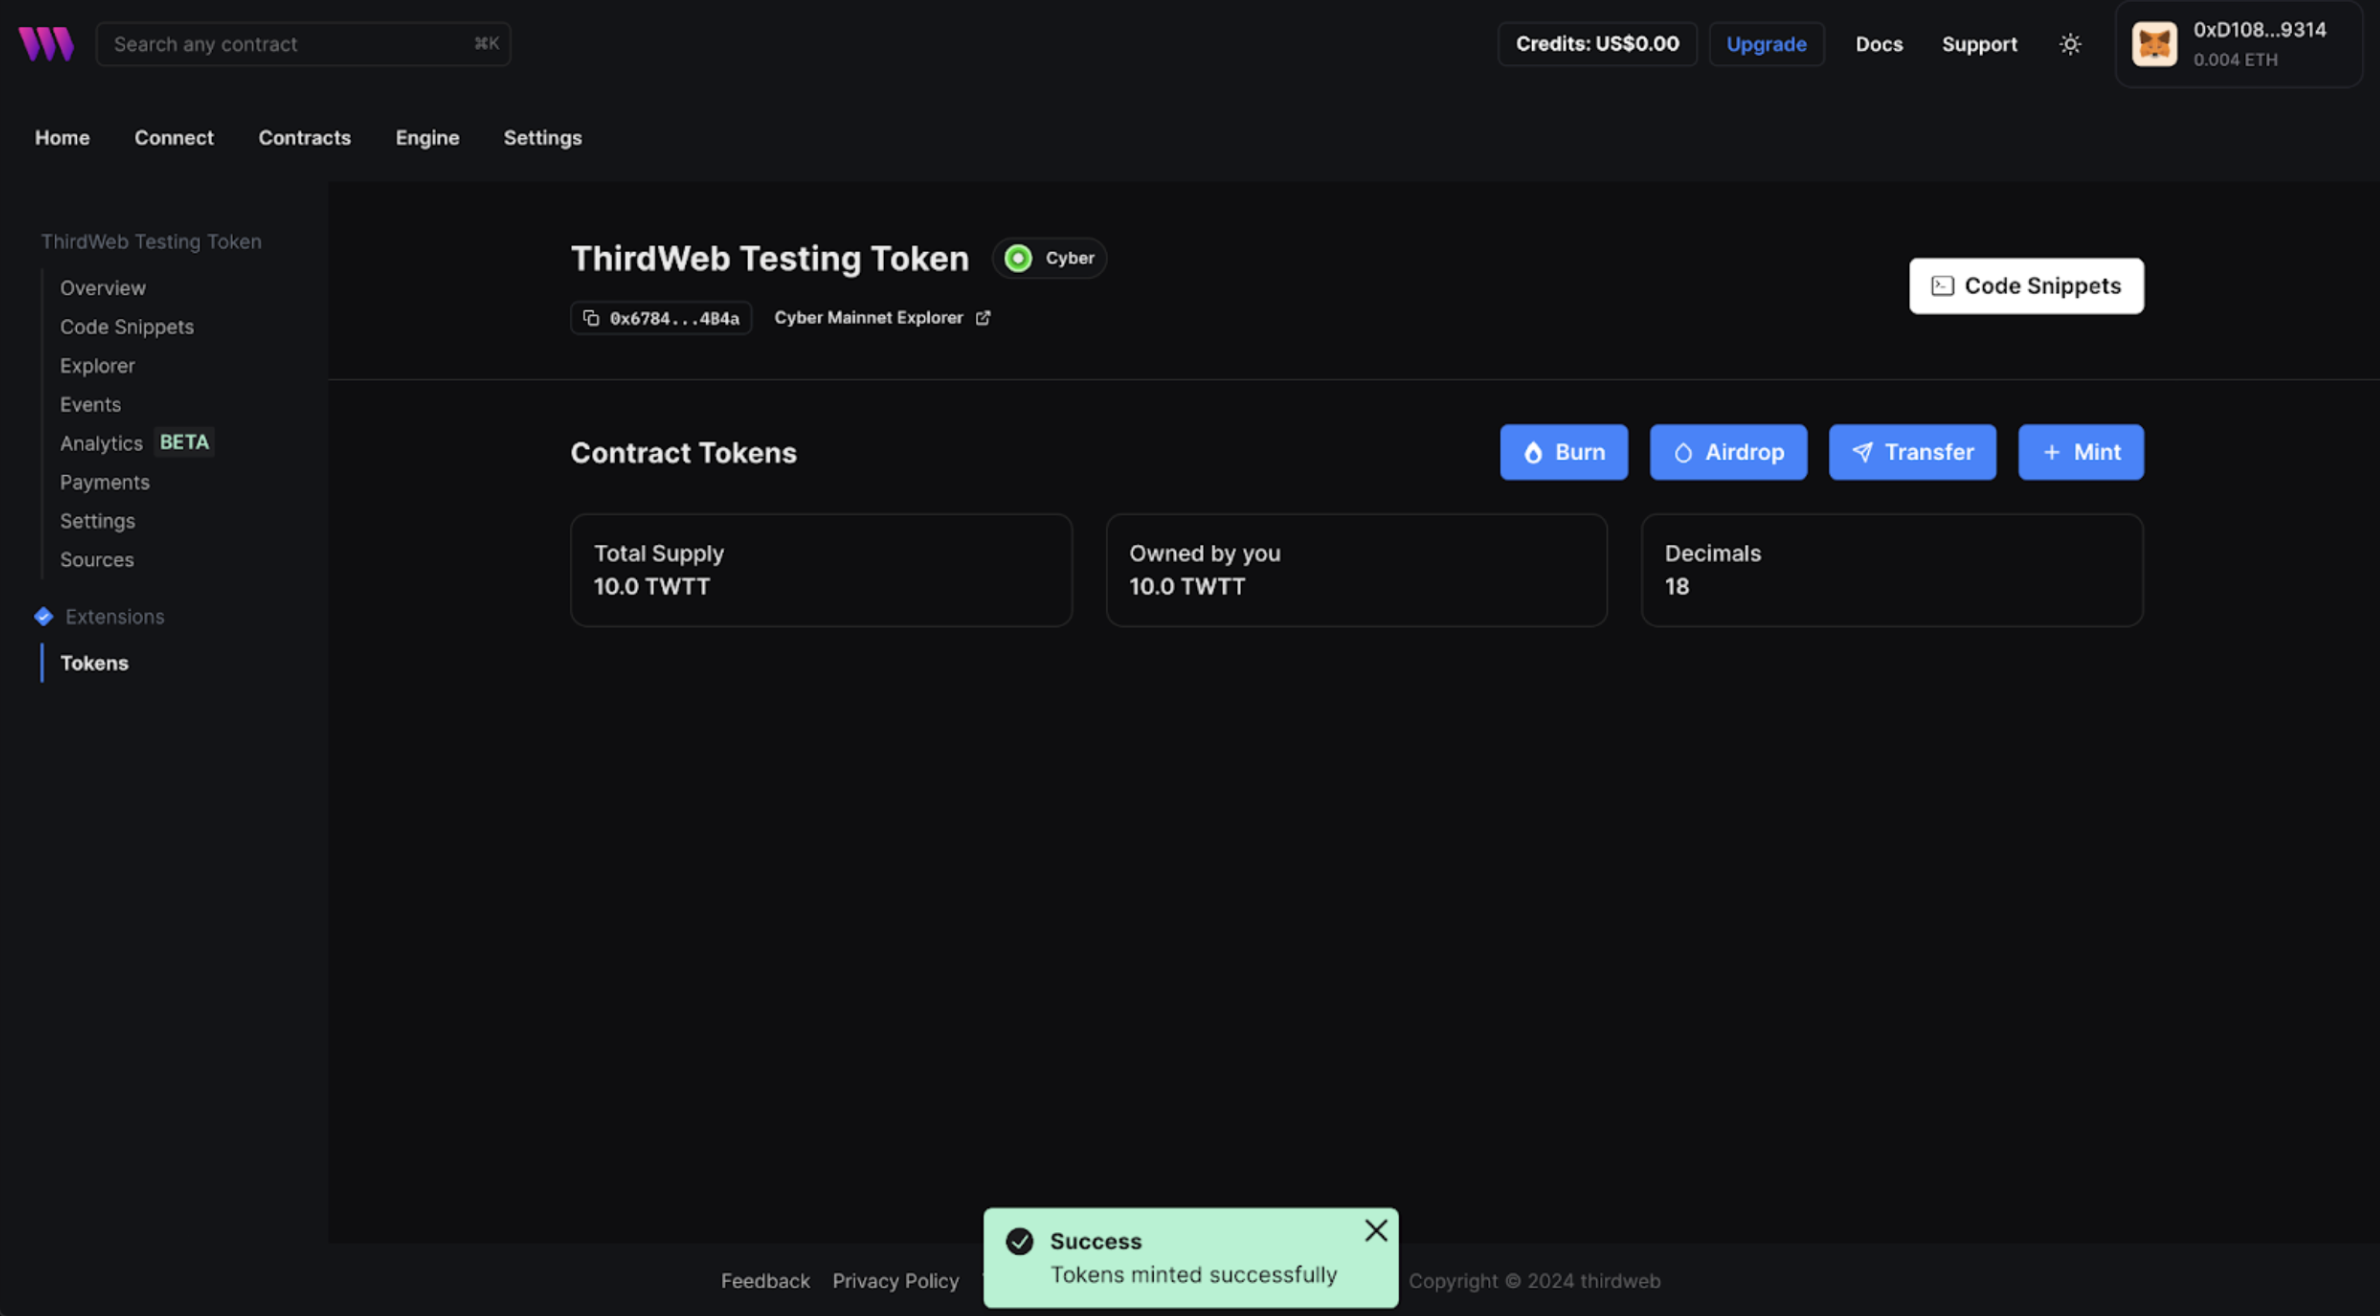
Once the contract is deployed, you will need to navigate to “Extensions” to mint the tokens. Here you will have to simply click on the “+Mint” button and then decide the total supply of tokens and the number of tokens owned by the creator.
Once the minting is successful you will see a prompt on the bottom notifying that "Tokens minted successfully".
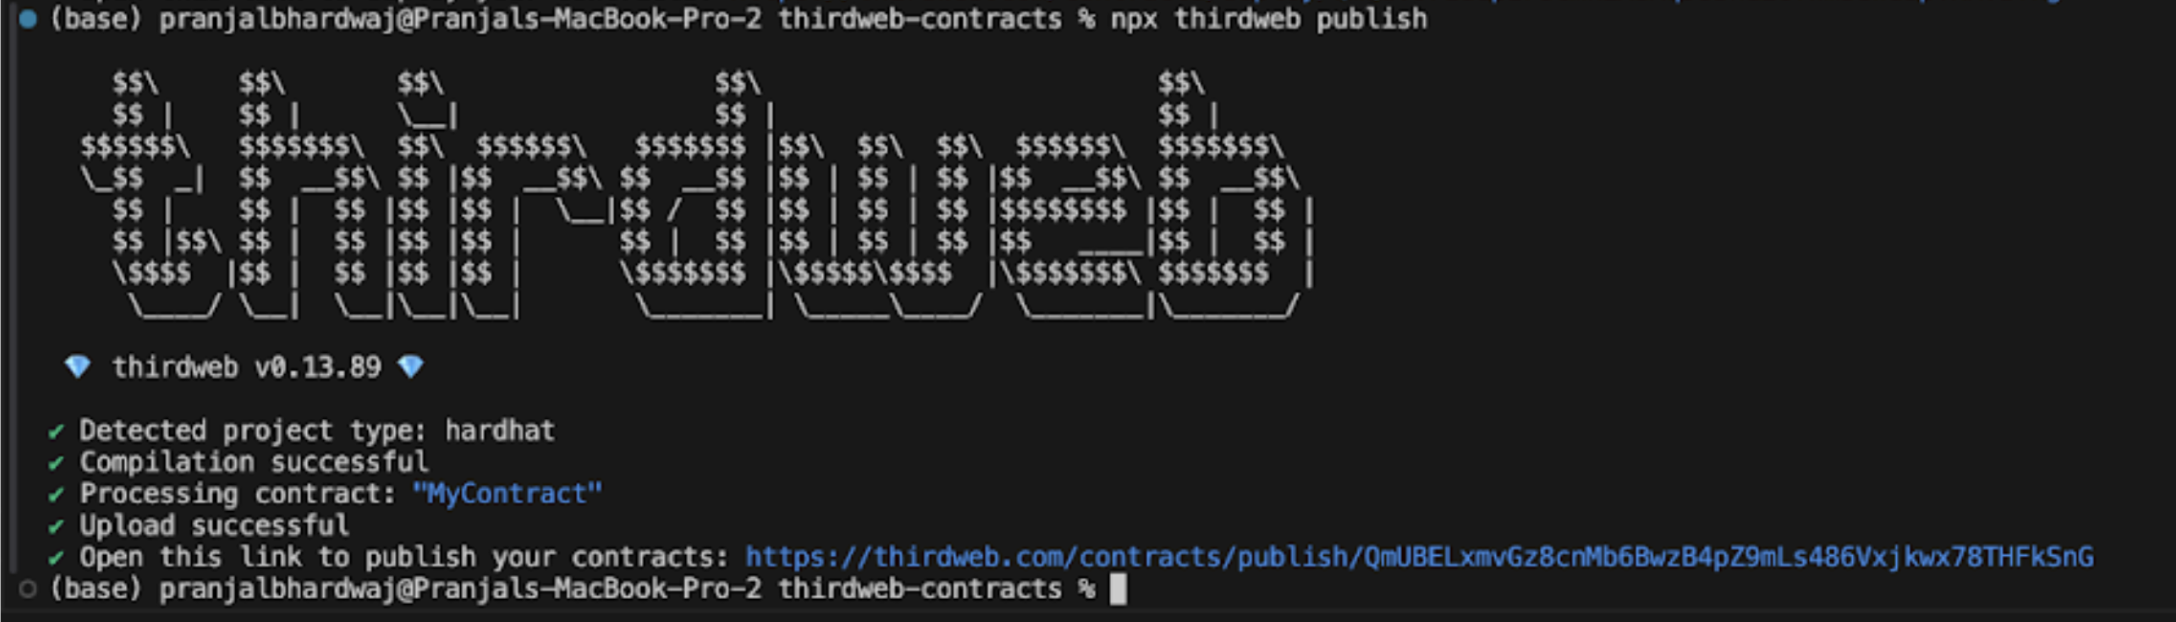
#### 6. **Publishing a smart contract**
You can publish and share your contract onto thirdweb's registry.
```bash
npx thirdweb publish
```
You will get a prompt to visit the link to publish your contract, which will ask you for some information about the contract. This includes: Contract Name, description, Image and a Readme.
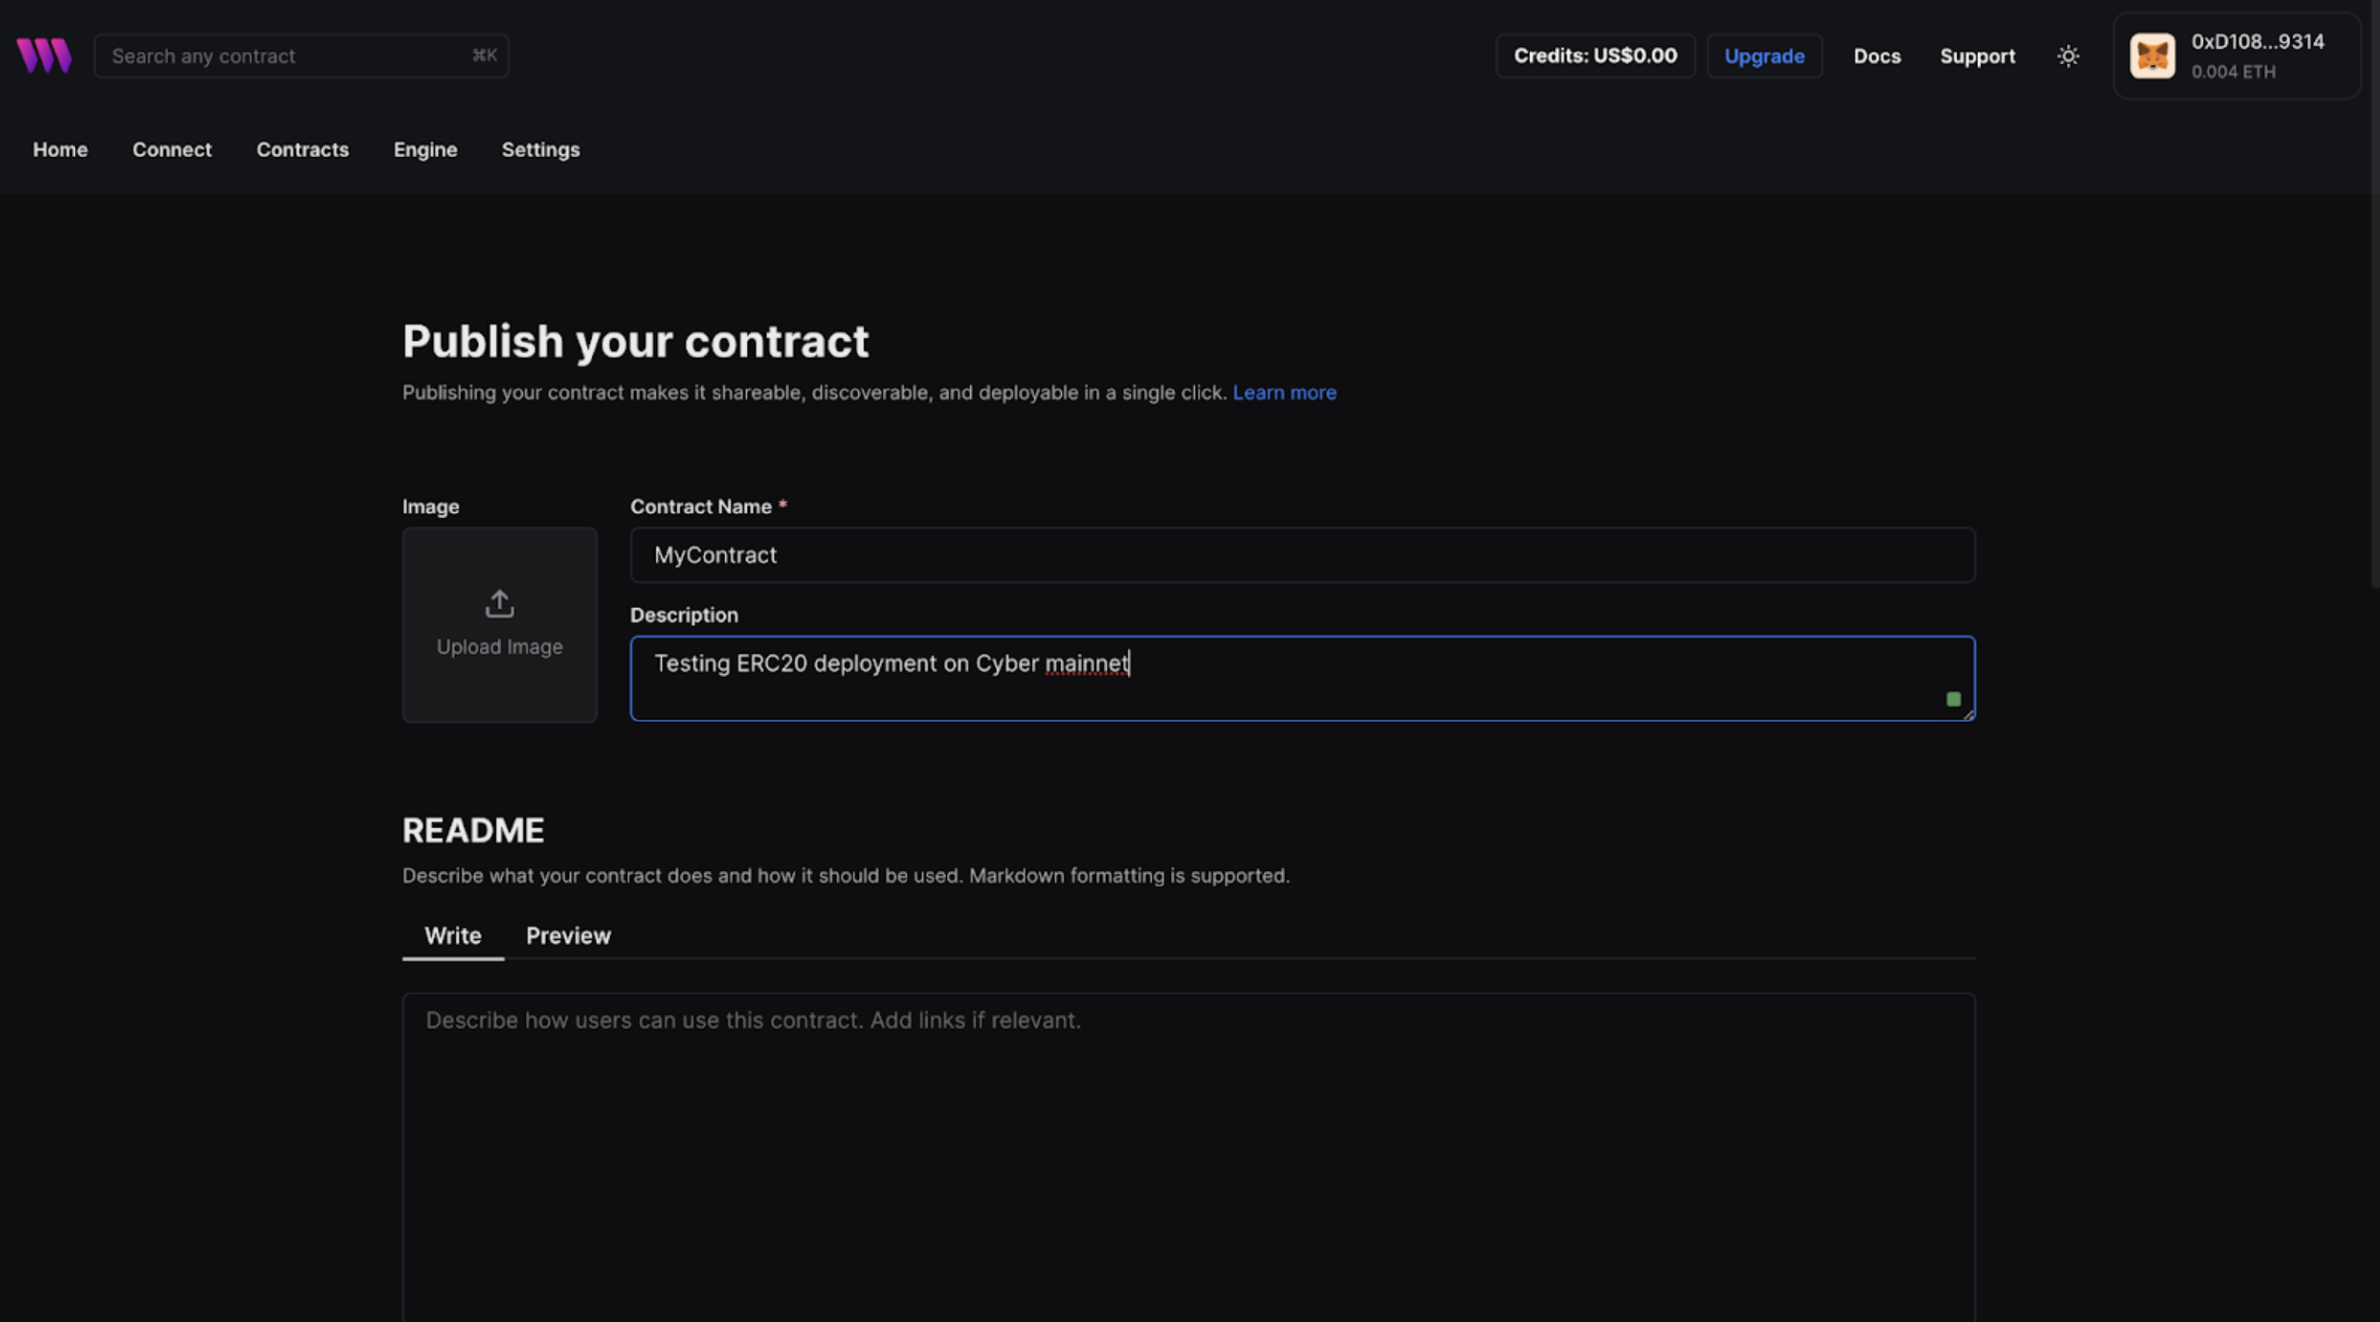
You can finish the publishing process by adding contract details.
### Conclusion
You've successfully deployed an ERC20 token on the Cyber mainnet using thirdweb tools. Continue to explore and leverage thirdweb's features to enhance your projects with Cyber and share your achievements within the developer community. If you face any issues, feel free to reach out to our engineers for [Support](/support.md).
## Building a dApp using Thirdweb SDK
In this tutorial, we will explore how to build a dAPP using Thirdweb SDK to display an NFT collection deployed on Cyber testnet. It is a great way to showcase your NFT collection with a gallery application that allows users to view the metadata of all NFTs in your collection. The process involves first setting up your NFT collection, then minting NFTs in your collection and lastly we will be building an NFT gallery dApp to view NFT collection.
### Setting up your NFT collection
* Go to the [thirdweb dashboard](https://thirdweb.com/dashboard).
* Click the Connect Wallet button located in the upper right corner to connect your wallet.
* From the dashboard, select [browse contracts](https://thirdweb.com/explore) to explore a list of deployable smart contracts. Now, Navigate to the NFTs section and select the **NFT Collection smart contract**.
* Click the **Deploy now** button.
* Now, Provide the required metadata details for your NFT collection such as Name, Symbol and Description.
* Under the Network selection choose Cyber Testnet.
* Click **Deploy Now** to deploy the NFT collection and sign the transactions from your wallet.
### Minting NFTs in your collection
Currently, our NFT Collection doesn't contain NFTs. To populate our upcoming NFT Gallery app, we will need to mint NFTs.
* Navigate to the NFTs tab on the left-hand sidebar and click **Mint**.
* Fill in the metadata details for the NFT like name, media, description, properties and Click **Mint NFT**.
* Repeat these steps to mint as many NFTs as you'd like.
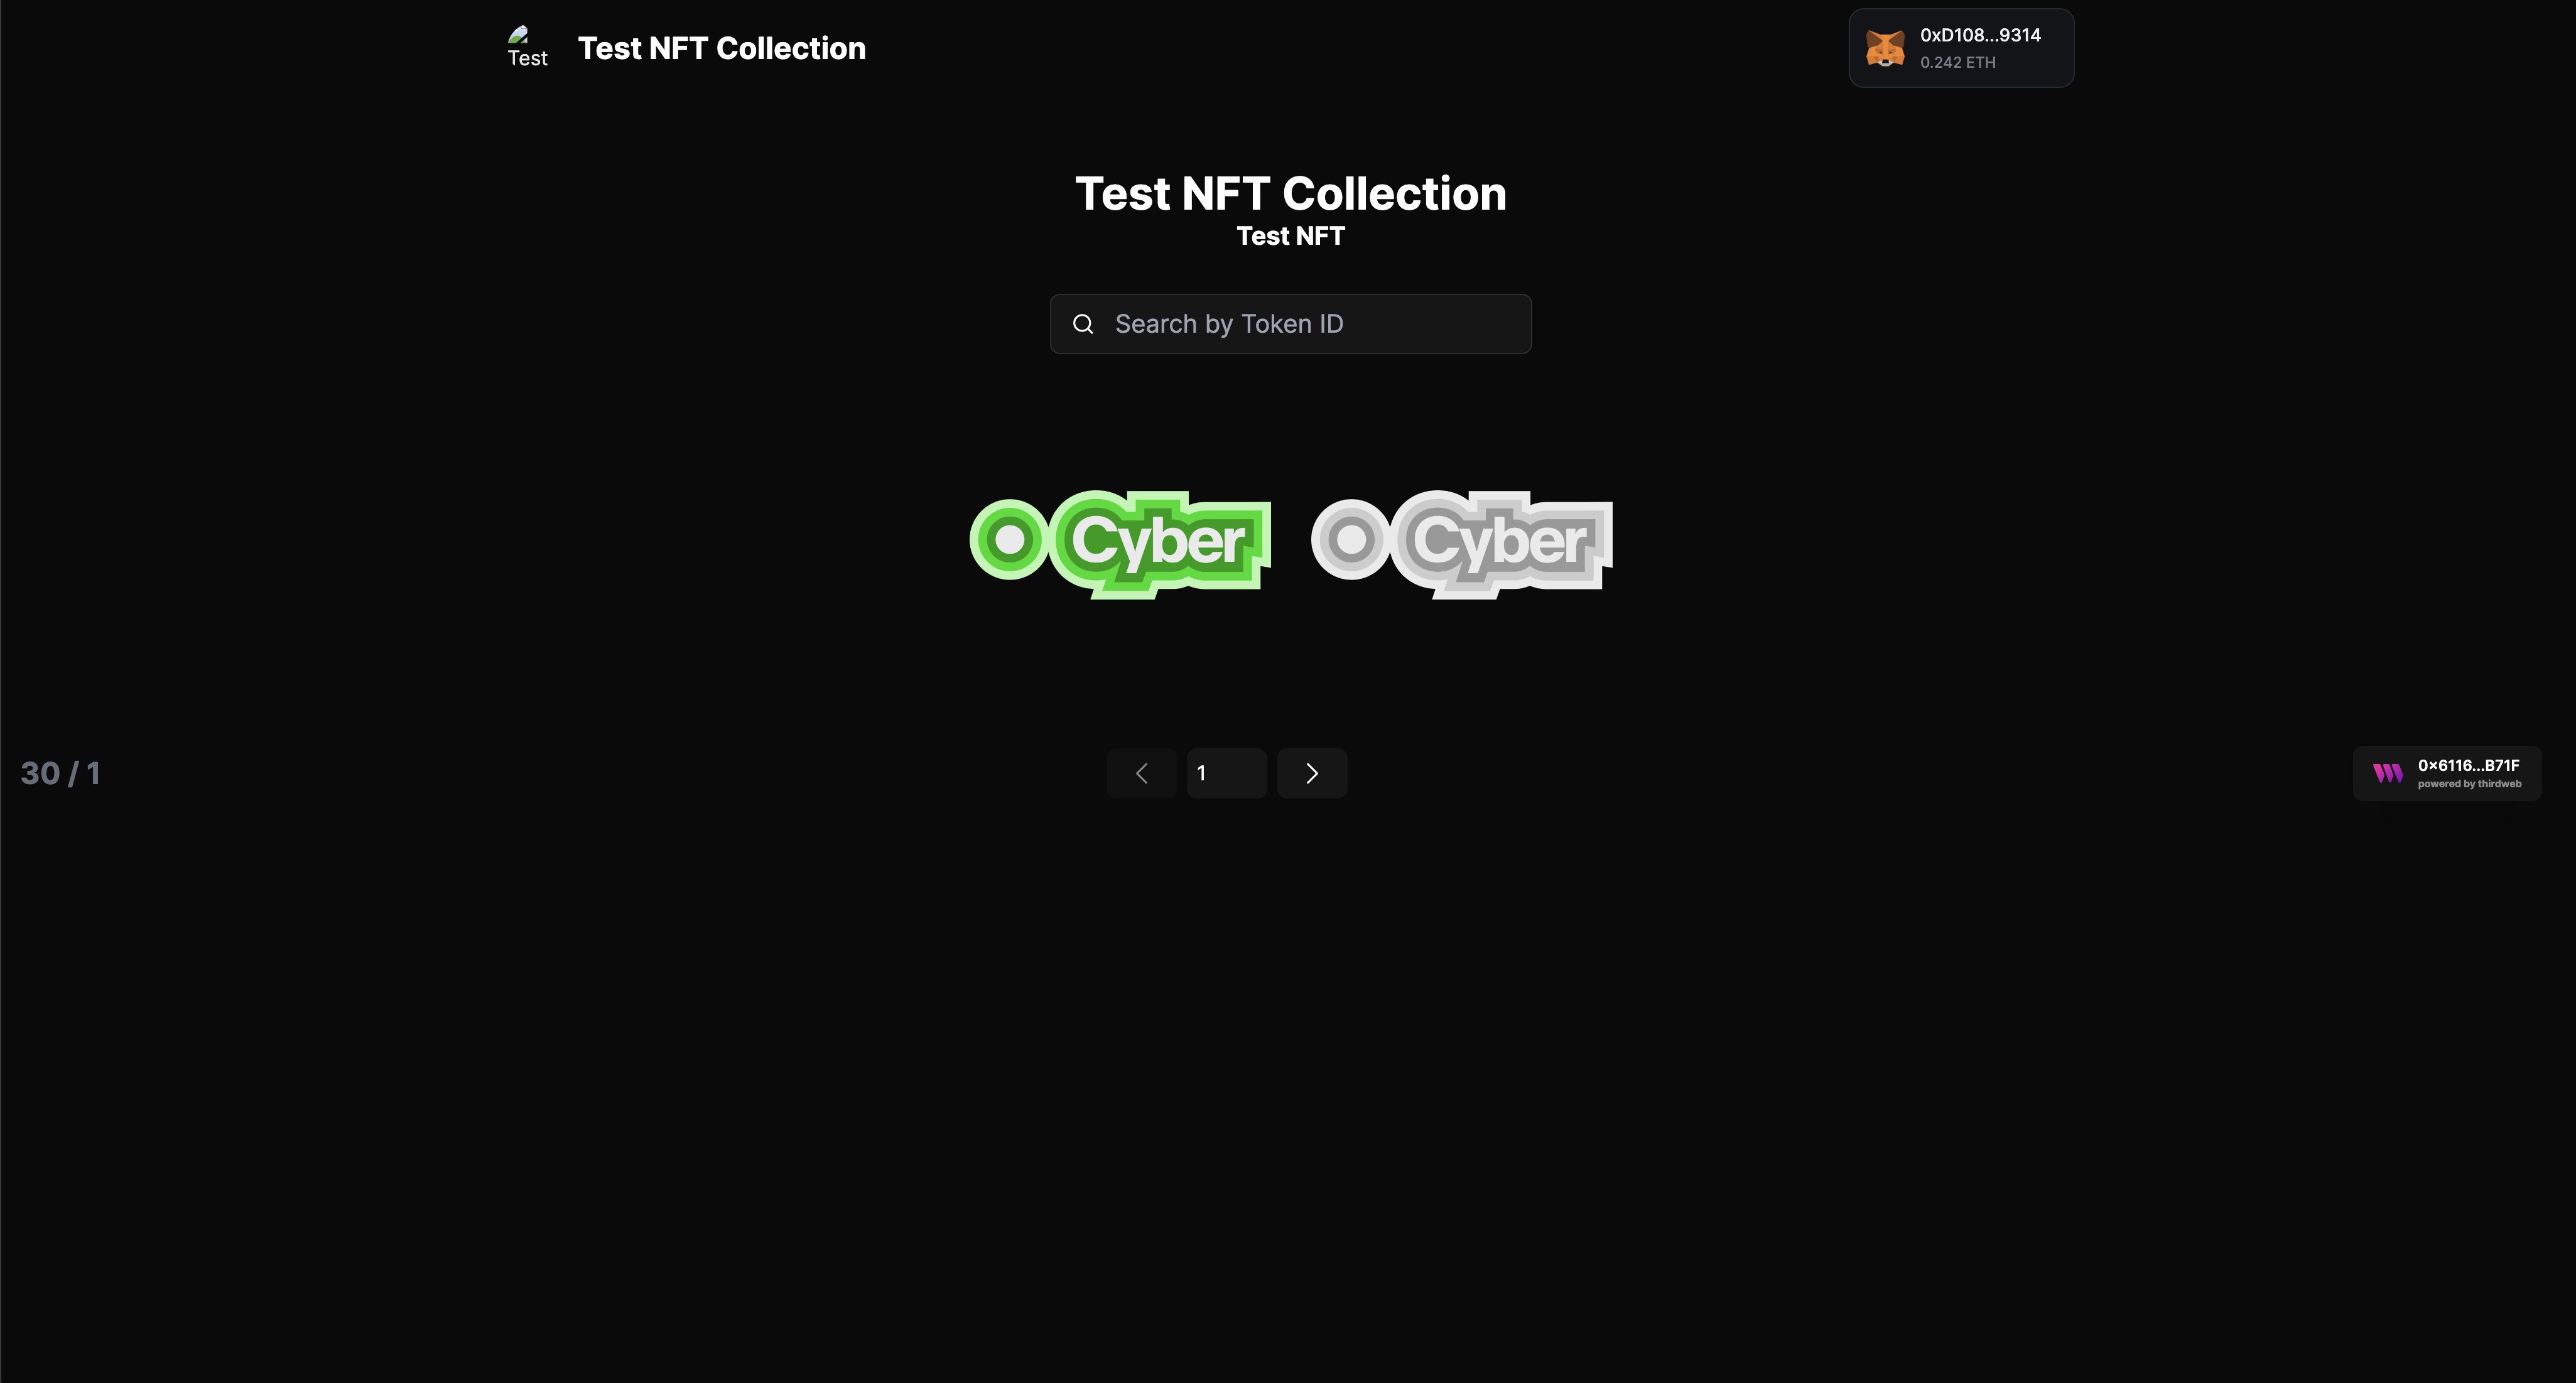
### Building an NFT Gallery App
Now that an NFT Collection is ready, it's time to build the NFT Gallery App. The [thirdweb CLI](https://portal.thirdweb.com/cli) provides various prebuilt templates for popular app use-cases, in this tutorial, we'll use the thirdweb CLI to generate a new app project using the [NFT Gallery template](https://github.com/thirdweb-example/nft-gallery).
* Run the following command in your terminal:
```bash
npx thirdweb create --template nft-gallery
```
After execution, you will have a project ready with pre-configured code.
By default, the template is configured for an NFT collection on the Ethereum Mainnet. We will modify the code to adapt our NFT collection on the Cyber Testnet.
* Navigate to `src/consts/parameters.ts` file.
* Update your Client ID from [thirdweb API dashboard](https://thirdweb.com/dashboard/settings/api-keys).
* Update the contractAddress variable to your NFT collection's contract address (found on the thirdweb dashboard).
* Change the chain name from ` { ethereum }` to ` { defineChain }`
* Update the chain variable to `defineChain(111557560)`.
The file should look like this:
```typescript
import { createThirdwebClient, getContract } from "thirdweb";
import { defineChain } from "thirdweb/chains";
/** Change these values to configure the application for your own use. **/
export const client = createThirdwebClient({
clientId: "ClientID",
});
export const nftContract = getContract({
// Your smart contract address (available on the thirdweb dashboard)
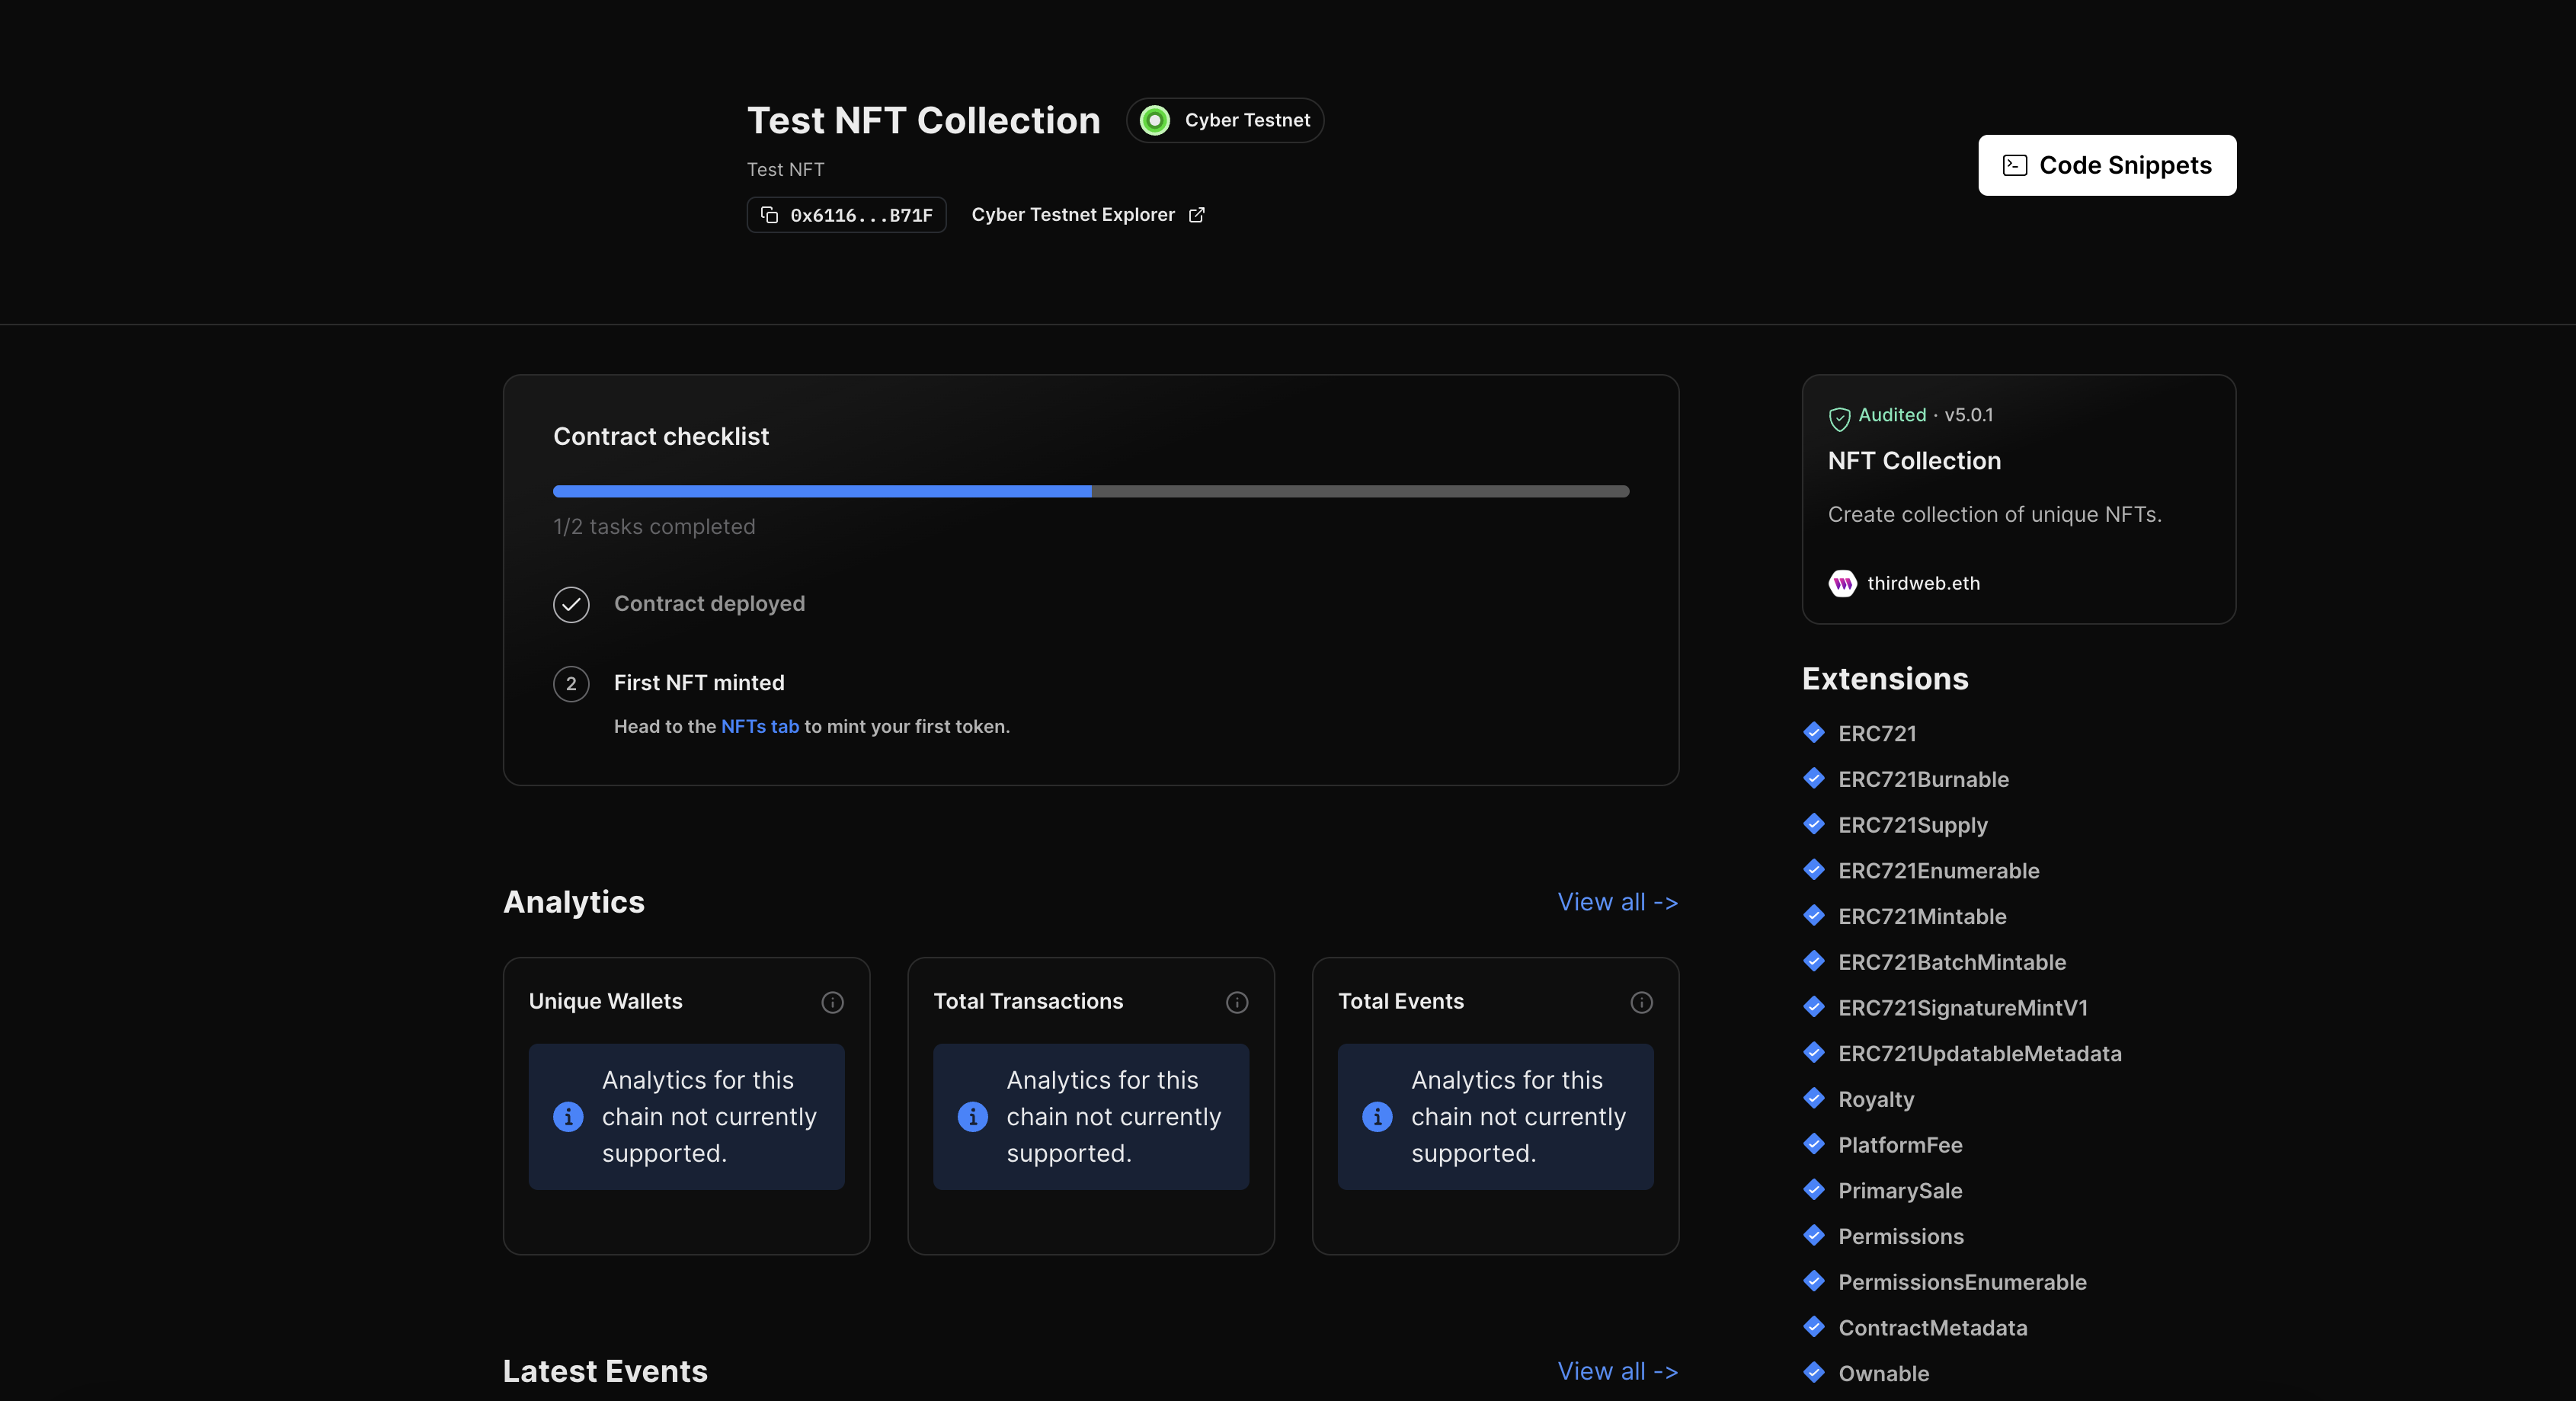
address: "0x61166E63C74b98e2C3aB73e47F1C8396ffAdB71F",
// The chain object of the chain your contract is deployed to.
// If that chain isn't in the default list of our SDK, use `defineChain` - for example: defineChain(666666)
chain: defineChain(111557560),
client,
});
```
### Running the Application
To start the application, run the following command from the root directory:
```bash
npm run dev
```
Navigate to the localhost address from the terminal to view the dAPP
### Conclusion
You've successfully deployed a dAPP on Cyber Testnet using thirdweb SDK. Continue to explore and leverage thirdweb's features to enhance your projects with Cyber and share your achievements within the developer community. If you face any issues, feel free to reach out to our engineers for [Support](/support.md).
## Bridging assets to Cyber Testnet
This guide provides instructions to bridge Ethereum from the Sepolia testnet to the Cyber testnet using the Cyber Testnet Bridge.
### Prerequisites
Before using the bridge, ensure you have:
1. MetaMask or Compatible Wallet: Installed and configured to connect to both Sepolia and Cyber networks.
2. Sepolia Testnet ETH: Sufficient balance to cover bridging costs and potential gas fees.
* To claim Sepolia ETH, you can use [QuickNode Faucet](https://faucet.quicknode.com/ethereum/sepolia) or [Alchemy Faucet](https://www.alchemy.com/faucets/ethereum-sepolia)
1. Cyber Testnet added to your wallet: Make sure you check out [Network Information](/network-info/overview) to receive assets on the cyber test network.
### How to Use the Bridge
Step 1: Visit the [Cyber Testnet Bridge](https://cyber-testnet.testnets.rollbridge.app/) and connect Your wallet.
* Click on "Connect Wallet" and select your wallet (e.g., MetaMask).
* Ensure your wallet is connected to the Sepolia Testnet.
Step 2: Initiate a Bridge Transaction
* Enter the amount of Sepolia Testnet ETH you wish to bridge to the Cyber Testnet.
* Double-check the recipient address on Cyber Testnet.
* Click "Approve" to authorize the bridge.
* Confirm the transaction in your wallet.
Step 3: Confirm Asset Arrival
* Once the transaction is confirmed on the Sepolia Testnet, the bridge will transfer the equivalent amount to your Cyber Testnet address.
* Switch your wallet network to Cyber Testnet.
* Check the balance to confirm that your assets have arrived.
## Connecting wallet to Cyber
Follow these steps to add the Cyber network to your MetaMask wallet:
1. **Open MetaMask**\
Make sure that MetaMask is installed in your browser and you are logged in.
2. **Access Settings**\
Click on the MetaMask extension icon and then click on your account icon in the top-right corner. From the dropdown menu, select **Settings**.
3. **Add Network**\
In the Settings menu, select **Networks** and then click **Add a network**.
4. **Enter Cyber Testnet or Mainnet Details**\
Fill in the following information:
| Name | Testnet | Mainnet |
| --------------- | ------------------------------------------------------------------------------ | -------------------------------------------------------------- |
| Network Name | Cyber Testnet | Cyber |
| RPC Endpoint | [https://cyber-testnet.alt.technology/](https://cyber-testnet.alt.technology/) | [https://cyber.alt.technology/](https://cyber.alt.technology/) |
| Chain ID | 111557560 | 7560 |
| Currency Symbol | ETH | ETH |
| Block Explorer | [https://testnet.cyberscan.co/](https://testnet.cyberscan.co/) | [https://cyberscan.co/](https://cyberscan.co/) |
💡 MetaMask's frequent queries often hit public RPC limits. Ensure faster, reliable dApp transactions with a [free private Cyber endpoint on QuickNode.](https://www.quicknode.com/chains/cyber?utm_source=cyber-docs)
5. **Save the Network**\
After filling in the details, click the **Save** button. You will now be connected to the Cyber network in MetaMask.
6. **Switch Network**\
To switch to the Cyber network, click on the network dropdown at the top of MetaMask and select **Cyber**.
7. **Adjust Gas Price**
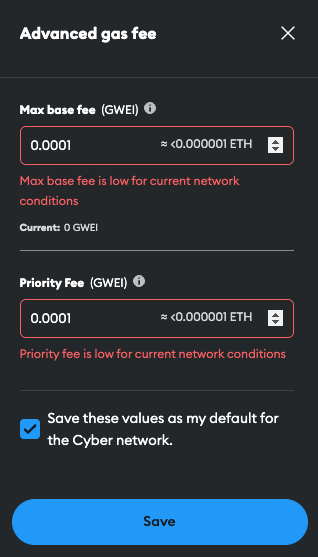
There is [a bug for MetaMask](https://github.com/MetaMask/metamask-extension/issues/24236) users that causes the gas price to be set too high. To avoid this, you can set the gas price manually by clicking on the **Estimated fee** button in the transaction confirmation window.
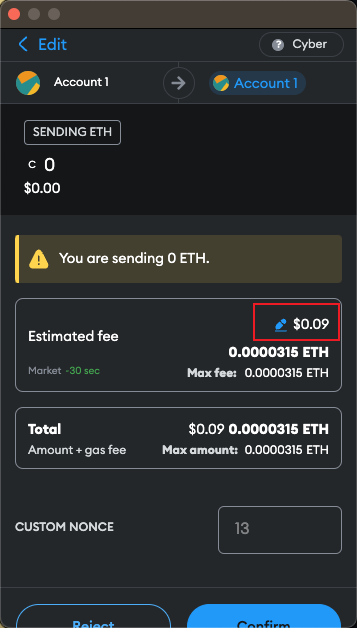
Click on the **Advanced** button

* Edit the **Max base fee** to a lower value, for example, `0.0001` GWEI.
* Edit the **Priority fee** to a lower value, for example, `0.0001` GWEI.
* Check the **Save values** checkbox.
* Click on the **Save** button.
You're now set up to interact with the Cyber via MetaMask!
## Deploy your first Smart Contract on Cyber Network
In this tutorial we will be learning how to deploy a simple smart contracts on Cyber Network using **Forge in Foundry**.
### Step 1: Pre-requisites
Before deploying your smart contract, ensure you have completed the following:
1. **Add Cyber Testnet to MetaMask**\
Follow the [Guide for adding the Cyber network](/get-started/connecting-wallet) to your MetaMask wallet.
2. **Bridging Assets to Cyber Testnet**\
Use the [Bridging assets to Cyber guide](/get-started/bridging-assets) to transfer assets from other networks to Cyber so you have funds available for deployment.
### Step 2: Install Foundry
* Linux or MacOS
```bash
curl -L https://foundry.paradigm.xyz | bash
foundryup
```
* Windows
```bash
curl --proto '=https' --tlsv1.2 -sSf https://sh.rustup.rs/ | sh
cargo install --git https://github.com/foundry-rs/foundry foundry-cli anvil --bins --locked
```
### Step 3: Create a project
```bash
forge init hello_foundry
```
* Foundry will create a new project directory with the name you specified. By default it will create a new project with a sample contract `Counter` and a sample test file.
```bash
cd hello_foundry
```
1. We can build the project with `forge build`
```bash
$ forge build
```
2. And run the tests with `forge test`
```bash
forge test
```
### Step 4: Deploying your Smart Contract
Deploying a contract with Forge is a simple process that can be done with a single command. However, it requires an RPC endpoint, a private key that has funds, and any arguments for the constructor of the contract.
To deploy the Counter.sol contract, use the command that corresponds to the Cyber chain's RPC URL while running the forge create command:
Testnet
```bash
forge create --rpc-url "https://cyber-testnet.alt.technology/" --private-key YOUR_PRIVATE_KEY src/Counter.sol:Counter
```
Mainnet
```bash
forge create --rpc-url "https://cyber.alt.technology/" --private-key YOUR_PRIVATE_KEY src/Counter.sol:Counter
```
### Step 5: Verify Your Smart Contract
After deployment, you can verify your smart contract on the Cyber Explorer by visiting [Cyber Testnet Explorer](https://testnet.cyberscan.co/) or [Cyber Mainnet Explorer](https://cyberscan.co/).
Search for your contract using its address and confirm that it has been successfully deployed.
**Congratulations on deploying your contract on our mainnet!**
### Step 6: Join Cyber builders ecosystem
Visit our [Ecosystem builder form](https://cyber.deform.cc/ecosystem-builder) and fill out all required fields. Provide the transaction hash of your **Mainnet** contract deployment as proof and submit the form.
### Step 7: Join Discord and receive NFT Airdrop
* Join our [Discord community](https://discord.com/invite/buildoncyber).
After verifying your **Mainnet** contract deployment and form submission, you will receive an NFT airdrop to the provided wallet address. Keep an eye on announcements in Discord for updates on the airdrop distribution process.
##### If you face any issues, feel free to reach out to our engineers for [Support](/support.md).
## Delegate Code of Conduct
#### Good Faith
Delegates should act at all times with honesty, integrity, and transparency.
#### Best Interest
Delegates should operate and vote in what they believe is in the best interests of the Cyber community.
#### Due Care and Attention
Delegates should conduct a professional and unbiased review of each proposal before casting their vote.
#### Communication
Delegates should ensure that the rationale behind each of their votes is communicated in a clear and accessible manner.
#### Professional Knowledge
Delegates should maintain a working knowledge of developments within Cyber and the broader cryptocurrency sector.
#### Conflicts of Interest
Delegates should avoid conflicts of interest where feasible and manage their impact when avoidance is not possible. Any conflicts should be disclosed in writing. Any offer of external compensation related to delegation or the Cyber community should be made public.
#### Availability
Delegates should be accessible to the community, within reason, to answer questions, respond to comments, and engage in discussions.
#### End of Delegation
Delegates should announce their intention to resign at least one month in advance to provide stakeholders using Cyber sufficient time to reallocate their assets to another delegate.
## Working Constitution of CyberDAO
*Note: This is a "Working" Constitution and is subject to change. The first version of the Working Constitution was ratified on August 24, 2024 by [vote from CyberDAO](https://gov.cyber.co/proposals/7021164072602929922775875300186847497427943811385239539386505941445523083641). It will evolve with the continuous contributions from the Cyber community, and future changes will be ratified through votes by the DAO.*
***
CyberDAO represents a diverse community of users, builders, token holders, and broader stakeholders engaged in the Cyber ecosystem. CyberDAO has been established to facilitate contributions from diverse stakeholders in governing the Cyber ecosystem.
This Working Constitution serves as a foundational guide for CyberDAO, describing the initial structures designed to decentralize governance within the Cyber Ecosystem. It establishes the initial governance framework for CyberDAO and and its legal wrapper, Cyber Foundation.
Recognizing the complexity and unpredictability of future challenges within the web3 space, CyberDAO’s Working Constitution is built with the flexibility to adapt and evolve. As a result, the Working Constitution is a framework intended to be revisited and potentially updated or replaced as the Cyber Ecosystem grows. All decisions to update CyberDAO's governance authority must be enacted by CyberDAO through the passage of a community governance vote, as described in the current CyberDAO Code and Procedures.
1. First and foremost, **this is a “Working Constitution”.** This Constitution describes the decision-making framework for CyberDAO governance. As a Working Constitution, this document is subject to change due to the dynamic nature of the industry and the decentralized structure inherent to DAOs. CyberDAO will experiment and evolve to maintain effective governance mechanisms and grow over time. The future direction and evolution of CyberDAO and the Cyber Ecosystem’s governance will be based on the decisions of the community enacted through CyberDAO.
2. **CYBER Stakers and Delegates will govern CyberDAO to advance the ecosystem’s best interests**. CyberDAO must balance short-term goals with the longer-term goals of the community and its members. Different stakeholders may have conflicting goals, so CyberDAO members should implement changes that are best for the overall community and keep Cyber L2 and the broader ecosystem competitive in the dynamic web3 space. CyberDAO will implement governance mechanisms that facilitate participation from the greatest number of community members while maintaining systems that minimize the governance burden on individual community members.
3. **The Cyber Foundation will be a steward of the CyberDAO and act on its behalf.** The Cyber Foundation is a Cayman Islands foundation company. It operates to support CyberDAO as a formal legal entity, facilitating the administration of CyberDAO’s collective governance. The Cyber Foundation also stewards the early evolution of DAO governance. The Foundation will not provide these administrative services indefinitely; its ultimate aim is to coordinate contributors in creating the technical and governance foundations that allow the Cyber Foundation to decentralize its role over time. Some of the administrative tasks the Cyber Foundation may engage in on behalf of the DAO include, but are not limited to:
* Entering into contracts with third parties on behalf of the DAO, such as with service providers,
* Helping develop frameworks, such as the Working Constitution and the Operating Manual, to facilitate participation,
* Other actions that are required for its stewardship role.
4. **Specialized Councils.** Councils are unique and important structures within CyberDAO governance, consisting of representatives who manage resources or make decisions on behalf of token holders and the community at large. They are comprised of elected representatives who fulfill roles otherwise filled by the Foundation or other centralized actors and therefore play a critical role in the decentralization of the DAO.
5. **Rights of CyberDAO Members**. It is intended that CYBER stakers have authority over Cyber, the L2 for social, and CyberConnect Social Graph, as well as the associated underlying protocols. CyberDAO members are CYBER stakers. Stakers have the ability to directly influence the ecosystem's future by submitting and voting on proposals through staked tokens (currently with cCYBER, with stCYBER voting support planned for the future). Through these staked tokens, CYBER stakers are able to submit, deliberate, and vote on governance proposals.
6. **Amendments to the Constitution by Majority Vote.** This is a working constitution and will evolve continuously based on contributions from the Cyber Community. The current Working Constitution, after ratification through a vote, will remain in effect until changed, with a mandatory review every year after publishing.
## The Cyber Foundation
The Cyber Foundation is a foundation company based in the Cayman Islands, established to support the formation of CyberDAO.
In alignment with CyberDAO’s Working Constitution, the Foundation is committed to:
* Providing the DAO with a formal legal structure.
* Guiding the initial development of DAO governance.
### Supporting the DAO through a formal legal entity
As an established entity (a Cayman foundation company), the Cyber Foundation serves as an established entity that can enter into legally binding agreements with third parties in the "real" world, operating under limited liability. This allows the Foundation to:
* Enter into contracts with service providers and other third parties.
* Handle necessary governmental reports and filings.
### Stewarding the early evolution of Collective self-governance
In its stewardship role, the Cyber Foundation currently facilitates a number of administrative aspects of Collective governance. For instance, it:
* Monitors and moderates governance proposal processes.
* Implements approved governance proposals.
* Helps develop frameworks, such as the Working Constitution and the Operating Manual, to facilitate participation.
The Foundation will not provide these administrative services indefinitely; its ultimate aim is to coordinate contributors into creating the technical and governance foundations that allow the Foundation to decentralize its role over time.
## Delegate Expectations
As a delegate in the Cyber community, you play a crucial role in shaping the future of our ecosystem. Your participation drives our mission forward, fostering a transparent, effective, and community-led governance process.
By accepting the role of a delegate, you agree to adhere to the following expectations and standards:
* **Initiative and Innovation**: Bring forward new ideas and proposals ranging from ecosystem growth to protocol improvements, community engagement, and strategic partnership initiatives.
* **Governance Engagement**: Stay informed about all key governance activities and changes within the protocol to participate effectively in discussions and decision-making processes.
* **Transparency in Decision-Making**: Publish your rationale for governance votes, providing the community with insights into your decision-making process.
* **Dedicated Service Commitment**: Commit to serving as a delegate for at least 6 months, ensuring continuity and reliability in governance participation.
### Detailed Responsibilities and Commitments
* Commitment to Governance
* Active Participation: Consistently engage in governance discussions and voting to ensure informed and effective decision-making.
* Informed Decision-Making: Base your voting decisions on thorough research and understanding of the proposals, considering their long-term impact on the protocol.
* Ethical Standards and Integrity
* Transparency: Openly disclose any potential conflicts of interest related to governance proposals to maintain the trust and integrity of the process.
* Independence: Ensure your decisions are made independently and reflect the best interests of the protocol and its community.
* Community Engagement and Communication
* Respectful Communication: Maintain professionalism and respect in all interactions, promoting a supportive and inclusive environment.
* Constructive Feedback: Provide constructive feedback on proposals and participate positively in the evolution of our ecosystem.
* Accountability and Responsibility
* Responsiveness: Remain responsive to outreach from the community and protocol team, participating actively in the governance process.
* Reporting: Regularly communicate your governance activities and decisions to the community through public forums or dedicated channels.
* Long-Term Alignment and Participation
* Alignment with Community Vision: Align your governance activities with the community’s long-term goals, focusing on sustainability and strategic growth.
As a delegate, your leadership, commitment, and active participation are crucial to our success. You are not only a decision-maker but also a steward of our protocol’s future, embodying the principles and values that drive our community forward.
### Delegate Best Practices
Before deciding to become a delegate, it's crucial to understand the responsibilities and expectations associated with the role. Review the following guidelines to ensure that you are fully prepared to serve as a delegate for the Cyber community:
1. **Understand the Responsibilities**: Delegates are expected to actively participate in the decision-making process and to act in the best interests of the network. Familiarize yourself with the Cyber community guidelines and governance documents.
2. **Review Key Documents**: Ensure you have read Cyber’s goals and visions around the future of the decentralized social and internet, such that you’re both aligned and excited by it! These documents will include the constitution, the docs, the community vision, and the governance roadmap laid out by the Foundation and community that is core to the mission of Cyber.
3. **Create your Delegate Statement**: Create a delegate profile to outline your qualifications, experience, and vision for the Cyber. Your profile will be displayed on [`gov.cyber.co`](https://gov.cyber.co/) and will allow community members to delegate their voting power to you.
4. **Prepared to Engage Openly and Continuously**: Becoming an active and engaged delegate requires a time commitment as well. You should expect to stay abreast of all the Cyber developments and community changes over time and help guide the community toward its future vision as the ecosystem evolves.
5. **Seek Support and Clarification**: If you have any questions or need further clarification on your role or responsibilities, do not hesitate to visit the Cyber governance forum (forum.cyber.co) or join us on Discord to ask!
We’re excited to build Cyber alongside you!
## What is a Delegate?
Participation in CyberDAO governance may require a significant time commitment. For this reason, members may delegate the voting power of their staked CYBER tokens to a community member who has volunteered to actively participate in governance. A **delegate** is such a volunteer and a member of the Cyber community who has been elected to represent other token holders and make governance decisions on their behalf. Delegates are elected by token holders granting them their voting power. Only delegates can participate in voting.
If you prefer not to delegate your voting power to another representative, you must still *delegate to yourself* to be able to participate in voting on proposals.
As a delegate, you must follow the [CyberDAO Constitution](/governance/constitution) and [Delegate Code of Conduct](/governance/code-of-conduct), be familiar with [Delegate Expectations](/governance/delegate-expectation), and act in the best interest of the token holders you represent.
### Participate in Delegation
Learn more about the delegates of CyberDAO, delegate your voting power, and explore becoming a delegate by creating your delegate statement on the [Cyber Governance Hub](http://gov.cyber.co/) on Agora.
## Cyber Ecosystem Grants
The [Cyber Ecosystem Grants](https://app.charmverse.io/cyber-ecosystem-grants/) program has been set up with a dedicated $2M in CYBER tokens to support builders in developing a vibrant ecosystem and fostering more social and engaging experiences within web3.
This program is managed by an initial Grants Council consisting of five members and a program manager from [CharmVerse](https://charmverse.io/). All grant proposals will follow a separate process different than those described above.
Specialized councils, composed of high-context delegates, are formed to streamline processes and make informed judgments. The first council established was the [Grants Council](https://app.charmverse.io/cyber-ecosystem-grants/) which aims to accelerate the ecosystem's growth and attract high-quality builders.
To learn more about the Ecosystem Grants and its round history, visit the [Ecosystem Grants Program HQ on Charmverse](https://app.charmverse.io/cyber-ecosystem-grants/).
## Processes & Governance Procedures
This document presents the proposed governance structure and code for CyberDAO in accordance with the proposed Working Constitution. It outlines rules and procedures, some of which are enforced directly by smart contracts on a blockchain, while others are not. Regardless, all rules are equally binding.
The actions governed by this document are in accordance with CyberDAO's Working Constitution. They encompass both on-chain and off-chain activities. On-chain actions are executed directly through the governance smart contracts of the DAO as transactions on a blockchain. Off-chain actions are carried out through other means.
Beyond rules and mandatory procedures, this document also includes "recommended guidelines." These guidelines are non-binding but strongly encouraged as best practices for good governance.
This document also describes the processes for the constitution’s amendment and establishes the processes for the governance framework for CyberDAO and the Cyber Foundation.
### Section 1: CyberDAO and the Constitution
CyberDAO represents a diverse community of users, builders, token holders, and broader stakeholders engaged in the Cyber ecosystem. At its core, CyberDAO operates as a community-driven governance mechanism, empowering participants to propose and vote on changes to both the organization and the technologies it manages. See the [Working Constitution](/governance/constitution).
Cyber is a Layer 2 blockchain designed specifically for social applications. Built on the Optimism Superchain, Cyber facilitates the creation of onchain apps that enrich social connections, strengthen community, and foster collaboration. By combining high-performance infrastructure with custom tooling, Cyber streamlines workflows and accelerates developers' time to market.
This document describes the decision-making framework for CyberDAO governance. The procedures in this document are subject to change based on the outcome of CyberDAO proposals.
### Section 2: DAO Proposals and Voting Process
It is intended that CYBER stakers have authority over Cyber, the L2 for social, and CyberConnect Social Graph, as well as the associated underlying protocols.
As such, CYBER stakers are responsible for submitting, deliberating, and voting on governance proposals. Stakers have the ability to directly influence the ecosystem's future by submitting and voting on proposals through staked tokens such as cCYBER and stCYBER. To participate in governance activities, CYBER holders must stake their CYBER and hold either cCYBER or stCYBER. In phase 1 of governance (summer 2024), voting participation has been enabled for cCYBER holders. In phase 2 of governance, Cyber will further decentralize governance and enable CyberDAO participation for holders of all staked CYBER tokens (including both cCYBER and stCYBER).
#### Governance Tools
1. **Cyber Forum powered by Discourse ([forum.cyber.co](http://forum.cyber.co)):**
This Forum is used for governance-related discussions. Community members must register for an account before sharing or engaging with posts.
2. **Cyber Governance Portal powered by Agora ([gov.cyber.co](http://gov.cyber.co)):**
Agora is a delegation and voting interface used for delegating voting power, as well as creating and voting on proposals.
#### Types of proposals
In general, there are three main types of non-grant governance proposals DAO members can submit:
1. **Executable Proposal:**
These proposals involve a series of smart contract operations to be executed by accounts controlled by the DAO, such as token transfers and arbitrary smart contract calls. Examples include allocating funds to a workstream multi-sig wallet or upgrading a contract. To maintain the security of the protocol, the proposed code must be audited by a reputable third-party auditor and reviewed by the Security Council, which may be established in the future.
2. **Social Proposal:**
This proposal type seeks consensus among DAO members on issues that cannot be implemented or enforced via on-chain mechanisms. For instance, making changes to the members of the grants council.
3. **Constitutional Amendment:**
This is a special kind of social proposal that requests the DAO amend its constitution. The draft proposal should clearly state the specific changes proposed to the constitution.
Specifically, all non-grant governance proposals must be about the following topics:
1. **Community Treasury**
2. **Protocol Upgrades**
3. **Council Member Designation and Removal**
4. **Ratification of Governance Documents**
All grant proposals will follow a separate process different than those described below.
#### Delegates
Participation in CyberDAO governance may require a significant time commitment. For this reason, members may delegate the voting power of their staked CYBER tokens to a community member who has volunteered to actively participate in governance. These volunteers are known as delegates. If you prefer not to delegate your voting power to another representative, you must still *delegate to yourself* to be able to participate in voting on proposals.
**Voting Process**
All governance proposals go through a two-stage cycle.
* **Stage 1: Feedback and Review & Voting Delay**
The proposer initiates a new proposal by submitting a discussion thread in the appropriate category on the forum. The proposal must use one of the standard proposal templates specific to the proposal category. Anyone in the Cyber community is invited to review and comment on it. Proposal authors are expected to be responsive to delegate and Citizen feedback. The feedback and review period lasts for 12 days.\
\
In order to progress to the next stage, 2 of the top 30 delegates (by voting power) must explicitly endorse the proposal on the forum as "ready for voting" by the end of the feedback and review period. This endorsement moves the proposal forward to the voting stage using one of the standard proposal templates in the Cyber Proposal Section hosted on Agora. Proposals initiated by the Foundation do not require delegate endorsements to proceed beyond stage 1, but will still be voted on in stage 2.\
\
*Note that delegates cannot approve their own proposals. Approval by a token holder to advance a proposal to voting simply indicates readiness for a vote, not endorsement of the proposal content.*\
\
If a proposal author does not get explicit approval or wants more time for feedback, they should continue to seek feedback from the community and submit an updated proposal in the next voting cycle.\
\
The 12-day feedback and review period is followed by a 2-day voting delay, during which when people participants can still delegate votes, and acquire new cCYBER tokens before the snapshot occurs.\
\
At the end of the voting delay period, a "snapshot" is taken that captures the voting power of each delegate. This voting power will not change until after the voting period that follows.
* **Stage 2: Voting**
After discussion, the voting delay, and a snapshot,\*\* all delegates are invited to vote on proposals during the *Voting Period*.\
\
The proposal is approved if it satisfies the following minimum vote thresholds:
1. **Quorum**: This is the minimum number of total votes that must be cast on a proposal. Quorum is calculated as a percentage of the total votable supply of tokens at the start of the voting period. The votable supply consists of cCYBER and stCYBER delegated to delegates. *Votable supply = cCYBER & stCYBER delegated to delegates.*
2. **Approval Threshold**: The minimum percentage of affirmative votes required for a proposal to pass. It is calculated as a percentage of 'yes' votes relative to the total number of 'yes' and 'no' votes cast, excluding abstentions.\
The different requirements for submission and approval of each Proposal Type are summarized below. Additional proposal types may be added in future Seasons.\
\
\| Proposal Type | Quorum | Approval Threshold |
\| --- | --- | --- |
\| Community Treasury | 30% | 51% |
\| Protocol Upgrade | 30% | 76% |
\| Council | 30% | 51% |
\| Constitutional Ratification & Amendments | 30% | 67% |
* **Stage 3: Timelock**\
The 3-day timelock period is meant to allow the Security Council (which will be established in the future) to act as the last line of defense against malicious proposals that are against the Constitution or harmful to the DAO. It is the final period where the Security Council can block proposals from executing.
### Section 3: Specialized Councils
Councils are unique and important structures within CyberDAO governance, consisting of representatives who manage resources or make decisions on behalf of token holders and the community at large. They are comprised of elected representatives who fulfill roles otherwise filled by the Foundation or other centralized actors and therefore play a critical role in the decentralization of the DAO.
Specialized councils, composed of high-context delegates, are formed to streamline processes and make informed judgments. The first council established was the [Grants Council](https://app.charmverse.io/cyber-ecosystem-grants/) which aims to accelerate the ecosystem's growth and attract high-quality builders. The [Cyber Ecosystem Grants](https://app.charmverse.io/cyber-ecosystem-grants/) program has been set up with a dedicated $2M in CYBER tokens to support builders in developing a vibrant ecosystem and fostering more social and engaging experiences within web3. This program is managed by an initial Grants Council consisting of five members and a program manager from [CharmVerse](https://charmverse.io/). All grant proposals will follow a separate process different than those described above.
The council election process *for all councils* includes an open nomination phase, an evaluation phase by the existing council and foundation, and a final voting phase to confirm selections. The initial Grants Council was elected through open nominations and foundation evaluations and is already operational. Any subsequent changes to the council, such as member retirements or additions, will undergo the complete election process and be subject to voting.
CyberDAO will later explore electing a Security Council to advance towards more decentralized governance.
### Section 4: Amendments to the Constitution by Majority Vote
This is a version of the governance processes and procedures for CyberDAO. Both this document and the Working Constitution will evolve continuously. The current Working Constitution, after ratification through a vote, will remain in effect until changed, with a mandatory review every year after publishing. Any proposed amendments to the constitution require a two-thirds majority vote with a minimum of 30% token participation (quorum) to be passed.
## Contract Addresses
| Contract | Address |
| --------------------------------- | ------------------------------------------ |
| AddressManager | 0x19b5804B88F10262A55ac731f28A3BbC4209853a |
| DataAvailabilityChallenge | 0x0d93eAA86eb6948b977857750A5512Bef6B05C51 |
| DataAvailabilityChallengeProxy | 0x10E34EfE14E4D270C0f77Bf1aF01b6C832161B49 |
| WETH | 0x4200000000000000000000000000000000000006 |
| DelayedWETH | 0x6dAf222AD565522Bfc1D9Ef3cc78751f6c007e6d |
| DelayedWETHProxy | 0x588dAd44201885ff23068f1142e303D52d103919 |
| DisputeGameFactory | 0xB79cF113e524043B3eF9bf7861a05900BB3649a3 |
| DisputeGameFactoryProxy | 0xbF4676f21a7889E0Fd61BcDc9b98E60b01C1B36F |
| L1CrossDomainMessenger | 0x849d0821B1D313b65f6FF152176F4b6a0AF7aa56 |
| L1CrossDomainMessengerProxy | 0x3c01ebF22e9c111528c1E027D68944eDaB08Dfc9 |
| L1ERC721Bridge | 0x1234c7a75f40551Fce5aFf1d58efD72F2ee2AFB1 |
| L1ERC721BridgeProxy | 0x4F4B716627D2Ba0439327Ce8B563b4443aF47Dbd |
| L1StandardBridge | 0x01b46e02fcE5FC0731076711aFFe73bEeCD87997 |
| L1StandardBridgeProxy | 0x12a580c05466eefb2c467C6b115844cDaF55B255 |
| L2OutputOracle | 0x93E1c0D8ef27930130fb809CE18ca681A8C32F85 |
| L2OutputOracleProxy | 0xa669A743b065828682eE16109273F5CFeF5e676d |
| Mips | 0x0048defcA9F0Da952CFD1Ae9F8e962937d3E4143 |
| OptimismMintableERC20Factory | 0x985F187489954435ddf9571D45500184566e4B46 |
| OptimismMintableERC20FactoryProxy | 0x51A00470Eb50D758EcFF3B96DB0bF4A8e86268F4 |
| OptimismPortal | 0xACfD93B4887cef4F05cF3440d150D2cE97339142 |
| OptimismPortal2 | 0x544DbFE87c3C308502371468b23386A9486c9680 |
| OptimismPortalProxy | 0x1d59bc9fcE6B8E2B1bf86D4777289FFd83D24C99 |
| PreimageOracle | 0x0747ef2570e3dbF65F0a12B371F19ca4a66a8DdE |
| ProtocolVersions | 0xc2E2D8150ae64367CADC3D47e98253E54B5458C7 |
| ProtocolVersionsProxy | 0xA1780B58a75816f69aC34D606486D98824D41a73 |
| ProxyAdmin | 0x7E54107731EC43e78DA678DFa5fB6222Ad036e03 |
| SafeProxyFactory | 0xa6B71E26C5e0845f74c812102Ca7114b6a896AB2 |
| SafeSingleton | 0xd9Db270c1B5E3Bd161E8c8503c55cEABeE709552 |
| SuperchainConfig | 0x579f8dFDAF8F180050C67B5D41342d686F2b28a6 |
| SuperchainConfigProxy | 0x1aeC4c3BE47C30d0BEfa7514Cf9D99EaC596959D |
| SystemConfig | 0x726C6ac8A53061e56AfB2c890545348ba6f0DF0E |
| SystemConfigProxy | 0x5D1F4bbaF6D484fA9D5D9705f92dE6063bff6055 |
| SystemOwnerSafe | 0xc2259E7Fb719411f97aBdCdf449f6Ba3B9D75398 |
| USDT | 0x6F6238c8eaea56F54Df418823585d61FDD7DE5Da |
| USDC | 0x81759AdbF5520aD94da10991DfA29Ff147d3337b |
## Network Information
| Name | Testnet | Mainnet |
| --------------- | ------------------------------------------------------------------------------ | -------------------------------------------------------------- |
| Network Name | Cyber Testnet | Cyber |
| RPC Endpoint | [https://cyber-testnet.alt.technology/](https://cyber-testnet.alt.technology/) | [https://cyber.alt.technology/](https://cyber.alt.technology/) |
| Chain ID | 111557560 | 7560 |
| Currency Symbol | ETH | ETH |
| Block Explorer | [https://testnet.cyberscan.co/](https://testnet.cyberscan.co/) | [https://cyberscan.co/](https://cyberscan.co/) |
### All Public RPC Endpoints
* [https://rpc.cyber.co](https://rpc.cyber.co/)
* [https://cyber.alt.technology](https://cyber.alt.technology/)
* [https://7560.rpc.thirdweb.com](https://7560.rpc.thirdweb.com/)
* wss\://rpc.cyber.co
* wss\://cyber-ws.alt.technology
💡 While public endpoints are an excellent starting point, they often come with rate limits to ensure fair usage for all users. As your project grows, overcome these limitations and scale your application effectively by signing up for a [free private Cyber endpoint on QuickNode.](https://www.quicknode.com/chains/cyber?utm_source=cyber-docs)
## Contract Addresses
| Contract | Address |
| --------------------------------- | ------------------------------------------ |
| AddressManager | 0x4E9874640d6a670B7F4c7A1370bC303Bb46F360f |
| DisputeGameFactory | 0xCe49D452f0E6369930691d1003db7b40720E4917 |
| DisputeGameFactoryProxy | 0x99f0f9B0E7B16B10042E0935CE34F2fCebBE13C1 |
| L1CrossDomainMessenger | 0x02F763ED63f63312A6AE61ca202c7184853ed2C1 |
| L1CrossDomainMessengerProxy | 0xB88ee11d822bEc8055f19711458dE8593E7117A3 |
| L1ERC721Bridge | 0x2cE2bD2F415DFfA29DB6284FF70Aa360F58cE30a |
| L1ERC721BridgeProxy | 0x524e85D2B49497561c53EFEB4B126Aa63883B480 |
| L1StandardBridge | 0xcfCFf15ebA03eb77CD28caDFcB3853AC09bDa6d4 |
| L1StandardBridgeProxy | 0xAA1bD6D4d8cFD37330a917bc678CB38BEFAf44E6 |
| L2OutputOracle | 0x6fecfB9B2373CAd385ba497ae46cD9C967C9B5E1 |
| L2OutputOracleProxy | 0xD94Ce9E4886A6dcEbC7cF993f4b38F5276516643 |
| Mips | 0xD0E6c40D8462466633BAa2d24796d788A08b2e9F |
| OptimismMintableERC20Factory | 0x0D05A1f2FB62822Cc1c715Cb96518F8e4F6b4866 |
| OptimismMintableERC20FactoryProxy | 0xCfc893490072F14F19ed6dF2b0d985f908ACEE50 |
| OptimismPortal | 0x0D50F407121B1ec5D0E6d1c1f60F8B070AaA574D |
| OptimismPortalProxy | 0x06C9Cadb0346c8E142fb8299cEF3EB5120d4c9b6 |
| PreimageOracle | 0xceF1e04Fd7413C4a7287DF9099Ac57EEd48fB8f2 |
| ProtocolVersions | 0x181A4f94B8fdeA6D4B8Afb300C766ebC5EDe5905 |
| ProtocolVersionsProxy | 0x920fc6F9d56f8CC3A70D159A9F42899487bdB363 |
| ProxyAdmin | 0x6FcE62e16720BE713e77C954d6f1e6bC8B8d9F48 |
| SafeProxyFactory | 0xa6B71E26C5e0845f74c812102Ca7114b6a896AB2 |
| SafeSingleton | 0xd9Db270c1B5E3Bd161E8c8503c55cEABeE709552 |
| SuperchainConfig | 0x235A2c1DCa4dEf6e2daad832606a6166DEE8D2F1 |
| SuperchainConfigProxy | 0x3BB614Da92A136Aa14912713F713b3Fa6d6176fE |
| SystemConfig | 0x59D9B22bf650f443A12bfDfaf24c97Ab929456ab |
| SystemConfigProxy | 0x43b838Aa237B27c4fC953E591594CEBb1CA2817F |
| SystemOwnerSafe | 0x642A102cD63f039930f99b4657f41Fd4AD7699d6 |
| WETH | 0x4200000000000000000000000000000000000006 |
## Alchemy Account Kit
[Alchemy Account kit](https://www.alchemy.com/account-kit) is a complete solution for account abstraction. Using Account Kit, you can create a smart contract wallet for every user that leverages account abstraction to simplify every step of your app's onboaring experience. It also offers Gas Manager and Bundler APIs for sponsoring gas and batching transactions.
## Particle Network Wallet-as-a-Service
Particle Network's Wallet-as-a-Service integrates decentralized wallet functionality with social logins into web applications. With minimal setup, developers can leverage Particle's powerful SDKs to enable 2-click onboarding into smart accounts through social logins and leverage Account Abstraction features.
### Particle Connect Quickstart Guide
**Particle Connect** combines Social and Web3 logins with built-in Account Abstraction support, all within a single SDK. This approach allows you to simplify user onboarding while directly incorporating AA features into your dApp.
Integrate **Particle Connect** with **Account Abstraction** into your Next.js application in minutes by following these steps:
#### Installation
Scaffold a Particle Connect boiler plate using the `create-connectkit` CLI:
```bash
npm init @particle-network/connectkit@latest
# or
pnpm create @particle-network/connectkit@latest
# or
yarn create @particle-network/connectkit
```
The CLI will guide you through a setup process; it will prompt you to enter a project name, choose your preferred framework (Next.js or React), and select additional options.
```bash
🤩 Welcome to Particle Network!
✔ What is the name of your project? … connectkit-aa-usage
✔ What is the template of your project? › create-next-app
✔ Which chains does your app support? › EVM
✔ Which ERC-4337 Contract does your app support? › CYBERCONNECT-1.0.0
✔ Does it support an embedded wallet? … yes
```
The CLI will inizialize a fully configured project.
#### Configuration
Configure Particle Connect in your application using the `src/connectkit.tsx` component. Obtain your `projectId`, `clientKey`, and `appId` from the [Particle Dashboard](https://dashboard.particle.network/), and add them to the `.env.sample` file coming with the boilerplate project.
The `ConnectKitProvider` component manages the setup for Particle Connect. A recommended approach is to create a separate `connectkit.tsx` file in the `src` directory, where you can configure and export a component to wrap your application with, the project scaffolded by the CLI is already set up this way.
After setting it up, use the exported component to wrap your main `App` component, ensuring that authentication is accessible across your entire application.
Below is an example of configuring `ConnectKitProvider` and exporting the `ParticleConnectkit` component.
```jsx
"use client";
import React from "react";
import { ConnectKitProvider, createConfig } from "@particle-network/connectkit";
import { authWalletConnectors } from "@particle-network/connectkit/auth";
import type { Chain } from "@particle-network/connectkit/chains";
// embedded wallet start
import { EntryPosition, wallet } from "@particle-network/connectkit/wallet";
// embedded wallet end
// aa start
import { aa } from "@particle-network/connectkit/aa";
// aa end
// evm start
import { cyberTestnet, cyber } from "@particle-network/connectkit/chains";
import { evmWalletConnectors } from "@particle-network/connectkit/evm";
// evm end
const projectId = process.env.NEXT_PUBLIC_PROJECT_ID as string;
const clientKey = process.env.NEXT_PUBLIC_CLIENT_KEY as string;
const appId = process.env.NEXT_PUBLIC_APP_ID as string;
const walletConnectProjectId = process.env
.NEXT_PUBLIC_WALLETCONNECT_PROJECT_ID as string;
if (!projectId || !clientKey || !appId) {
throw new Error("Please configure the Particle project in .env first!");
}
const supportChains: Chain[] = [];
// evm start
supportChains.push(cyberTestnet, cyber);
// evm end
const config = createConfig({
projectId,
clientKey,
appId,
appearance: {
recommendedWallets: [
{ walletId: "metaMask", label: "Recommended" },
{ walletId: "coinbaseWallet", label: "Popular" },
],
language: "en-US",
},
walletConnectors: [
authWalletConnectors(),
// evm start
evmWalletConnectors({
// TODO: replace it with your app metadata.
metadata: {
name: "Connectkit Demo",
icon:
typeof window !== "undefined"
? `${window.location.origin}/favicon.ico`
: "",
description: "Particle Connectkit Next.js Scaffold.",
url: typeof window !== "undefined" ? window.location.origin : "",
},
walletConnectProjectId: walletConnectProjectId,
}),
// evm end
],
plugins: [
// embedded wallet start
wallet({
visible: true,
entryPosition: EntryPosition.BR,
}),
// embedded wallet end
// aa config start
aa({
name: "CYBERCONNECT",
version: "1.0.0",
}),
// aa config end
],
chains: supportChains as unknown as readonly [Chain, ...Chain[]],
});
// Wrap your application with this component.
export const ParticleConnectkit = ({ children }: React.PropsWithChildren) => {
return {children};
};
```
After configuring the `ParticleConnectkit` component, integrate it into your `layout.tsx` or `index.tsx` file:
```tsx
import { ParticleConnectkit } from '@/connectkit'; // Export of a configured ConnectKitProvider instance
import type { Metadata } from 'next';
import { Inter } from 'next/font/google';
import './globals.css';
const inter = Inter({ subsets: ['latin'] });
export const metadata: Metadata = {
title: 'Particle Connectkit App',
description: 'Generated by create next app',
};
export default function RootLayout({
children,
}: Readonly<{
children: React.ReactNode;
}>) {
return (
{children}
);
}
```
After configuring the SDK, you can integrate social logins and Account Abstraction (AA) into your application. Particle Connect offers a variety of hooks to streamline the implementation of these features.
#### Social Logins
With **Particle Connect** now configured, you can proceed to enable social logins within your application through the aforementioned `ConnectButton` component.
Additionally, for driving application-level interaction (after initial onboarding), `@particle-network/connectkit` provides a variety of hooks. You can explore all available hooks in the [Particle Connect SDK documentation](https://developers.particle.network/api-reference/connect/desktop/web#key-react-hooks-for-particle-connect).
The boilerplate application includes a basic example featuring only a **Connect** button (`ConnectButton`).
After logging in (connecting), users can access the embedded wallet modal provided by Particle Connect via the button in the bottom right corner, unless customized through the `wallet` configuration within `ConnectKitProvider`.
#### Account Abstraction Features
You can configure the smart account using the aa plugin located in `src/components/ConnectKit.tsx`. Below is an example configuration:
```tsx
plugins: [
// Smart Account (AA) configuration
aa({
name: "CYBERCONNECT",
version: "1.0.0",
}),
],
```
##### Sending AA Transactions
You can send gasless transactions using the native `smartAccount` instance provided by **Particle Connect**.
> This does not require the Particle AA ADK.
Here’s an example:
```tsx
import { useSmartAccount } from "@particle-network/connectkit";
const smartAccount = useSmartAccount();
/**
* Sends a transaction using the native AA Particle provider with gasless mode.
*/
const executeTxNative = async () => {
setIsSending(true);
try {
const tx = {
to: recipientAddress,
value: parseEther("0.01").toString(),
data: "0x",
};
// Fetch fee quotes and use verifyingPaymasterGasless for a gasless transaction
const feeQuotesResult = await smartAccount?.getFeeQuotes(tx);
const { userOp, userOpHash } =
feeQuotesResult?.verifyingPaymasterGasless || {};
if (userOp && userOpHash) {
const txHash =
(await smartAccount?.sendUserOperation({
userOp,
userOpHash,
})) || null;
setTransactionHash(txHash);
console.log("Transaction sent:", txHash);
} else {
console.error("User operation is undefined");
}
} catch (error) {
console.error("Failed to send transaction:", error);
} finally {
setIsSending(false);
}
};
```
Or you can send transactions using an **EIP-1193** provider. Here is an example using **ethers.js**:
```tsx
// Initialize custom provider with gasless transaction mode
const customProvider = smartAccount
? new ethers.BrowserProvider(
new AAWrapProvider(
smartAccount,
SendTransactionMode.Gasless
) as Eip1193Provider,
"any"
)
: null;
/**
* Sends a transaction using the ethers.js library.
* This transaction is gasless since the customProvider is initialized as gasless.
*/
const executeTxEthers = async () => {
if (!customProvider) return;
const signer = await customProvider.getSigner();
setIsSending(true);
try {
const tx = {
to: recipientAddress,
value: parseEther("0.01").toString(),
};
const txResponse = await signer.sendTransaction(tx);
const txReceipt = await txResponse.wait();
setTransactionHash(txReceipt?.hash || null);
} catch (error) {
console.error("Failed to send transaction using ethers.js:", error);
} finally {
setIsSending(false);
}
};
```
> Find a complete implementation example on the [Cyber-Particle-AA Demo](https://github.com/Particle-Network/cyber-aa-connect).
### Learn More
Explore Particle Network's [documentation](https://docs.particle.network/) to learn more about the Particle SDKs.
## Pimlico
[Pimlico](https://pimlico.io/) provides an infrastructure platform that makes building smart accounts simpler. If you are developing, an ERC-4337 smart account, they provide bundlers, verifying paymasters, ERC-20 paymasters, and much more.
## Privy
[Privy](https://www.privy.io/) is a library designed for progressive user onboarding and authentication. It enables users to connect to your app using traditional methods such as email addresses, phone numbers, or social profiles, as well as through web3 methods like crypto wallets. Additionally, Privy supports embedded wallets, eliminating the need for users to have a self-custodial wallet prior to exploring your app. Privy is compatible with most EVM chains, including Cyber.
You can get started with Privy by visiting their docs [here](https://docs.privy.io/guide/react/quickstart).
## thirdweb
[thirdweb](https://portal.thirdweb.com/connect/account-abstraction/overview) offers the complete toolkit to leverage account abstraction technology that enables seamless user experiences. This includes Account Factory contracts that lets your users spin up Smart Accounts, Bundler for UserOps support, and Paymaster to enable gas sponsorships.
## Turnkey
[Turnkey](https://turnkey.com/) is crypto private key infrastructure that lets developers securely generate private keys and sign transactions via simple APIs.
## ZeroDev
[ZeroDev](https://zerodev.app/) is an embedded wallet powered by account abstraction. It offers you the ability to create self-custody wallets for your users, sponsor gas, and simplify user flows by batching and automating transactions.
## Ethers.js
ethers.js is a JavaScript library that allows developers to interact with EVM-compatible blockchain networks. You can use ethers.js to connect to Cyber Testnet and Mainnet.
### Install
```bash
npm install --save ethers
```
### Setup
```javascript
const ethers = require("ethers"); // ethers v6
const url = "https://cyber-testnet.alt.technology/";
const provider = new ethers.JsonRpcProvider(url);
```
### Read data from Cyber
```javascript
const latestBlock = await provider.getBlockNumber();
```
## Foundry
Deploying Smart Contracts using Forge in Foundry
### What is Foundry?
Foundry is a toolset for Ethereum development written in Rust that assists developers in managing dependencies, compiling projects, running tests, deploying contracts, and interacting with blockchains through the command line interface. Additionally, Foundry can directly communicate with Cyber's Ethereum API, enabling the use of Foundry to deploy smart contracts into the Cyber network.
### Getting Started with Foundry
1. Install Foundry
* Linux or MacOS
```bash
curl -L https://foundry.paradigm.xyz | bash
foundryup
```
* Windows
```bash
curl --proto '=https' --tlsv1.2 -sSf https://sh.rustup.rs/ | sh
cargo install --git https://github.com/foundry-rs/foundry foundry-cli anvil --bins --locked
```
2. Create a project
```bash
forge init hello_foundry
```
3. Foundry will create a new project directory with the name you specified. By default it will create a new project with a sample contract `Counter` and a sample test file.
```bash
cd hello_foundry
```
4. We can build the project with `forge build`
```bash
$ forge build
```
5. And run the tests with `forge test`
```bash
forge test
```
### Deploying your Smart Contract
Deploying a contract with Forge is a simple process that can be done with a single command. However, it requires an RPC endpoint, a private key that has funds, and any arguments for the constructor of the contract.
To deploy the Counter.sol contract, use the command that corresponds to the Cyber chain's RPC URL while running the forge create command:
Testnet
```bash
forge create --rpc-url "https://cyber-testnet.alt.technology/" --private-key YOUR_PRIVATE_KEY src/Counter.sol:Counter
```
Mainnet
```bash
forge create --rpc-url "https://cyber.alt.technology/" --private-key YOUR_PRIVATE_KEY src/Counter.sol:Counter
```
## Hardhat
Deploying Smart Contracts using Hardhat
### What is Hardhat?
Hardhat is a development environment for Ethereum that helps developers manage and automate the common tasks involved in building smart contracts and decentralized applications. It can directly interact with Cyber's Ethereum API, allowing for the deployment of smart contracts into the Cyber network. Additionally, Hardhat is a comprehensive set of tools for creating Ethereum-based software, which includes various components that aid in editing, compiling, debugging, and deploying smart contracts and decentralized applications. All of these components work together to create a complete development environment.
### Creating a Hardhat Project
1. Create a directory for your project
```bash
mkdir hardhat && cd hardhat
```
2. Initialize the project which will create a package.json file
```bash
npm init -y
```
3.Install Hardhat
```bash
npm install hardhat
```
4.Create a project
```bash
npx hardhat
```
### Creating your Configuration File
Modify the Hardhat configuration file and create a secure file to store your private key in.
1. Create a secrets.json file to store your private key
```bash
touch secrets.json
```
2. Add your private key to secrets.json
```json
{
"privateKey": "YOUR-PRIVATE-KEY-HERE"
}
```
3. Add the file to your project's .gitignore, and never reveal your private key.
4. Modify the hardhat.config.js file
* Import the secrets.json file
* Inside the module.exports add the Cyber network configuration
```js
//hardhat.config.js
require("@nomicfoundation/hardhat-toolbox");
const { privateKey } = require("./secrets.json");
module.exports = {
solidity: "0.8.14",
defaultNetwork: "CyberTestnet",
networks: {
CyberTestnet: {
url: "https://cyber-testnet.alt.technology/",
chainId: 111557560,
accounts: [privateKey],
},
Cyber: {
url: "https://cyber.alt.technology/",
chainId: 7560,
accounts: [privateKey],
},
},
};
```
### Deploying your Smart Contract
1. Compile the contract
```bash
npx hardhat compile
```
2. Create a new directory for the script and name it scripts and add a new file to it called deploy.js
```bash
mkdir scripts && cd scripts
touch deploy.js
```
3. Create a deployment script, like the one below
```js
// scripts/deploy.js
async function main() {
// 1. Get the contract to deploy
const LockFactory = await ethers.getContractFactory("Lock");
console.log("Deploying Lock...");
// 2. Instantiating a new smart contract
const lock = await LockFactory.deploy(1900000000);
// 3. Waiting for the deployment to resolve
await lock.waitForDeployment();
// 4. Use the contract instance to get the contract address
console.log("lock deployed to:", lock.target);
}
main()
.then(() => process.exit(0))
.catch((error) => {
console.error(error);
process.exit(1);
});
```
4. Deploy Lock.sol using the command below
```bash
cd ../
```
Testnet
```bash
npx hardhat run scripts/deploy.js --network CyberTestnet
```
Mainnet
```bash
npx hardhat run scripts/deploy.js --network Cyber
```
## Remix
Deploying Smart Contracts using Remix
### What is Remix?
Remix Project is a robust set of tools that can be used by individuals of any skill level throughout the entire process of developing contracts, and it also serves as an educational platform for learning and experimenting with Ethereum.
### Getting Started with Remix
1. Visit [Remix](https://remix.ethereum.org/) to get started.
2. Navigate to the **File Explorer** and click **"- create a new workspace -"** to create a workspace.
3. Input your smart contract or use the sample contract below.
```solidity
// SPDX-License-Identifier: UNLICENSED
pragma solidity >=0.8.13 <=0.8.19;
contract Counter {
uint256 public number;
function setNumber(uint256 newNumber) public {
number = newNumber;
}
function increment() public {
number++;
}
}
```
4. Navigate to the **Solidity compiler** sidebar option, select the COMPILER version.
5. Click **Compile**.
### Deploying your Smart Contract
1. Navigate to the **Deploy & run transactions** sidebar option.
2. Change the top ENVIRONMENT dropdown to "Injected Provider - MetaMask"
3. This will take you MetaMask - Press connect in Metamask to allow Remix access.
4. Use the following information to add Cyber network to Metamask
* Network: Cyber
* New RPC URL: \[RPC\_URL]
* Chain ID: \[CHAIN\_ID]
* Currency Symbol: ETH
* Block Explorer URL(Optional): \[EXPLORER\_URL]
5. Once connected, you can deploy your contract by clicking the **Deploy** button.
## Thirdweb
[Thirdweb](https://thirdweb.com/cyber) is an all-encompassing Web3 development platform that provides a comprehensive suite of tools essential for smart contract and DApp development. With thirdweb, developers have access to a variety of resources tailored to support every stage of the DApp development process.
For a detailed instructions on thirdweb, using the CLI & SDK for creating and deploying applications, refer to the comprehensive thirdweb [documentation](https://portal.thirdweb.com/).
### Thirdweb CLI
#### 1. Create a project
To create a new smart contract using the thirdweb CLI, run the following command:
```bash
npx thirdweb create
```
#### 2. Configure your project
Input the following to confirgure your project in CLI:
* What type of project do you want to create?
* What is your project named?
* What is the framework do you want to use?
* What will be the name of your new smart contract?
* What type of contract do you want to start from?
* What extension do you want to add to your contract?
Thirdweb gives you the flexibility to chose the suitable options. Example, You can create a new project using [Hardhat](/developer-tools/deploy/hardhat) or [Forge](/developer-tools/deploy/foundry) and add optional [extensions](https://portal.thirdweb.com/typescript/v5/extensions).
#### 3. Deploying a smart contract:
```bash
npx thirdweb deploy
```
Executing this command will trigger the following actions:
* Compiling all the contracts in the current directory
* Providing the option to select which contract(s) you wish to deploy
* Uploading your contract source code (ABI) to IPFS
#### 4. Network selection
After running the above command, visit the provided dashboard URL and select Cyber or Cyber Testnet from the network dropdown.
* The dashboard will also require you to fill out the parameters, For example, If you are deploying an ERC20 based smart contract, you will have to enter the `_name`(Contract Name) and `_symbol`(Token symbol or ticket).
For additional information on Deploy, please reference [thirdweb’s documentation.](https://portal.thirdweb.com/contracts/deploy/overview)
#### 5. Publishing a smart contract
```bash
npx thirdweb publish
```
You can [publish](https://portal.thirdweb.com/contracts/publish/overview) and share your contract onto thirdweb's registry.
### Thirdweb SDK
Thirdweb offers SDKs for a range of programming languages, such as [TypeScript](https://portal.thirdweb.com/typescript/v5), [React](https://portal.thirdweb.com/typescript/v5/react), [React Native](https://portal.thirdweb.com/react-native/v0), [Unity](https://portal.thirdweb.com/unity), [.NET](https://portal.thirdweb.com/dotnet) and [Solidity](https://portal.thirdweb.com/contracts/build/overview).
#### 1. Create a new application
Run the following command to start creating a new application:
```bash
npx thirdweb create --app
```
Input your preferences for the command line prompts:
* Give your project a name
* Choose your network
* Choose your preferred framework: Next.js, CRA, Vite, React Native, Node.js, or Express
* Choose your preferred language: JavaScript or TypeScript
#### 2. Initialize SDK on Cyber Network
Wrap your application in the ThirdwebProvider component and change the activeChain to Cyber Network.
```typescript
import { ThirdwebProvider } from "@thirdweb-dev/react";
import { Cyber } from "@thirdweb-dev/chains";
const App = () => {
return (
);
};
```
#### 3. Connect to your contract:
To connect to your contract, use the SDK’s `getContract` method. You will need to pass a client ID/secret key to use thirdweb's infrastructure services. If you don't have any API keys yet you can create one for free from the [dashboard settings.](https://thirdweb.com/dashboard)
```typescript
// create the client with your clientId, or secretKey if in a server environment
export const client = createThirdwebClient({
clientId: "YOUR_CLIENT_ID"
});
// connect to your contract
export const contract = getContract({
client,
chain: defineChain(7560),
address: "0x..."
});
```
#### 4. Calling contract functions
You can use the hook, `useReadContract` to read from a contract:
```typescript
import { useReadContract } from "thirdweb/react";
import { getOwnedNFTs } form "thirdweb/extensions/erc721"
const { data, isLoading } = useReadContract(getOwnedNFTs, { contract, owner: address });
```
* Example: below is a code snippet that uses `useOwnedNFTs` hook to get a list of NFTs owned by a single wallet address:
```typescript
import { useOwnedNFTs } from '@thirdweb-dev/react';
const { data: ownedNFTs, isLoading, error } = useOwnedNFTs(contract, "0x...", { start: 0, count: 100 });
```
#### 5. Connect Wallets
You can use the hook, `useConnectedWallets`, to return all connected wallets.
```typescript
import { useConnectedWallets } from "thirdweb/react";
const wallets = useConnectedWallets();
```
#### 6. Send Transaction
You can use `useSendTransaction`, hook to send a transaction
```typescript
import { useSendTransaction } from "thirdweb/react-native";
const { mutate: sendTx, data: transactionResult } = useSendTransaction();
// later
sendTx(tx);
```
#### 6. Deploy your app
Use the following command to deploy your static web application on IPFS:
```bash
npx thirdweb deploy --app
```
If you face any issues, feel free to reach out to our engineers for [Support](/support.md) or to thirdweb support at [support.thirdweb.com](support.thirdweb.com)
## Verify Contract
### Forge
#### mainnet
```bash
forge verify-contract --verifier blockscout --verifier-url https://api.socialscan.io/cyber/v1/explorer/command_api/contract --chain-id 7560 src/Counter.sol:Counter
```
#### testent
```bash
forge verify-contract --verifier blockscout --verifier-url https://api.socialscan.io/cyber-testnet/v1/explorer/command_api/contract --chain-id 111557560 src/Counter.sol:Counter
```
[More Information](https://thehemera.gitbook.io/explorer-api/verify-smart-contract/verify-smart-contract/verify-through-foundry)
### Hardhat
#### Config network
```
networks: {
CyberTestnet: {
url: "https://cyber-testnet.alt.technology/",
chainId: 111557560,
accounts: [privateKey],
},
Cyber: {
url: "https://cyber.alt.technology/",
chainId: 7560,
accounts: [privateKey],
},
},
```
### Config etherscan
```
etherscan: {
customChains: [
{
network: "CyberTestnet",
chainId: 111557560,
urls: {
apiURL: "https://api.socialscan.io/cyber-testnet/v1/explorer/command_api/contract",
browserURL: "https://cyber-testnet.socialscan.io",
},
},
{
network: "Cyber",
chainId: 7560,
urls: {
apiURL: "https://api.socialscan.io/cyber/v1/explorer/command_api/contract",
browserURL: "https://cyber.socialscan.io",
},
},
],
apiKey: {
CyberTestnet: "abc",
Cyber: "abc",
},
}
```
#### Verify Counter contract
##### mainnet
```shell
npx hardhat verify --network Cyber
```
##### testent
```shell
npx hardhat verify --network CyberTestnet
```
[More Information](https://thehemera.gitbook.io/explorer-api/verify-smart-contract/verify-smart-contract/verify-through-hardhat)
## Wagmi
Wagmi Core is a VanillaJS library for Ethereum. You can use Wagmi and Viem to connect to Cyber Testnet and Mainnet.
### Install
```bash
npm install @wagmi/core @wagmi/connectors viem@2.x
```
### Setup
**Create chain using viem**
```typescript
import { type Chain } from "viem";
export const cyberTestnet = {
id: 111557560,
name: "Cyber Testnet",
nativeCurrency: { name: "Ether", symbol: "ETH", decimals: 18 },
rpcUrls: {
default: { http: ["https://cyber-testnet.alt.technology/"] },
},
blockExplorers: {
default: {
name: "Cyber Testnet Explorer",
url: "https://testnet.cyberscan.co/",
},
},
} as const satisfies Chain;
```
**Create config**
```typescript
import { http, createConfig } from "@wagmi/core";
import { mainnet, sepolia } from "@wagmi/core/chains";
export const config = createConfig({
chains: [cyberTestnet],
transports: {
[cyberTestnet.id]: http(),
},
});
```
### Read data from Cyber
```typescript
import { getBlockNumber } from "@wagmi/core";
import { config } from "./config";
const blockNumber = await getBlockNumber(config);
```
## Web3.js
You can also use web3.js to connect to Cyber Testnet and Mainnet.
### Install
```bash
npm install --save web3
```
### Setup
```javascript
const { Web3 } = require("web3");
const web3 = new Web3("https://cyber-testnet.alt.technology/"); // Testnet rpc
```
### Read data from Cyber
```javascript
const latestBlock = await web3.eth.getBlockNumber();
```